GeoAstra BLE-GNSS User Manual
Subtitle: For Columbus BLE GNSS receivers
Platform: Apple iPhone / iPad (iOS)
Example receiver: Columbus EX-1 RTK GNSS (screenshots in this manual primarily use this model)
Brand: GeoAstra
Developer / Publisher: GPSWebShop (Canada) Inc.
Version: Refer to the version shown in the App under About
Contents
- Introduction: Why this App is needed
- Compatible devices
- Before you start
- Chapter 1: Scan and connect a compatible GNSS receiver
- Chapter 2: Configuration
- Chapter 3: Dashboard
- Chapter 4: Share NMEA with other iOS apps
- Chapter 5: RTK Base
- Chapter 6: RTK Rover
- Chapter 7: EX-1 vs P-70
- Chapter 8: Projects
- Chapter 9: Collect Data
- Chapter 10: My Data
- Appendix A: Glossary
- Appendix B: FAQ
- Appendix C: QField quick setup (example)
- Appendix D: Video demos
Knowledge-card index
If you are new to surveying, open these short explanations first, then return to the steps:
| Topic | Jump to |
|---|---|
| Orthometric height (MSL) vs ellipsoidal height (h) | 2.1.5 |
| hAcc / vAcc (receiver-side accuracy) | 3.5 |
| NTRIP Caster / your own CORS | 5.2 |
| What is GeoJSON? | 10.3 |
| Export decimal places | 10.3 |
| NTRIP Server auto-reconnect | 5.6 |
Introduction: Why this App is needed
The reality on iOS
On Android and some other platforms, many external GNSS receivers can feed coordinates into system Location Services for all apps.
iOS is different: Apple does not allow an external GNSS receiver to replace or inject into system Location Services the way the built-in GPS does. Therefore:
- “Plug in and share with the whole system” external GNSS options on iOS are rare;
- Apple’s preferred pattern is: a dedicated app connects to the receiver over Bluetooth at the application layer, then uses the position itself and/or forwards it to other apps that support NMEA.
In short: to make an external GNSS usable on iPhone, you usually need a bridge app.
What this App solves
GeoAstra BLE-GNSS is that bridge. For Columbus BLE GNSS receivers on iOS it provides:
- Reliable Bluetooth connection with automatic reconnect on unexpected link loss, plus live positioning (Dashboard)
- Core RTK features (Rover / Base, depending on model)
- Local data capture (Collect Point, Record Track)
- Project management, browse / export / Stakeout
- NMEA Server: forward receiver NMEA over local TCP/UDP to other iOS apps that support NMEA over TCP/UDP (for example QField, ArcGIS Survey123, ArcGIS QuickCapture; see Chapter 4)
Important:
Positions shown in this App come from the connected Columbus receiver, not from the iPhone’s built-in GPS. The GNSS receiver log also shows the receiver’s raw NMEA, not phone GPS.
One sentence for beginners
Think of this App as:
“Connect a Bluetooth GNSS to your iPhone so you can survey points and tracks yourself, and share coordinates with other professional mapping apps.”
Compatible devices
Built-in compatible models currently include:
| Device | Plain-language notes |
|---|---|
| Columbus EX-1 RTK GNSS | RTK Rover / Base; Survey-in and fixed coordinates can be written to the receiver; example model in this manual |
| Columbus P-70 Ultra RTK GNSS | RTK Rover / Base; Survey-in is Receiver Managed; Output Rate can be set in-app and saved to the device (1 / 5 / 10 / 20 Hz) |
| Columbus P-9 Race GNSS | High-precision GNSS (sports / general positioning); Output Rate can be set in-app and saved (1 / 5 / 10 / 25 Hz); no in-app NTRIP Rover/Base |
| Columbus P-7 Pro GNSS | High-precision GNSS; no in-app NTRIP Rover/Base; this App does not provide Output Rate write control |
EX-1 / P-70 Bluetooth names:
Names withNTRIPappear in the scan list, for example:
EX-1 NTRIP BLEP-70 Ultra NTRIP BLE
The App only discovers these BLE advertisements that support a full RTK workflow; tap the matching device in the list.
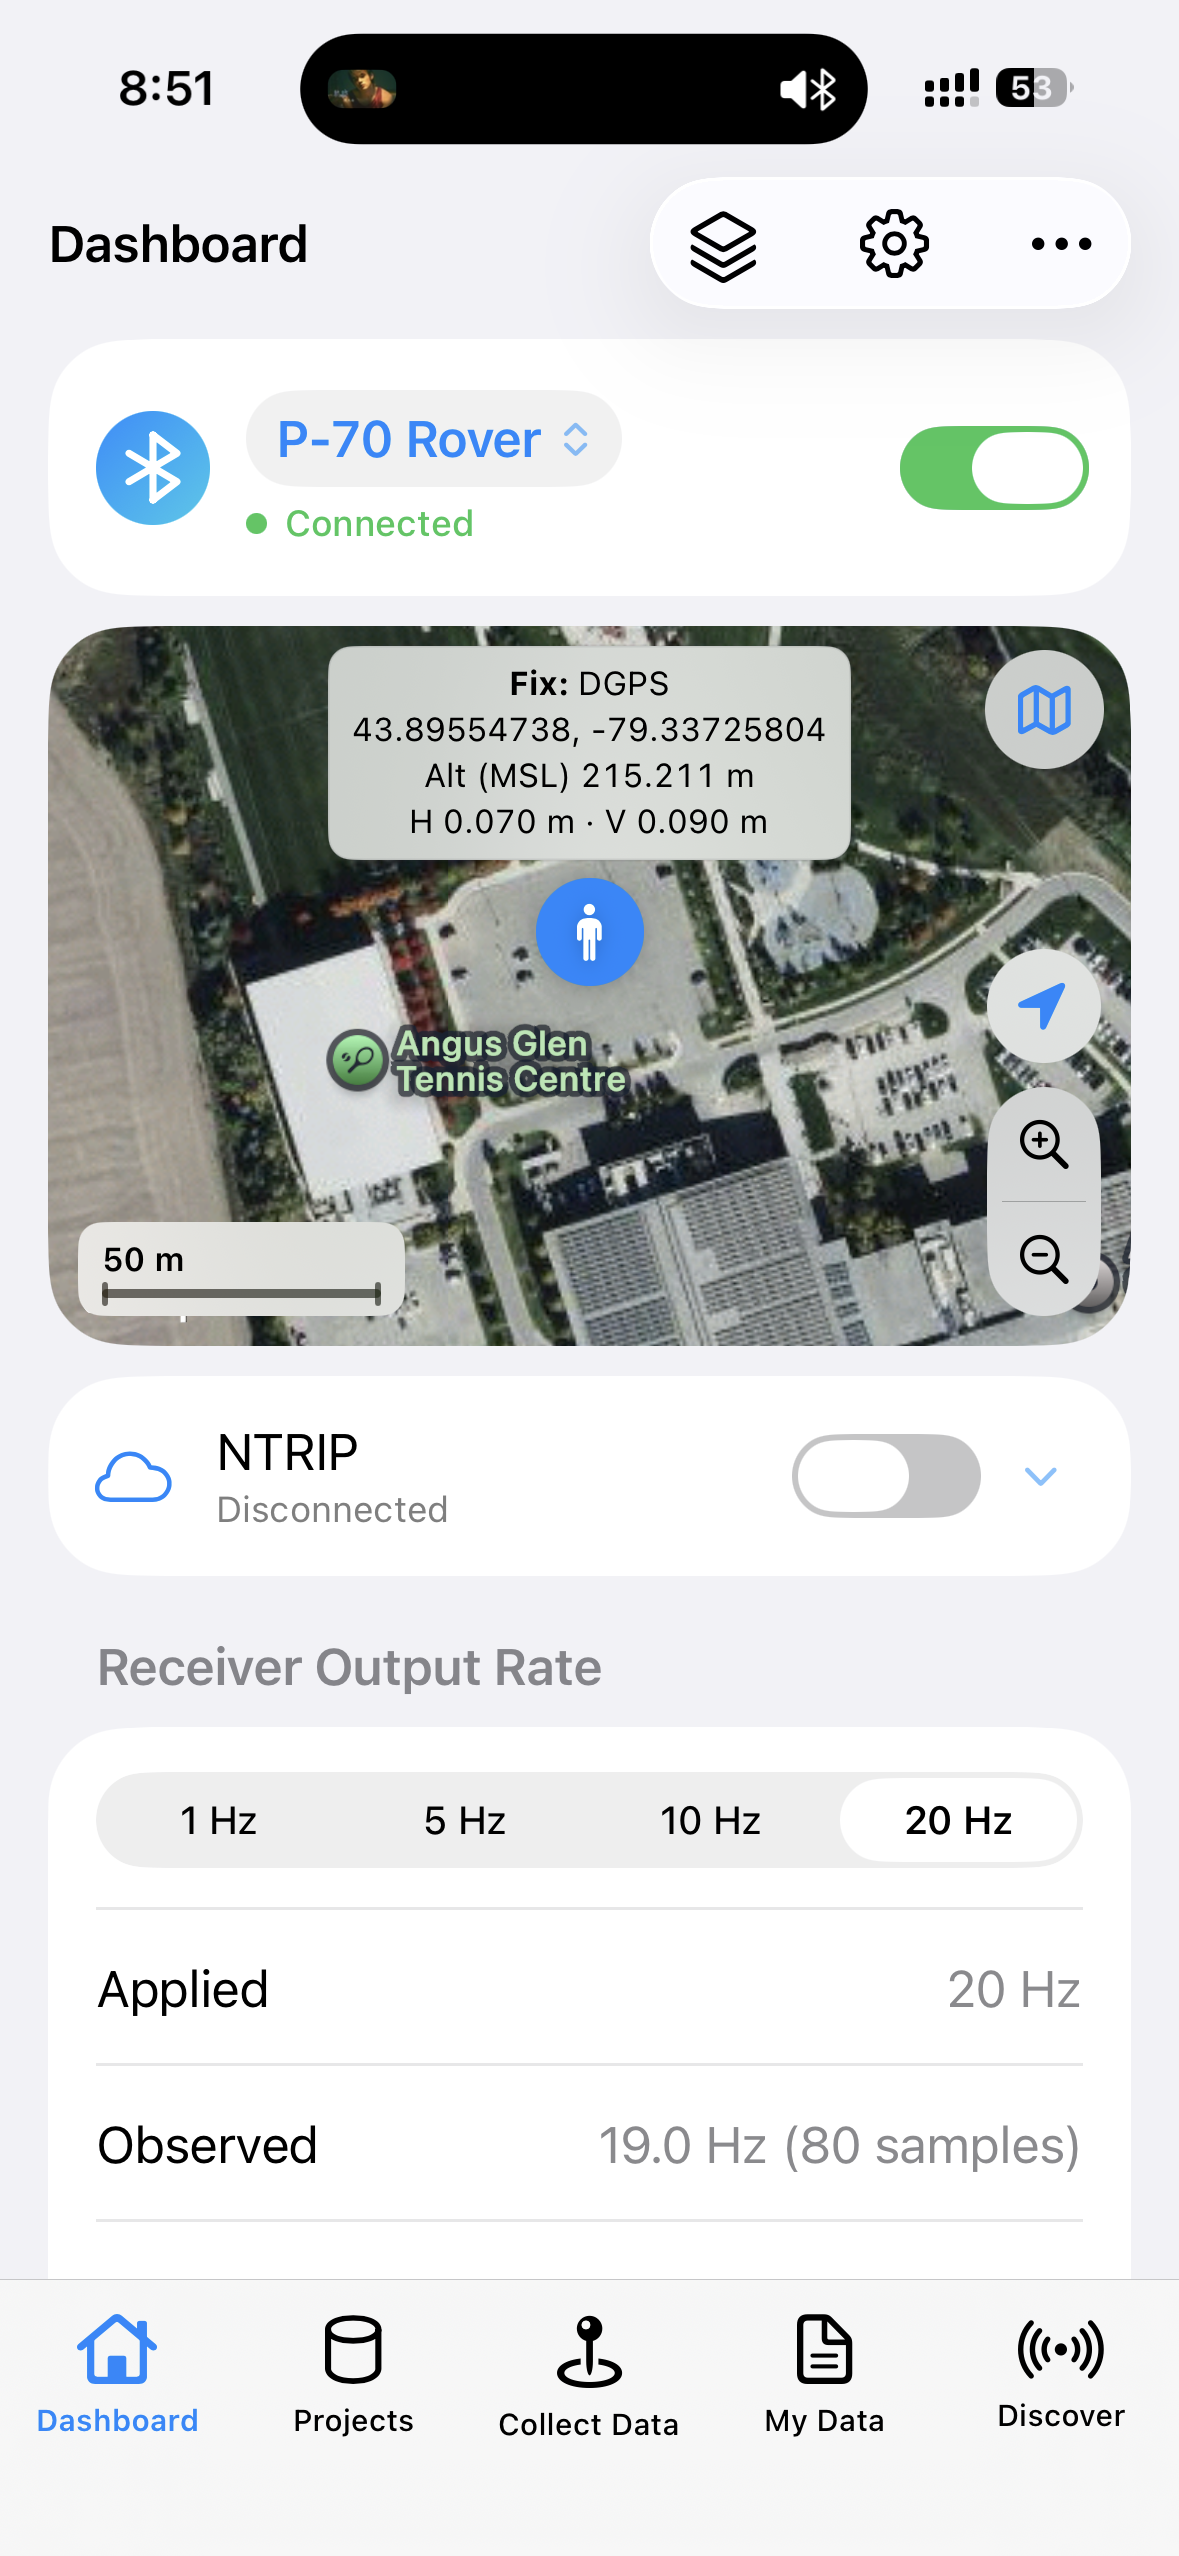
Overview of the five bottom tabs (Dashboard / Projects / Collect Data / My Data / Discover).
Before you start
- Hardware: A compatible Columbus receiver (this manual uses EX-1), charged, with a clear sky view outdoors.
- Phone: iPhone / iPad with GeoAstra BLE-GNSS installed and Bluetooth permission allowed.
- Network (RTK only): Cellular or Wi‑Fi when the Rover connects to an NTRIP caster or the Base uploads to a caster.
- Other apps (optional): If you use QField, ArcGIS Survey123, ArcGIS QuickCapture, or similar TCP NMEA apps, install them and note the local NMEA Server address (often
127.0.0.1:9000TCP). - CORS / NTRIP (RTK only): RTK Rover usually needs a CORS / NTRIP subscription; RTK Base that broadcasts online usually needs an NTRIP Caster account (free commercial-grade signup at https://geoastra.com/ via Sign-up; product page: landing-ntrip-caster).
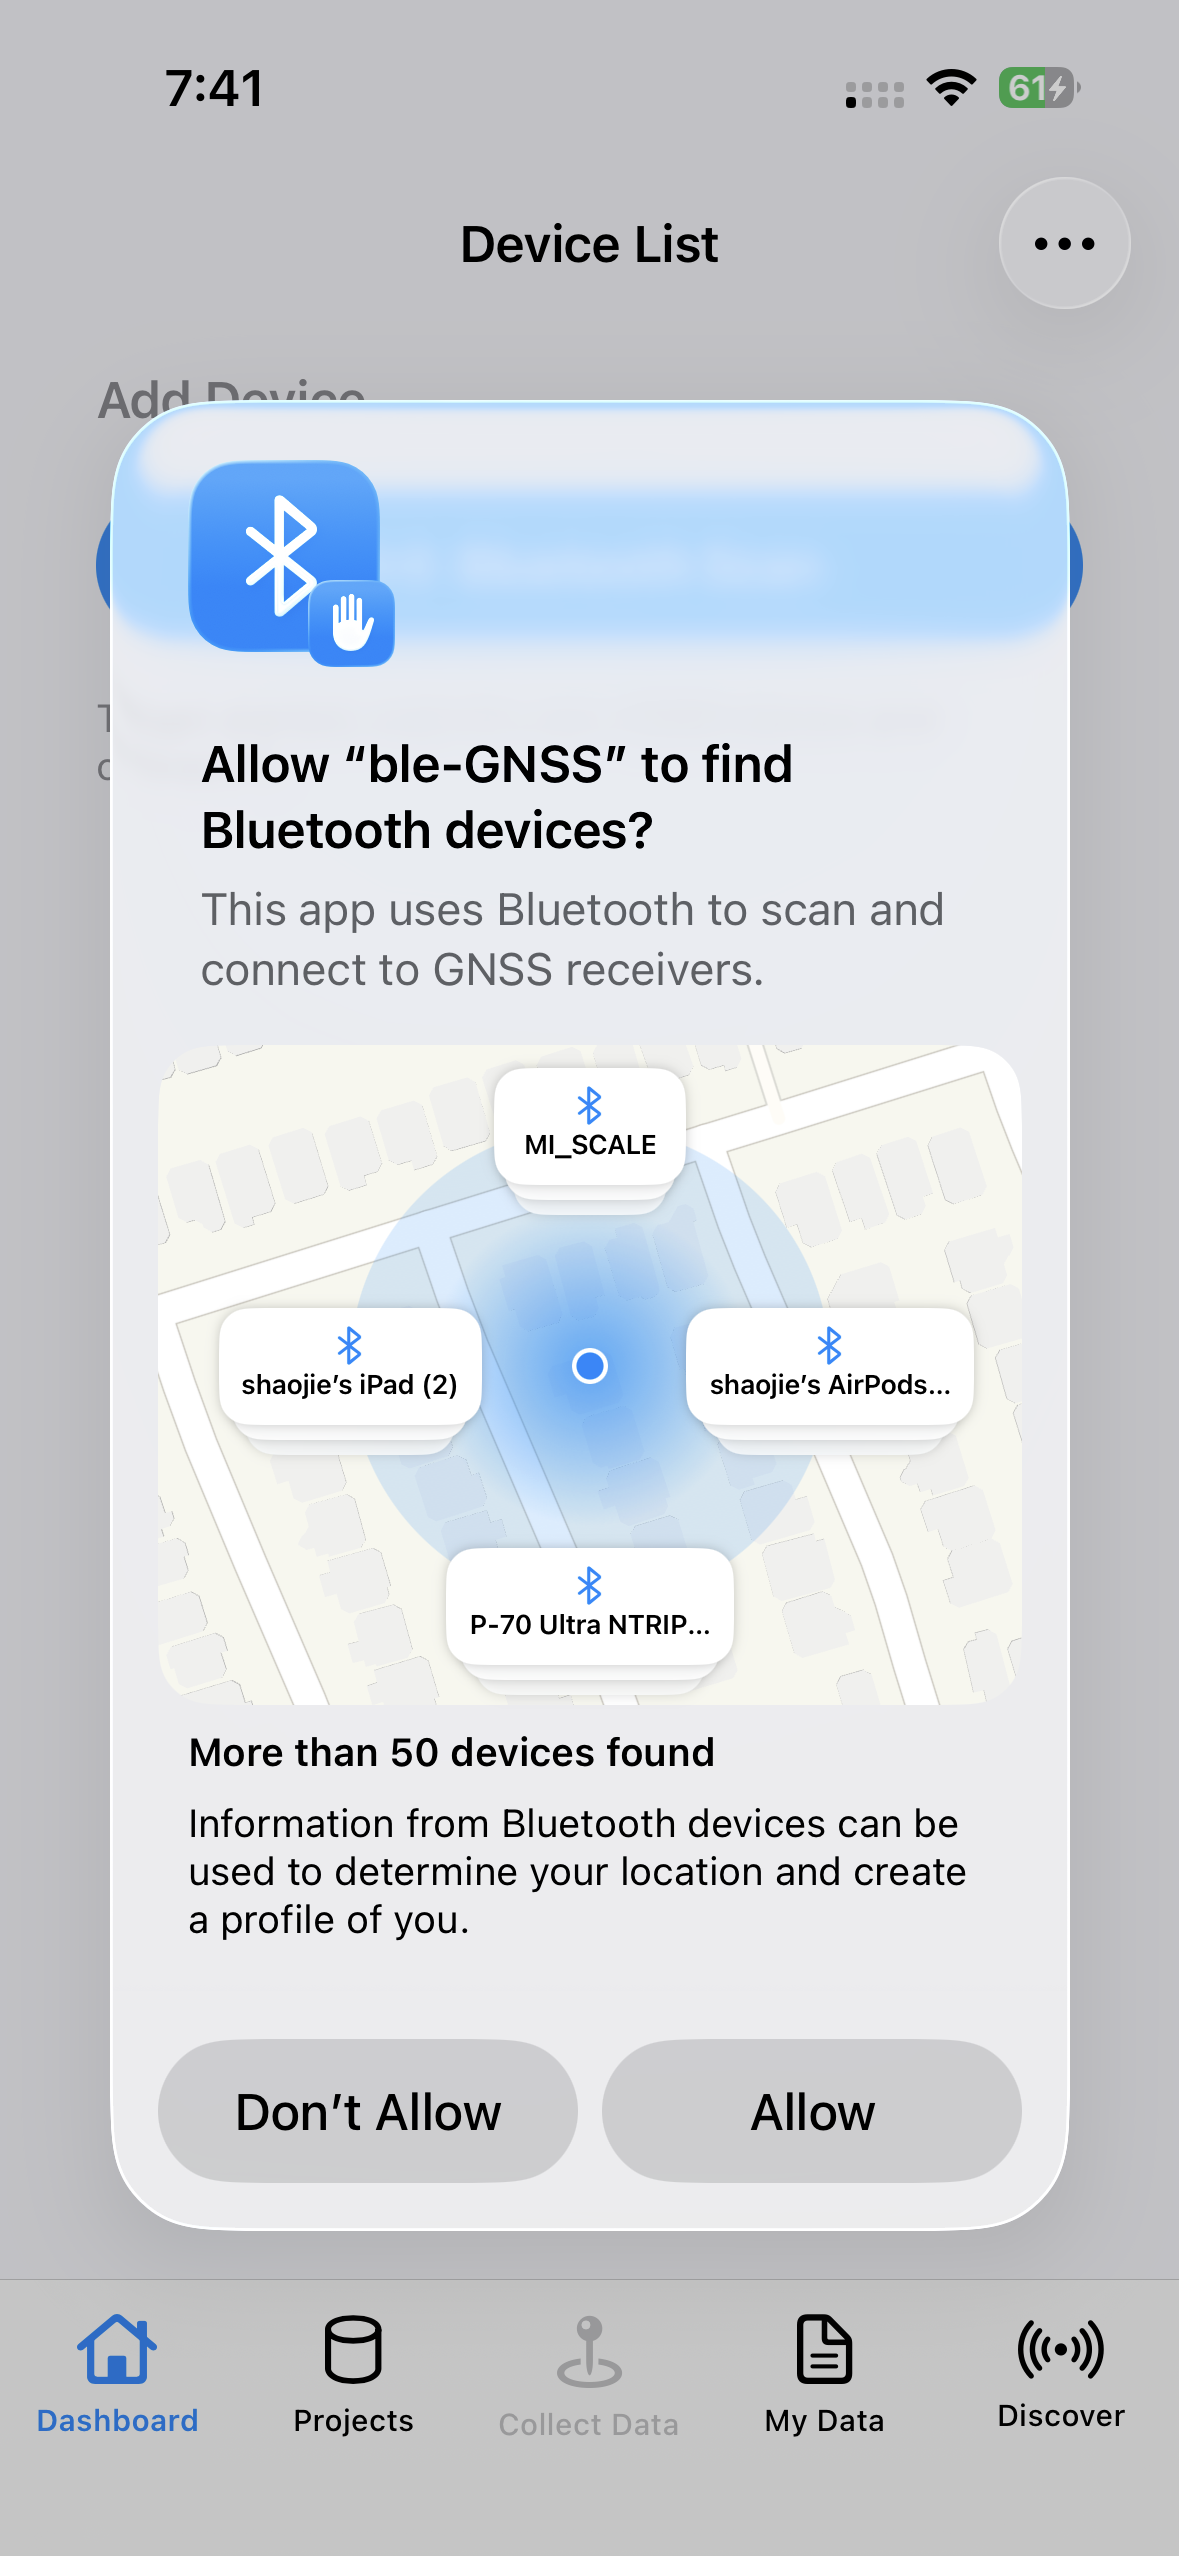
System Bluetooth permission dialog on first launch (if still reproducible).
Chapter 1: Scan and connect a compatible GNSS receiver
1.1 Two entry points
| Entry | Path | Purpose |
|---|---|---|
| Discover | Bottom tab Discover | Scan nearby not-yet-saved compatible devices and connect |
| Device List | Device list on the Dashboard root | Manage saved devices; Bluetooth Scan can jump to Discover |
1.2 Scan with Discover (recommended for beginners)
- Power on the receiver and wait for Bluetooth advertising.
- Open the App → bottom Discover.
- Keep the phone close; scanning lasts about 15 seconds.
- In Nearby Devices, tap your device (for example EX-1 shows as
EX-1 NTRIP BLE). - Wait for connection; on success the App opens that device’s Dashboard and registers it in Device List.
Connection timeout: about 20 seconds. On failure, tap Try Again or cancel and retry.
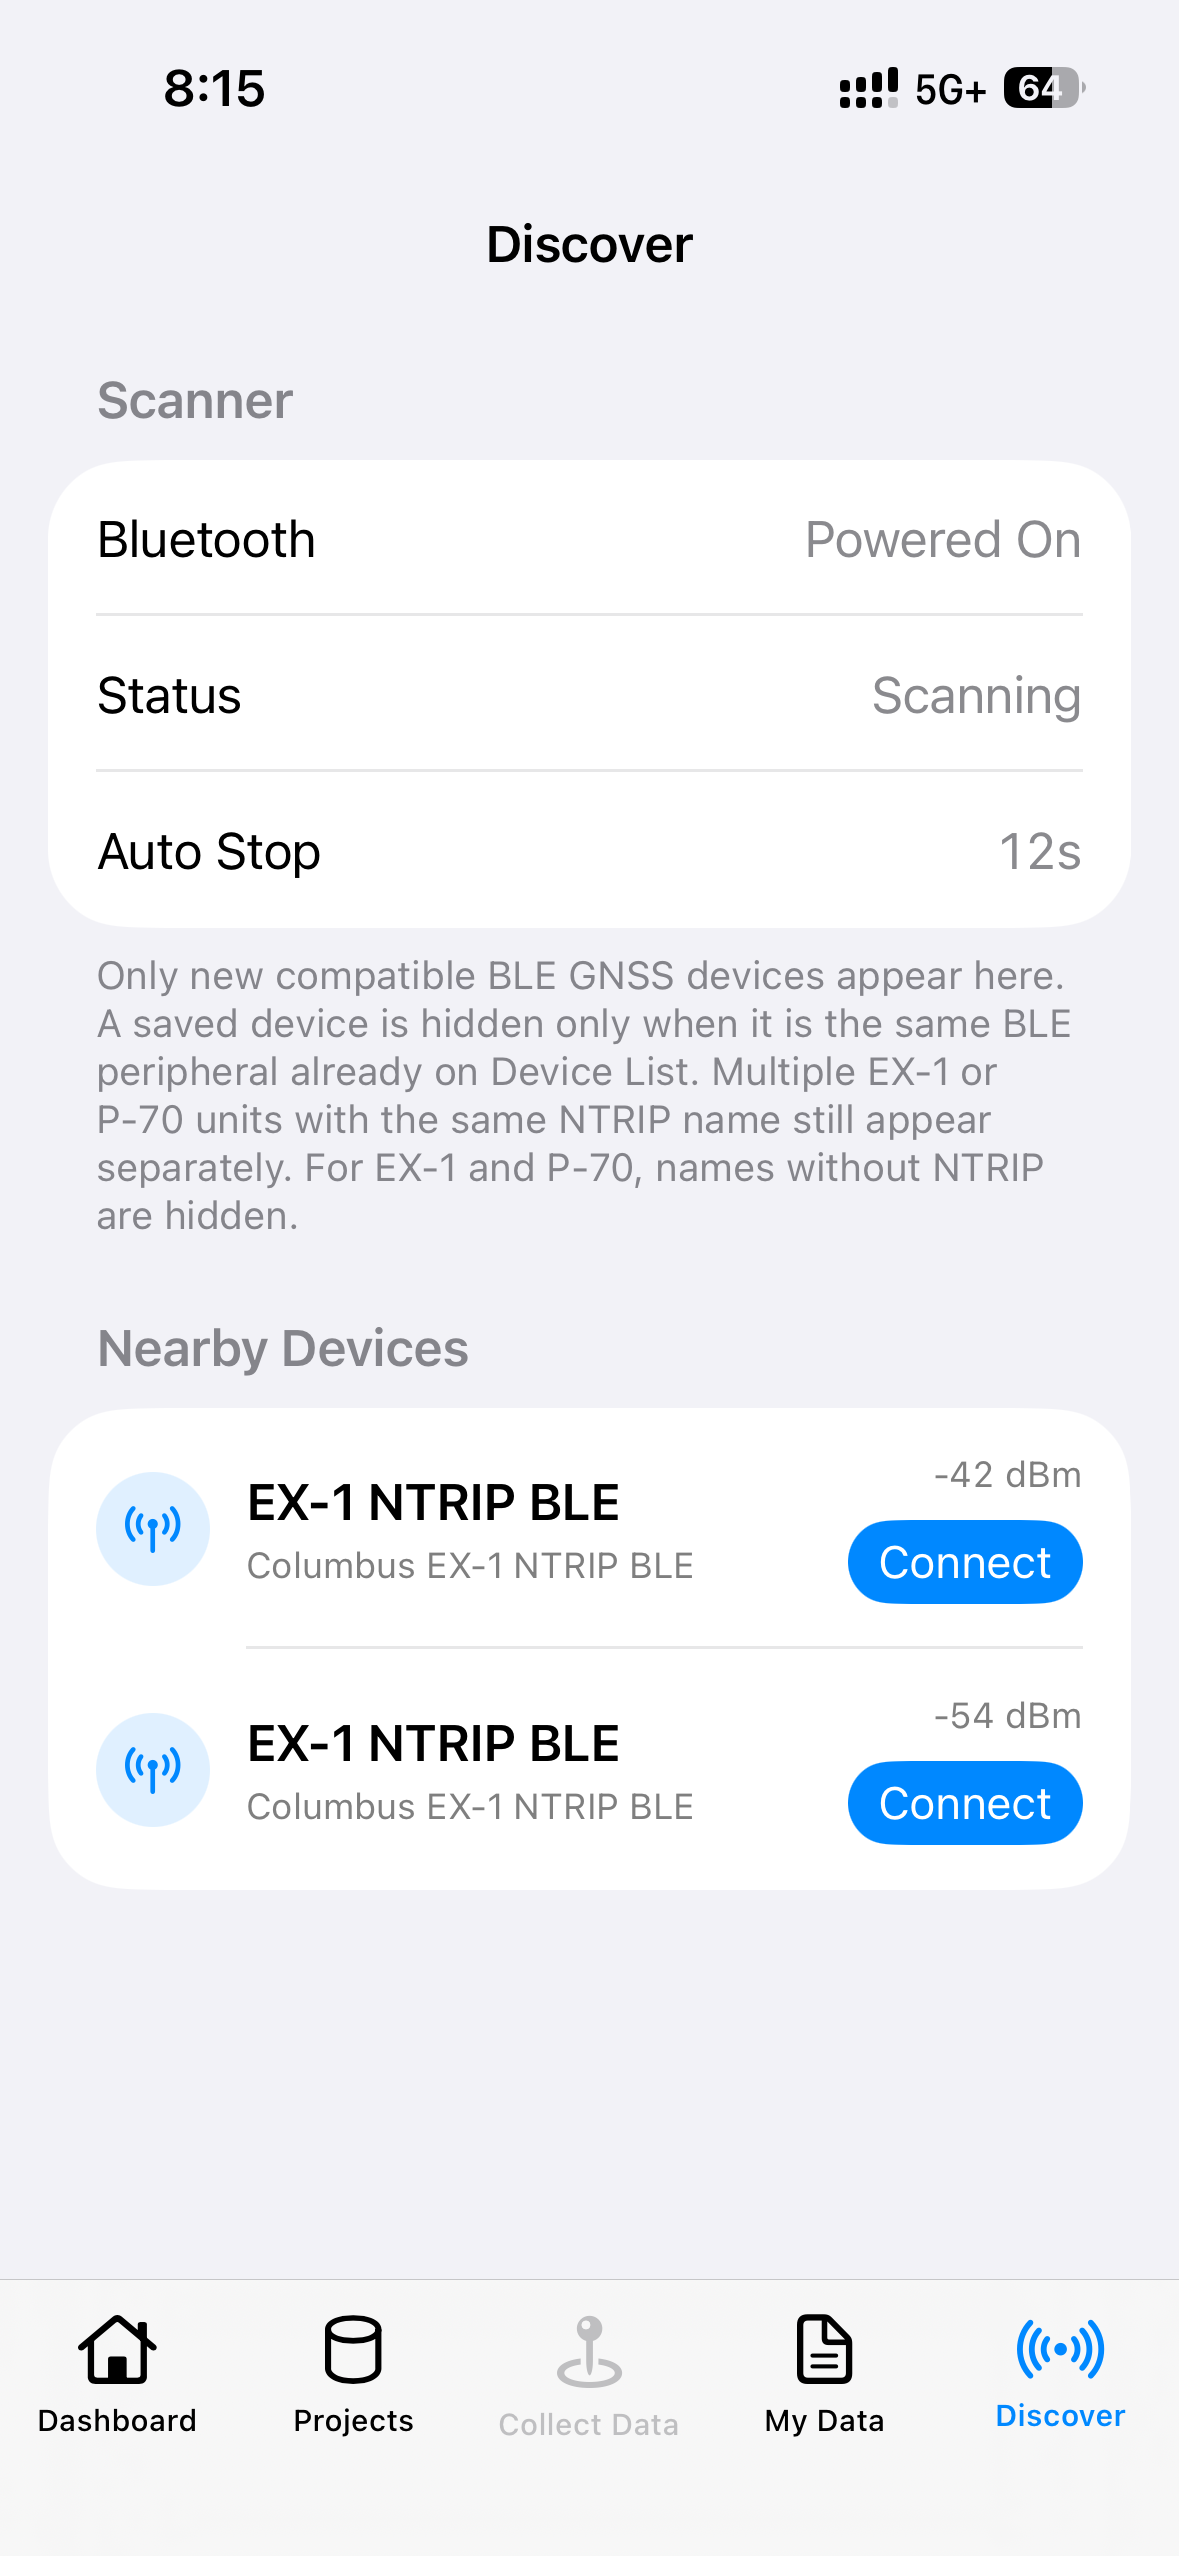
Discover scanning with EX-1 NTRIP BLE in Nearby Devices.
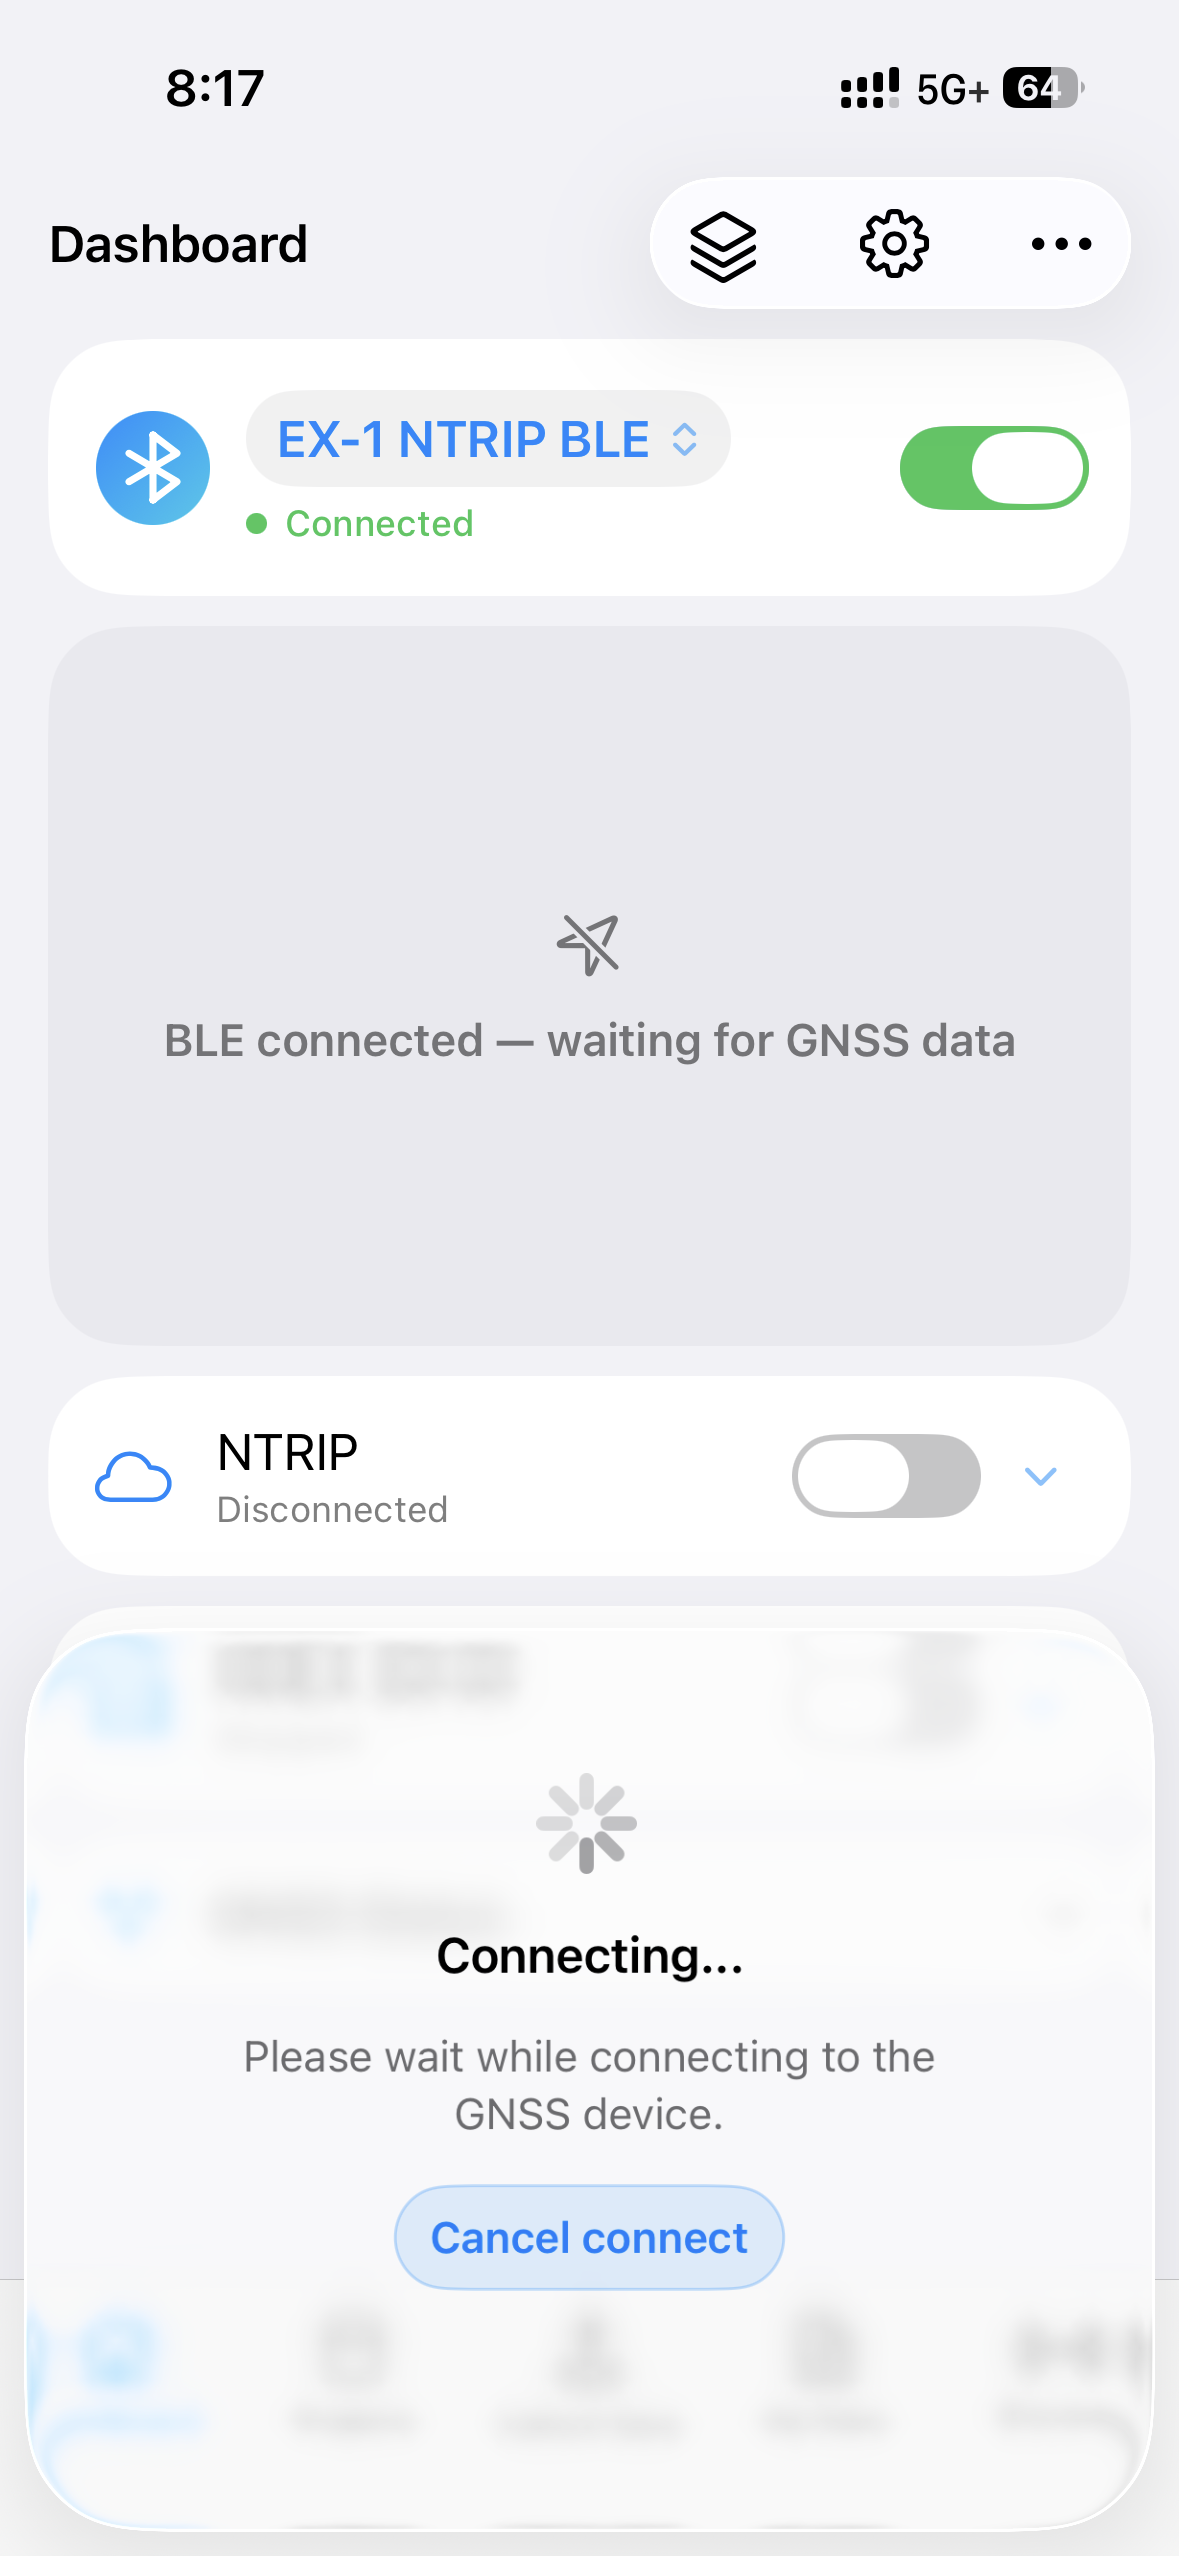
Connecting… overlay.
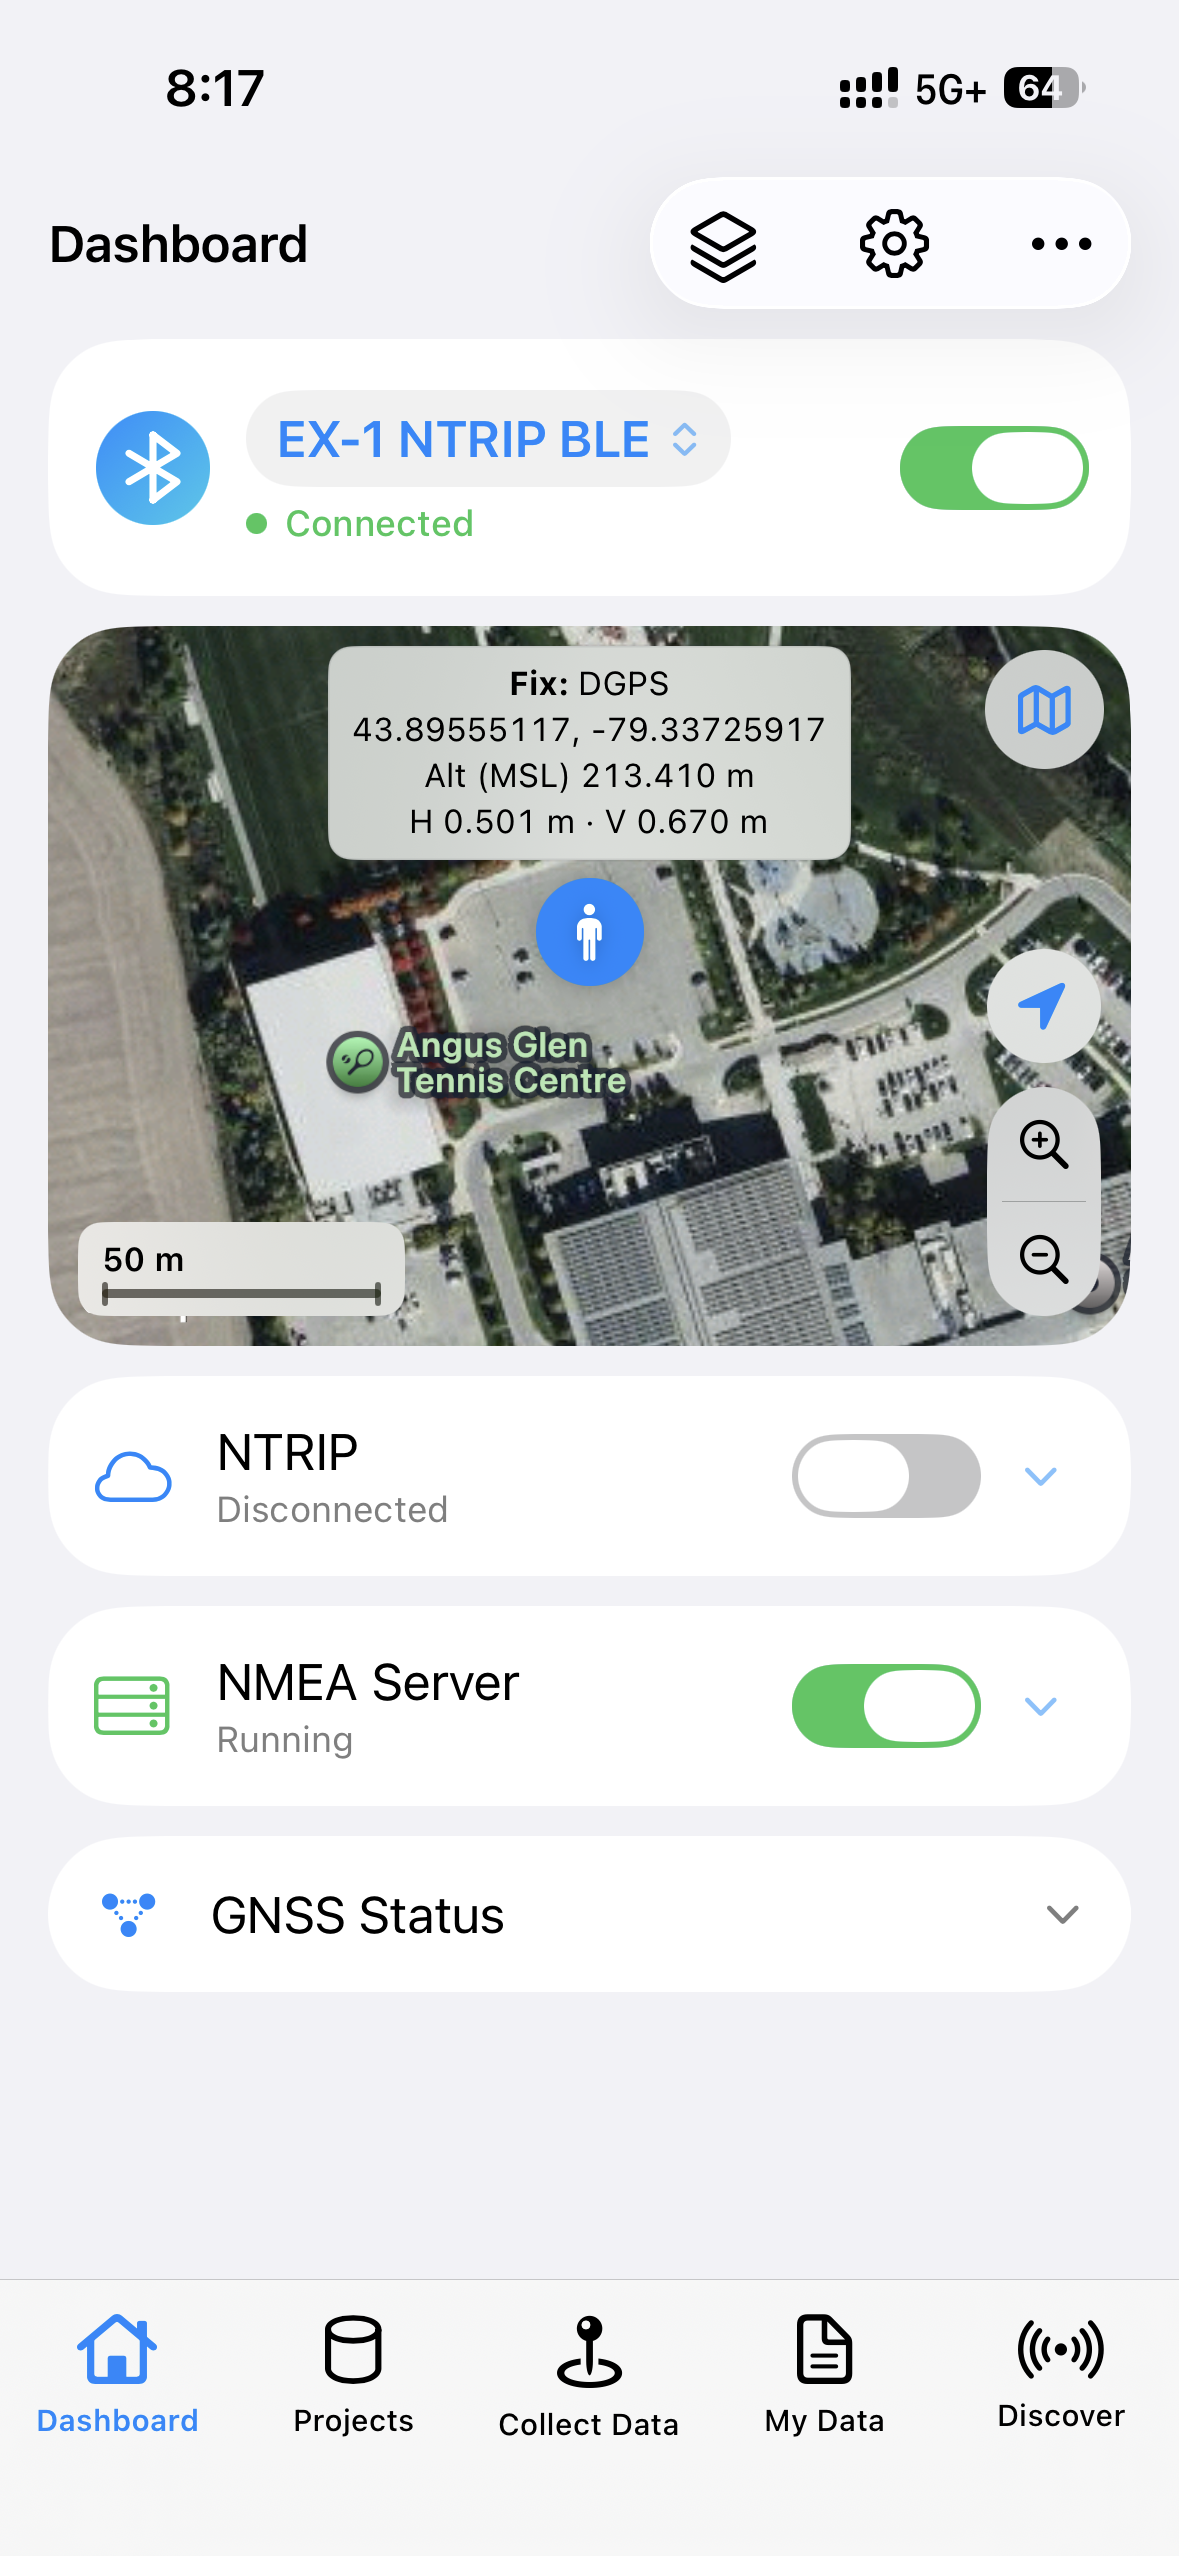
Rover Dashboard after a successful connection (live coordinates / Fix preferred).
1.3 Reconnect a saved device
- Open Dashboard (device list).
- Find the device and turn on the connect switch / button.
- The App runs a targeted scan (about 30 seconds) and connects automatically when found.
1.4 Automatic reconnect (unexpected Bluetooth loss)
If the receiver drops Bluetooth unexpectedly (for example you walk out of range or the receiver powers off briefly), the App can automatically try to reconnect while you stay on that device’s Dashboard.
| Topic | Behavior |
|---|---|
| When it runs | Only after an unexpected disconnect—not after you turn off the connect switch yourself, and not during short EX-1 / P-70 configuration transactions |
| Which device | The device you are viewing on Dashboard (or the last successfully connected device) |
| What you see | Orange status such as Reconnecting… attempt 1/5 in progress or waiting for attempt 2/5; the connect switch stays On but is disabled until reconnect finishes or you tap Cancel; the map shows BLE link lost — … instead of “BLE connected” |
| Attempts | Up to 5 tries over about 2 minutes (direct reconnect first, then short burst scans) |
| After success | BLE link and streaming resume; NTRIP Client / Server turn back on if they were active before the drop |
| After failure | Auto-reconnect stops quietly (no notification); turn the connect switch off/on or use Discover to connect manually |
| Collect Data | Does not auto-resume Record Track or Collect Point—use the orange interrupted banner and Finalize / Discard, or reconnect and Resume as in 9.6 |
| Setting | Dashboard top-right … → Connection → Auto-reconnect (default On) |
Background note: While the App is in the background, only the first phase of reconnect runs (about 30 seconds). Bring the App to the foreground to continue the full sequence.
1.5 Chapter summary
- First time: Discover → select → Dashboard.
- Later: Device List → connect.
- Unexpected BLE loss: auto-reconnect on Dashboard (can be disabled under Connection).
- EX-1 / P-70: connect the names with
NTRIPthat appear in the list (non-NTRIP advertisements are no longer discoverable).
Chapter 2: Configuration
Configuration is usually done after the device is saved. Common entries:
- Device List → device
…→ RTK Settings / NMEA Server Settings - Or related settings on the Dashboard (including Output Rate on some models)
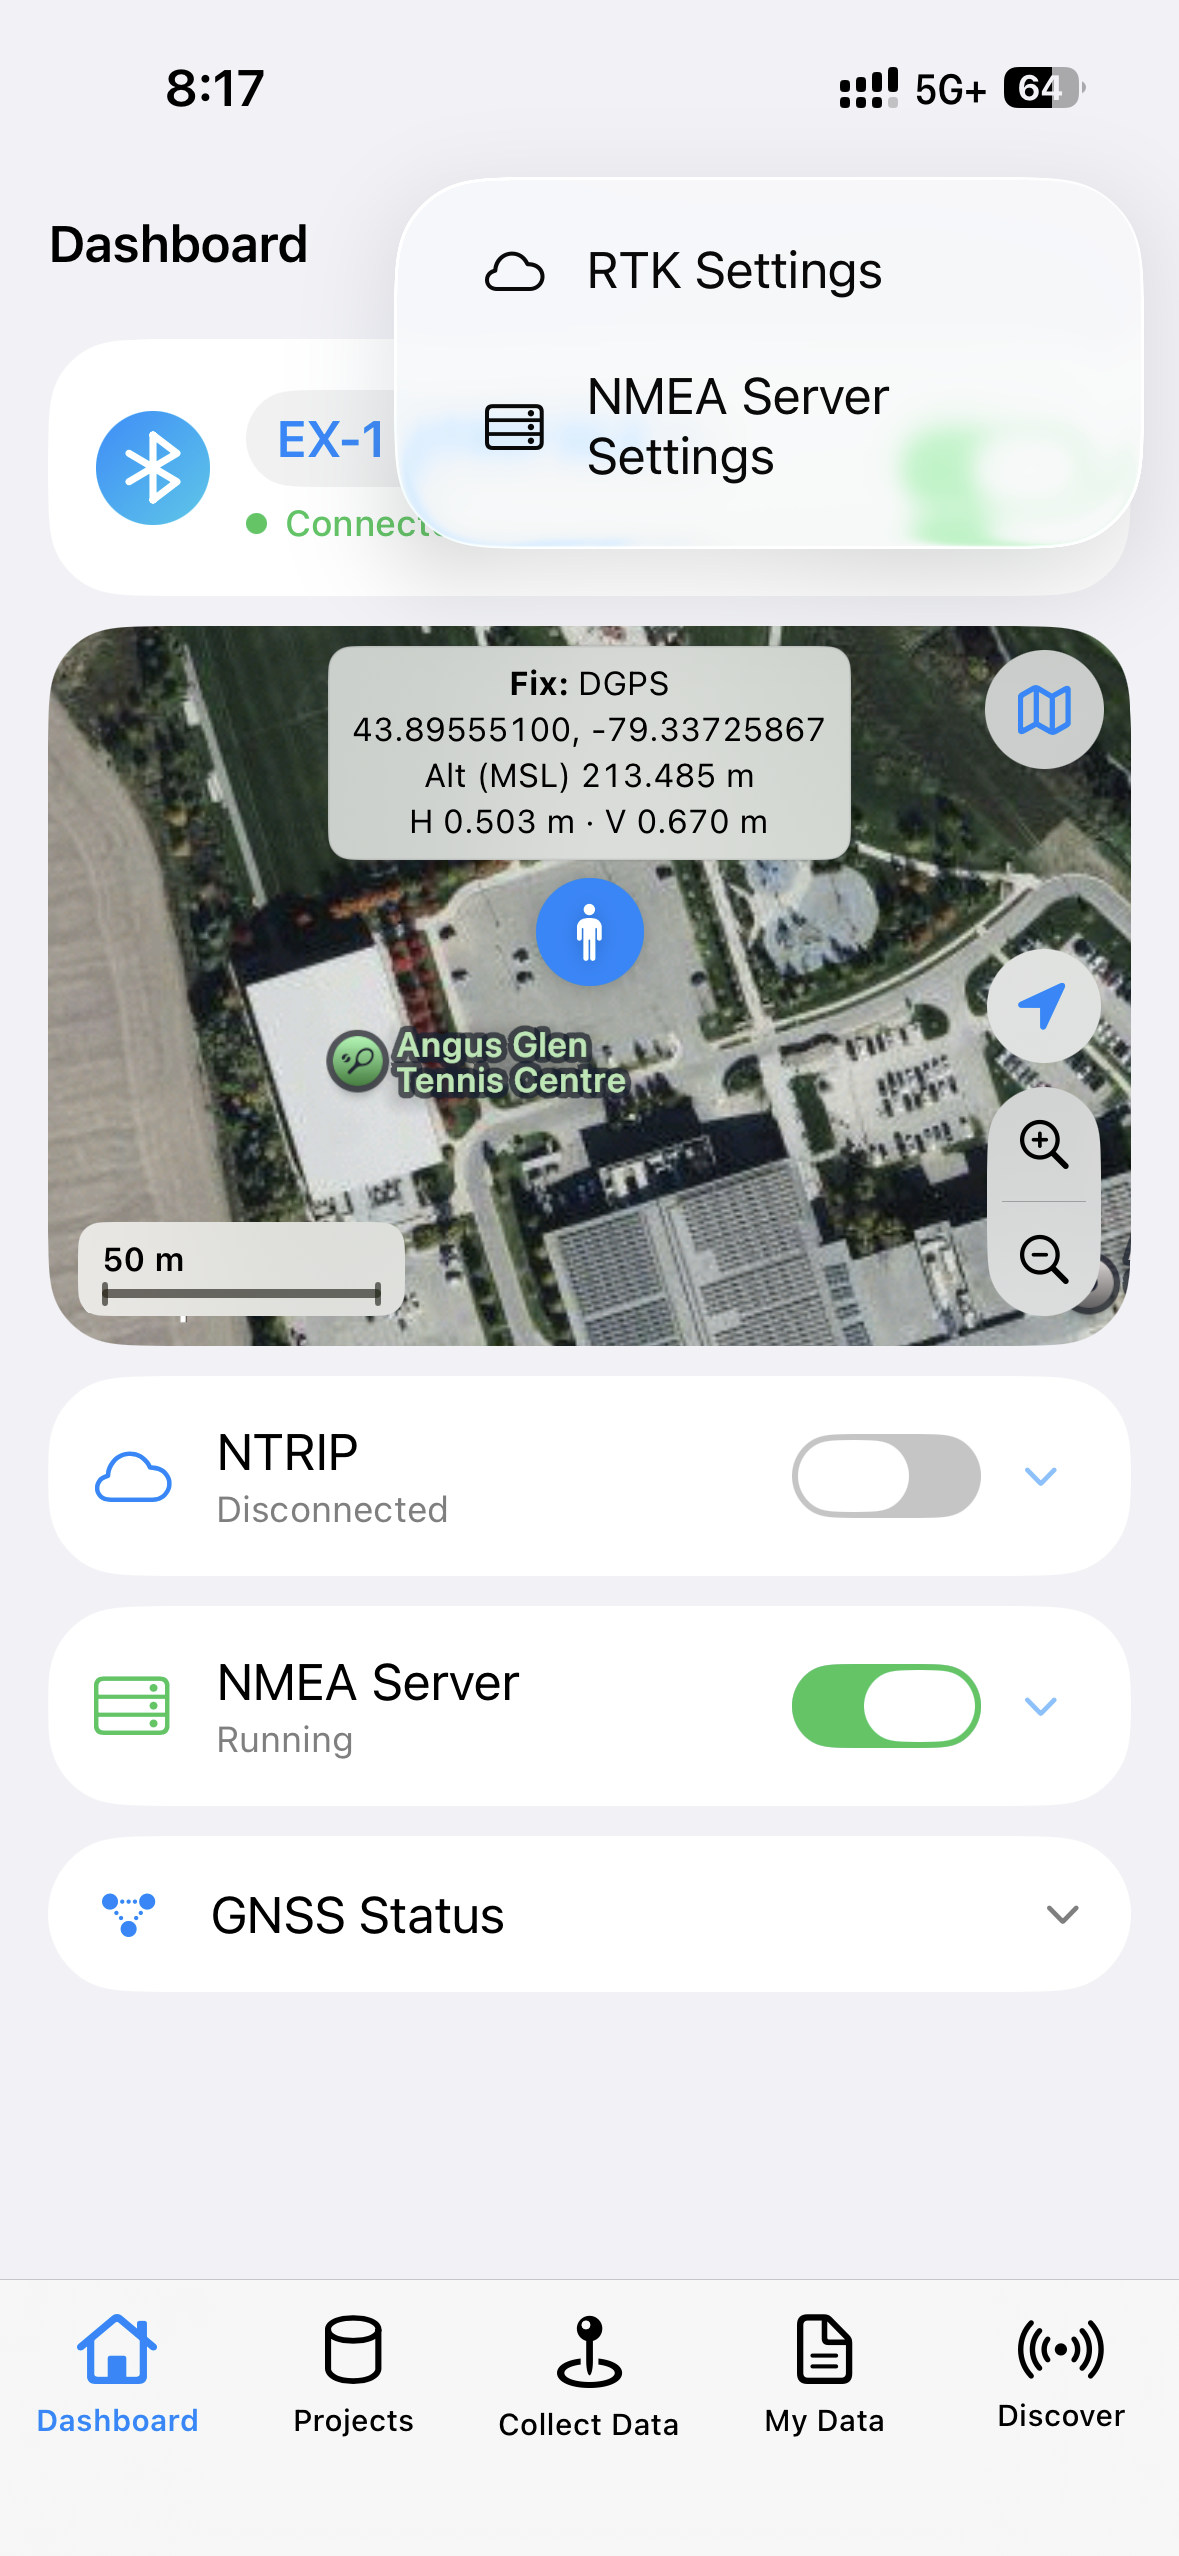
Device List … menu showing RTK Settings, NMEA Server Settings, Rename, Delete.
2.1 RTK settings
Screen name: RTK Settings
2.1.1 Key terms
| Term | Plain meaning |
|---|---|
| RTK | Improves accuracy using a Rover + Base differential corrections; often centimeter-level (depends on environment and link) |
| Rover | The unit you carry in the field; receives RTCM corrections from a caster |
| Base | Fixed on known or surveyed coordinates; sends RTCM to a caster |
| NTRIP | Common internet protocol for carrying RTCM (a “network pipe” for corrections) |
| NTRIP Caster | Internet relay: Base uploads corrections; Rover downloads them (see Chapter 5) |
| CORS | Continuously Operating Reference Station network; many CORS services deliver RTK via NTRIP |
2.1.2 GNSS Mode
- Standard (NMEA only): Use receiver NMEA only; no NTRIP RTK in this App.
- RTK GNSS: Enable Rover / Base configuration (model must support it).
2.1.3 RTK Role
- Rover: Receive corrections.
- Base: Send corrections.
Capability notes:
- EX-1, P-70: Rover / Base supported (details differ below).
- P-7 / P-9: this App does not provide NTRIP Rover/Base configuration.
2.1.4 Rover: NTRIP Client (Rover connects to a caster)
Why you usually need a CORS / NTRIP subscription first
An RTK Rover is not “centimeter-ready” by itself—it must continuously receive RTCM corrections from a reference. Those usually come from:
- A public or commercial CORS network, or
- Your own RTK Base + NTRIP Caster (Chapter 5)
Before configuring Rover, get from your CORS / NTRIP provider (or their portal):
- Host
- Port (often 2101)
- Mount Point
- User / Password
- Whether Require GGA is needed (on by default: report Rover position to the caster; many commercial casters require this)
Without a valid correction source, even with a good antenna and sky view you typically stay at single-point / DGPS quality and rarely reach stable RTK Fixed.
Use Clear NTRIP Client Setting to reset the fields.
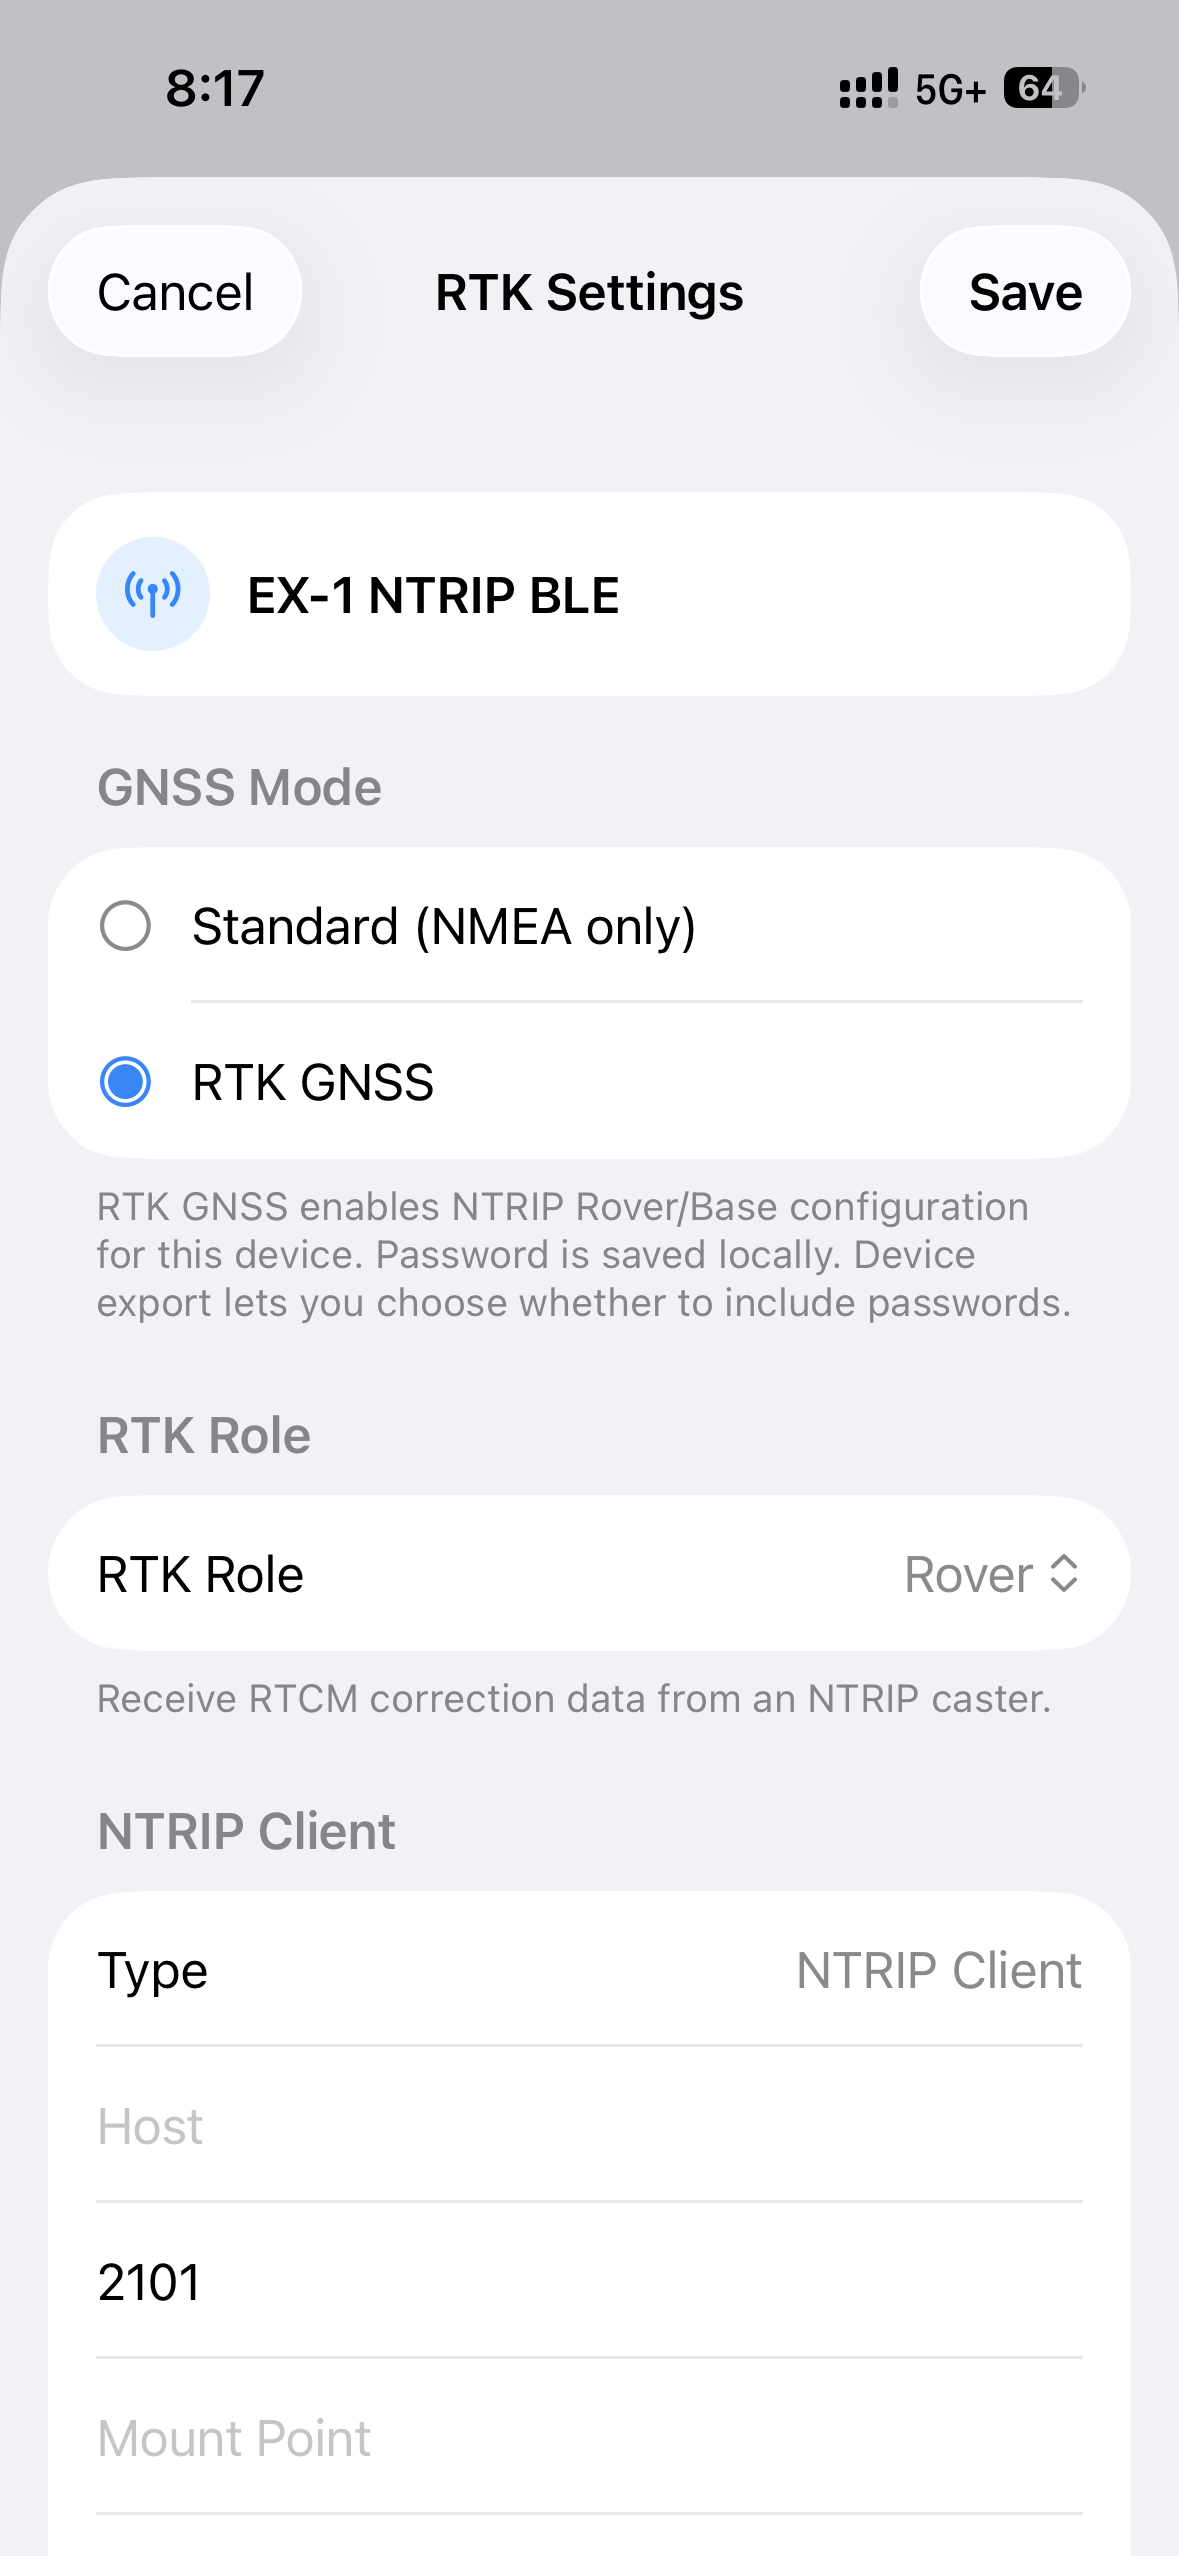
EX-1 RTK Settings with Role=Rover and NTRIP Client filled (password may be masked).
2.1.5 Base: position & NTRIP Server (Base upload)
Base coordinate source (EX-1):
- Enter Fixed Position
- Enter latitude and longitude
- Height may be MSL (orthometric) or ellipsoidal h (the App converts the other on save; see knowledge card below)
- Survey In Current Position
- Minimum observation time (seconds), default about 30
- Required accuracy (mm), default about 1000 mm
- Optionally start Survey-in automatically after connect
Base coordinate source (P-70):
P-70 uses a Receiver Managed Survey-in / Base workflow:
Survey-in parameters and progress are managed mainly inside the receiver; the App starts/monitors in Receiver Managed mode instead of EX-1-style Duration / Accuracy mm fields.
You can still enter fixed coordinates, or let the receiver finish Survey-in; follow Receiver-managed in RTK Settings and Dashboard status.
Knowledge card: MSL height vs ellipsoidal height h
- Ellipsoidal height h: height above a mathematical ellipsoid (e.g. WGS84), closely tied to GNSS solutions.
- Orthometric / MSL-related height: height relative to mean sea level / the geoid—closer to “elevation” on maps and engineering drawings.
- They differ by geoid undulation (N): approximately (h \approx H_{\mathrm{MSL}} + N).
- When entering fixed coordinates, you may choose MSL or ellipsoidal height; the App converts the other on save to avoid mixing datums.
Why does a Base still need an NTRIP Caster?
Radio-only Base coverage is limited. Configure the Base as an NTRIP Server (uploader) and send RTCM to an internet NTRIP Caster:
- Any networked Rover can subscribe to that mount point;
- One Base can serve many Rovers;
- Baseline length is no longer limited by radio range (still limited by GNSS and service policy);
- Effectively your Base becomes a small private CORS.
GeoAstra NTRIP Caster signup:
- Open https://geoastra.com/ → Sign-up (or Login; Apple / Google / Microsoft or a local account)
- Product / plans: https://geoastra.com/landing-ntrip-caster
- Signup docs: NTRIP Caster Sign-up / Login
After first login, mount point and Base / Rover credentials are usually generated. Enter Host / Port / Mount Point / User / Password in this App’s NTRIP Server / Client settings (case-sensitive; follow Dashboard values).
Unexpected loss: After a Base upload has connected successfully, the App can automatically reconnect to the caster if the link drops unexpectedly (see 5.6). You can turn this off under Connection settings.
2.1.6 Writing settings into EX-1 (important)
For EX-1:
| Button | Meaning |
|---|---|
| Apply to EX-1 Temporarily | Temporary Bluetooth apply (e.g. CFG-TMODE3); may be lost after power-off |
| Save to EX-1 Permanently | After temporary apply and verification, write to receiver BBR/Flash |
Note: Changing only caster account/password (network-side) usually does not require permanent save to the receiver.
Permanent save mainly applies to receiver mode / fixed coordinates.
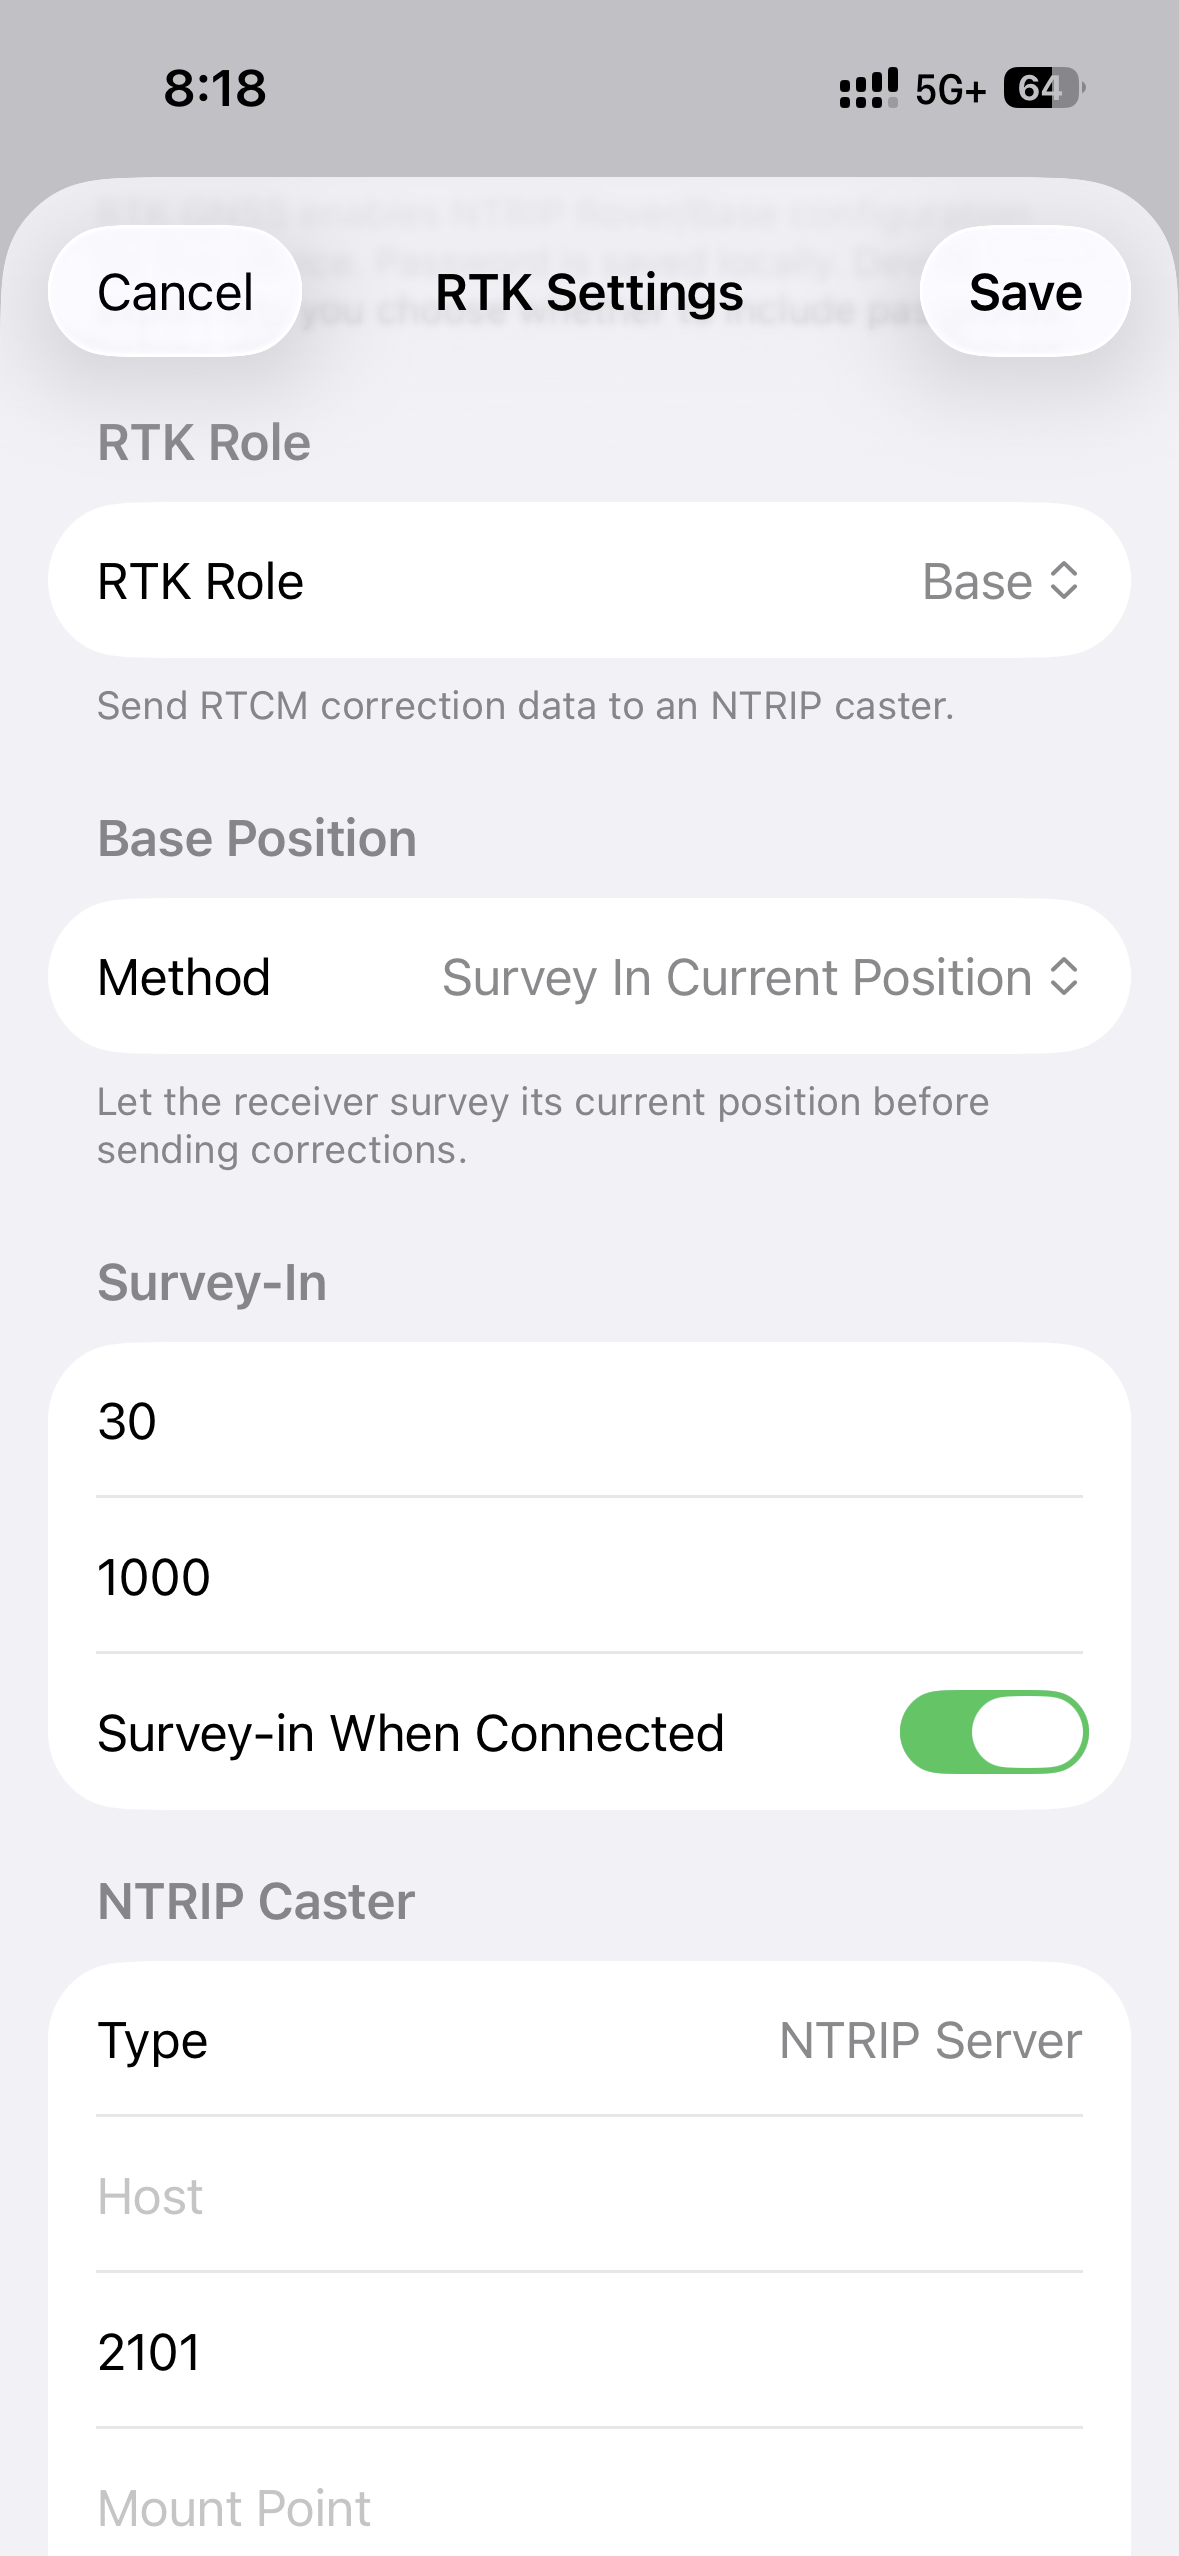
EX-1 Base settings (Fixed Position or Survey-in visible).
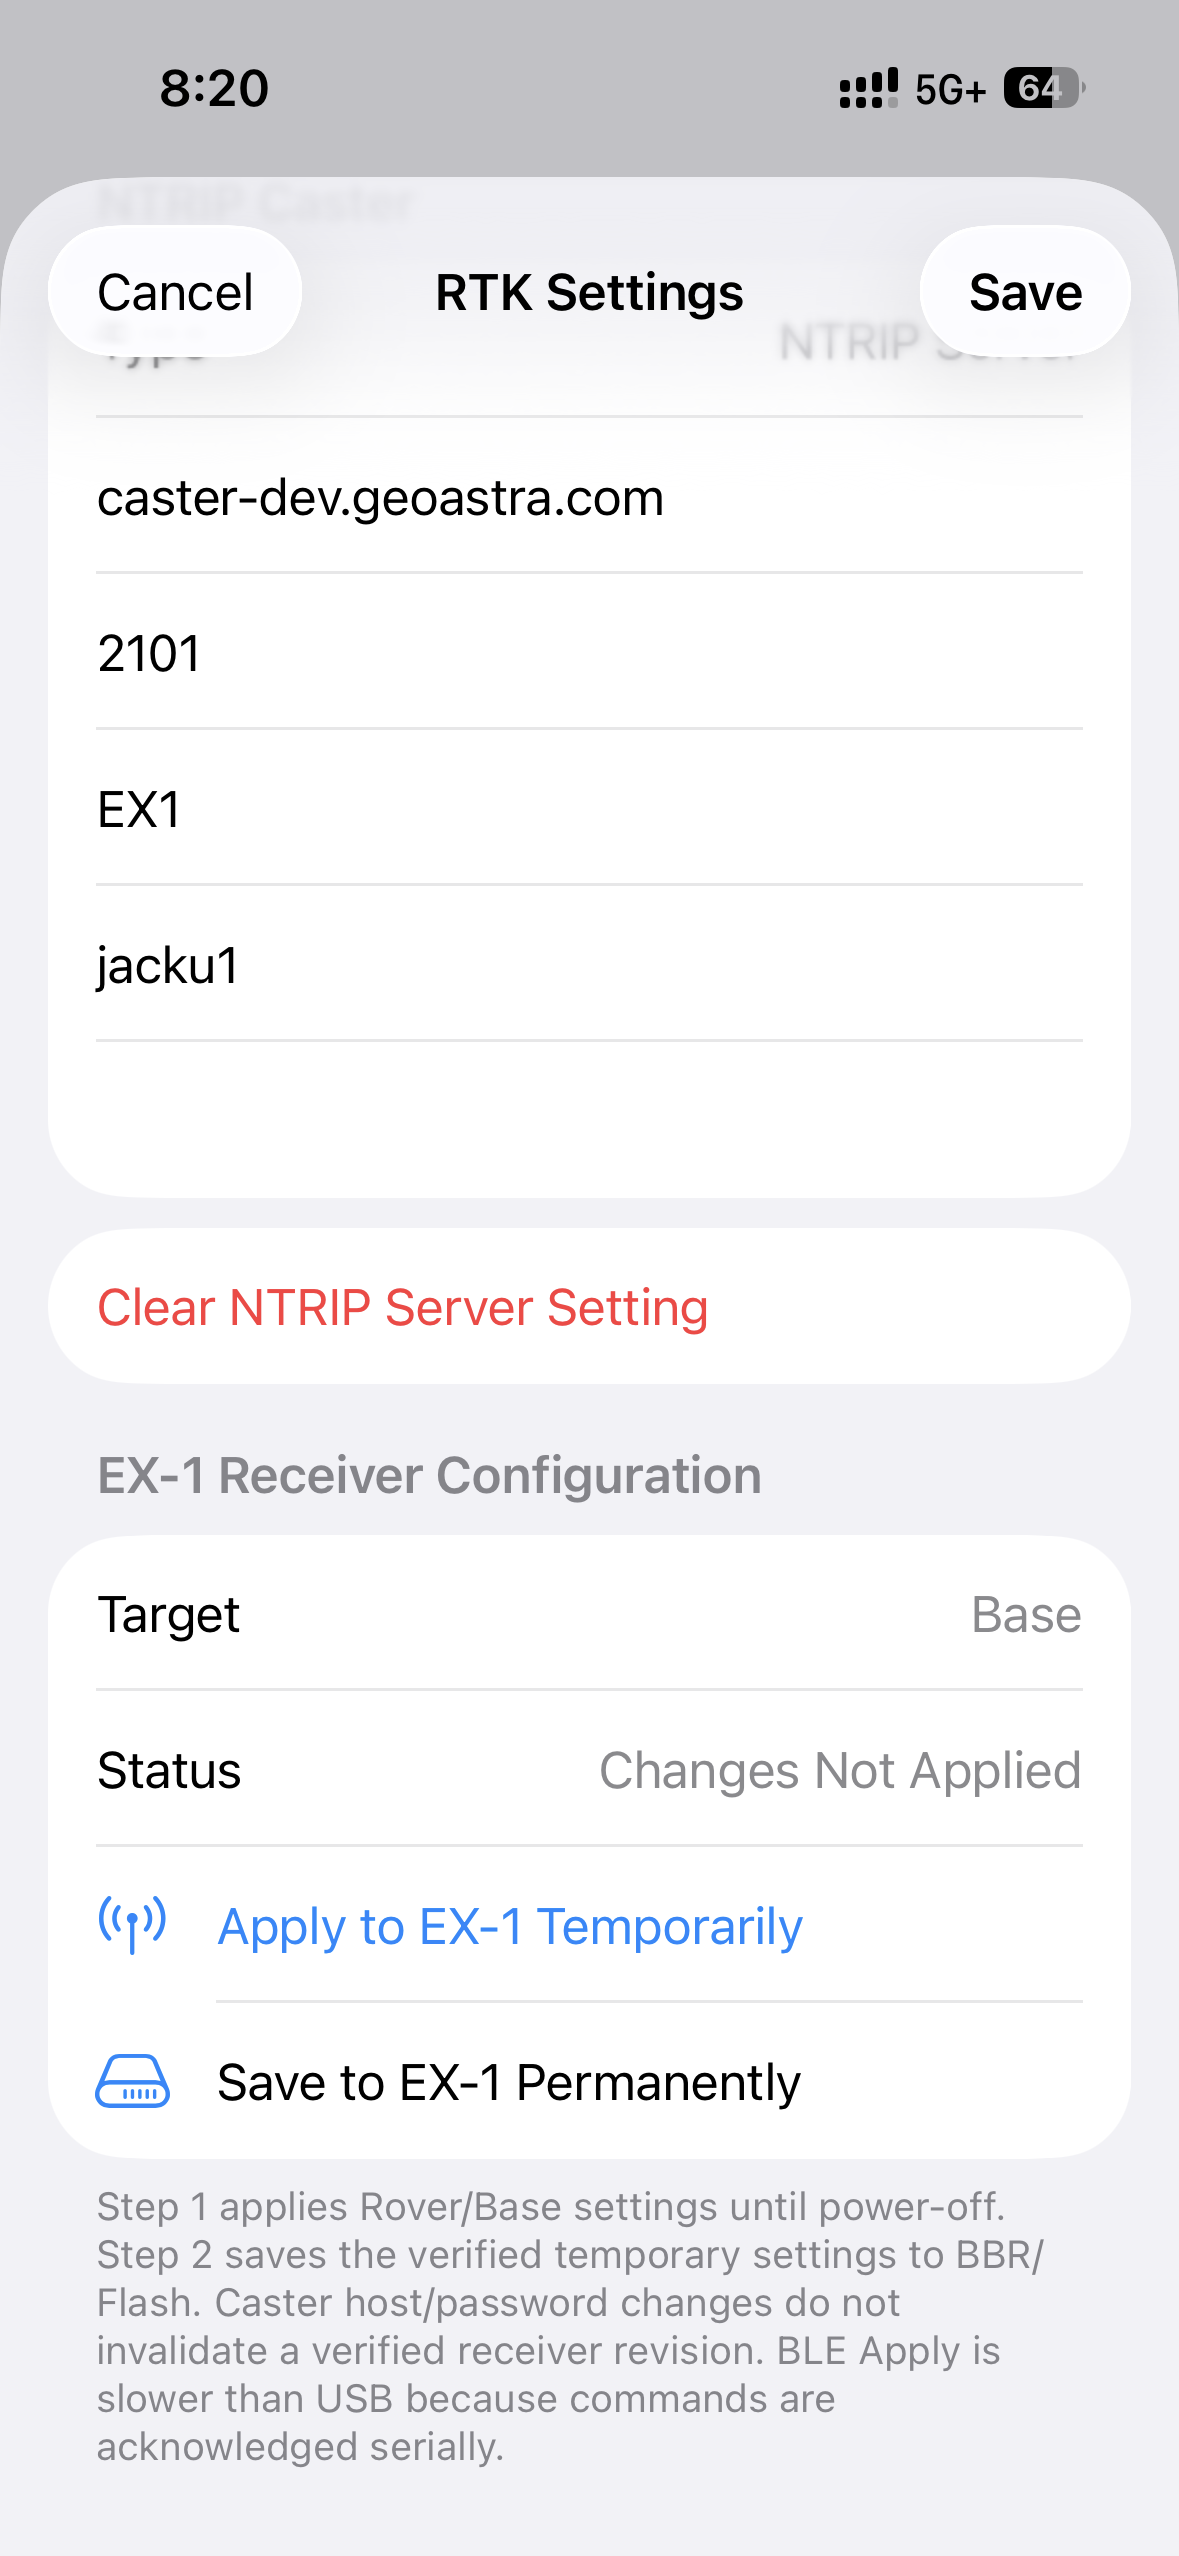
Apply Temporarily / Save Permanently buttons.
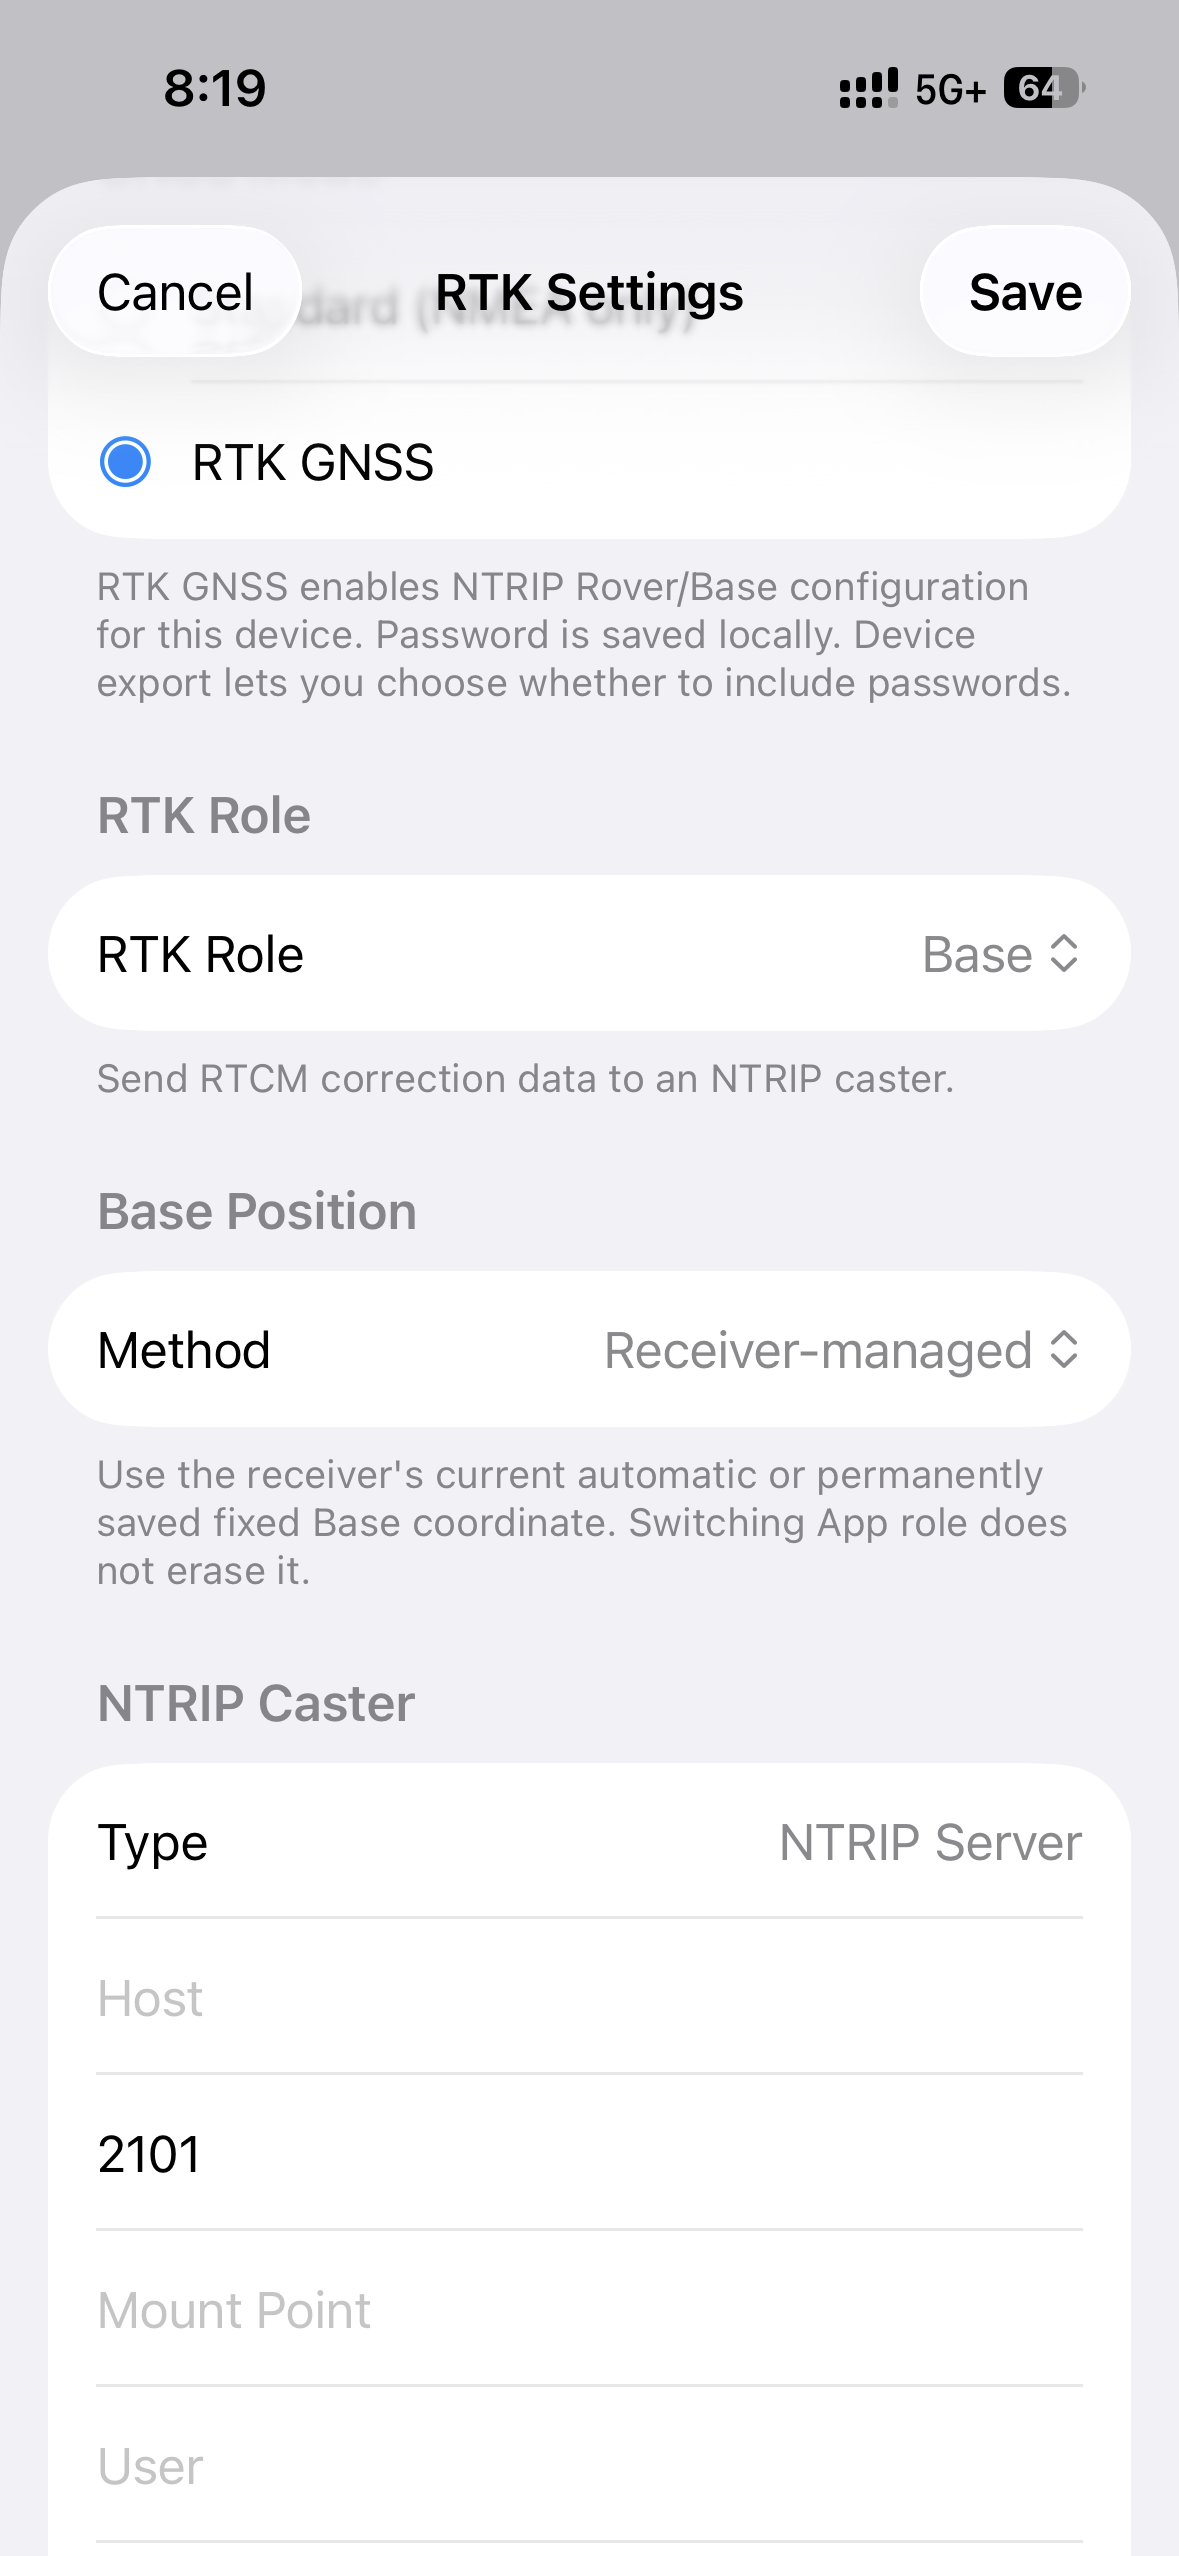
P-70 Base settings (Receiver-managed option visible).
2.2 NMEA Server settings
Screen name: NMEA Server Settings
2.2.1 What it does
After the receiver sends NMEA to this App over Bluetooth, the App can open a small local server / output so other apps on the same iPhone/iPad (QField, Survey123, QuickCapture, etc.) can fetch that NMEA via TCP or UDP.
This is not an internet cloud caster—it is local port sharing.
2.2.2 Server Type
| Option | Meaning |
|---|---|
| None | Disable network output |
| NMEA Server | Enable local NMEA output (recommended default) |
Newly registered devices usually default to NMEA Server (TCP,
127.0.0.1, port 9000).
2.2.3 Protocol and ports
| Protocol | Typical use | Default port (auto-updates when switching if still on the old default) |
|---|---|---|
| TCP | Other local apps connect in (most common: QField / Survey123 / QuickCapture) | 9000 |
| UDP | This App sends UDP packets to a target address | 11111 |
TCP concept: this App listens; other apps connect to 127.0.0.1:9000.
Only one device may use the same protocol/port at a time; conflicts show Replace / Cancel.
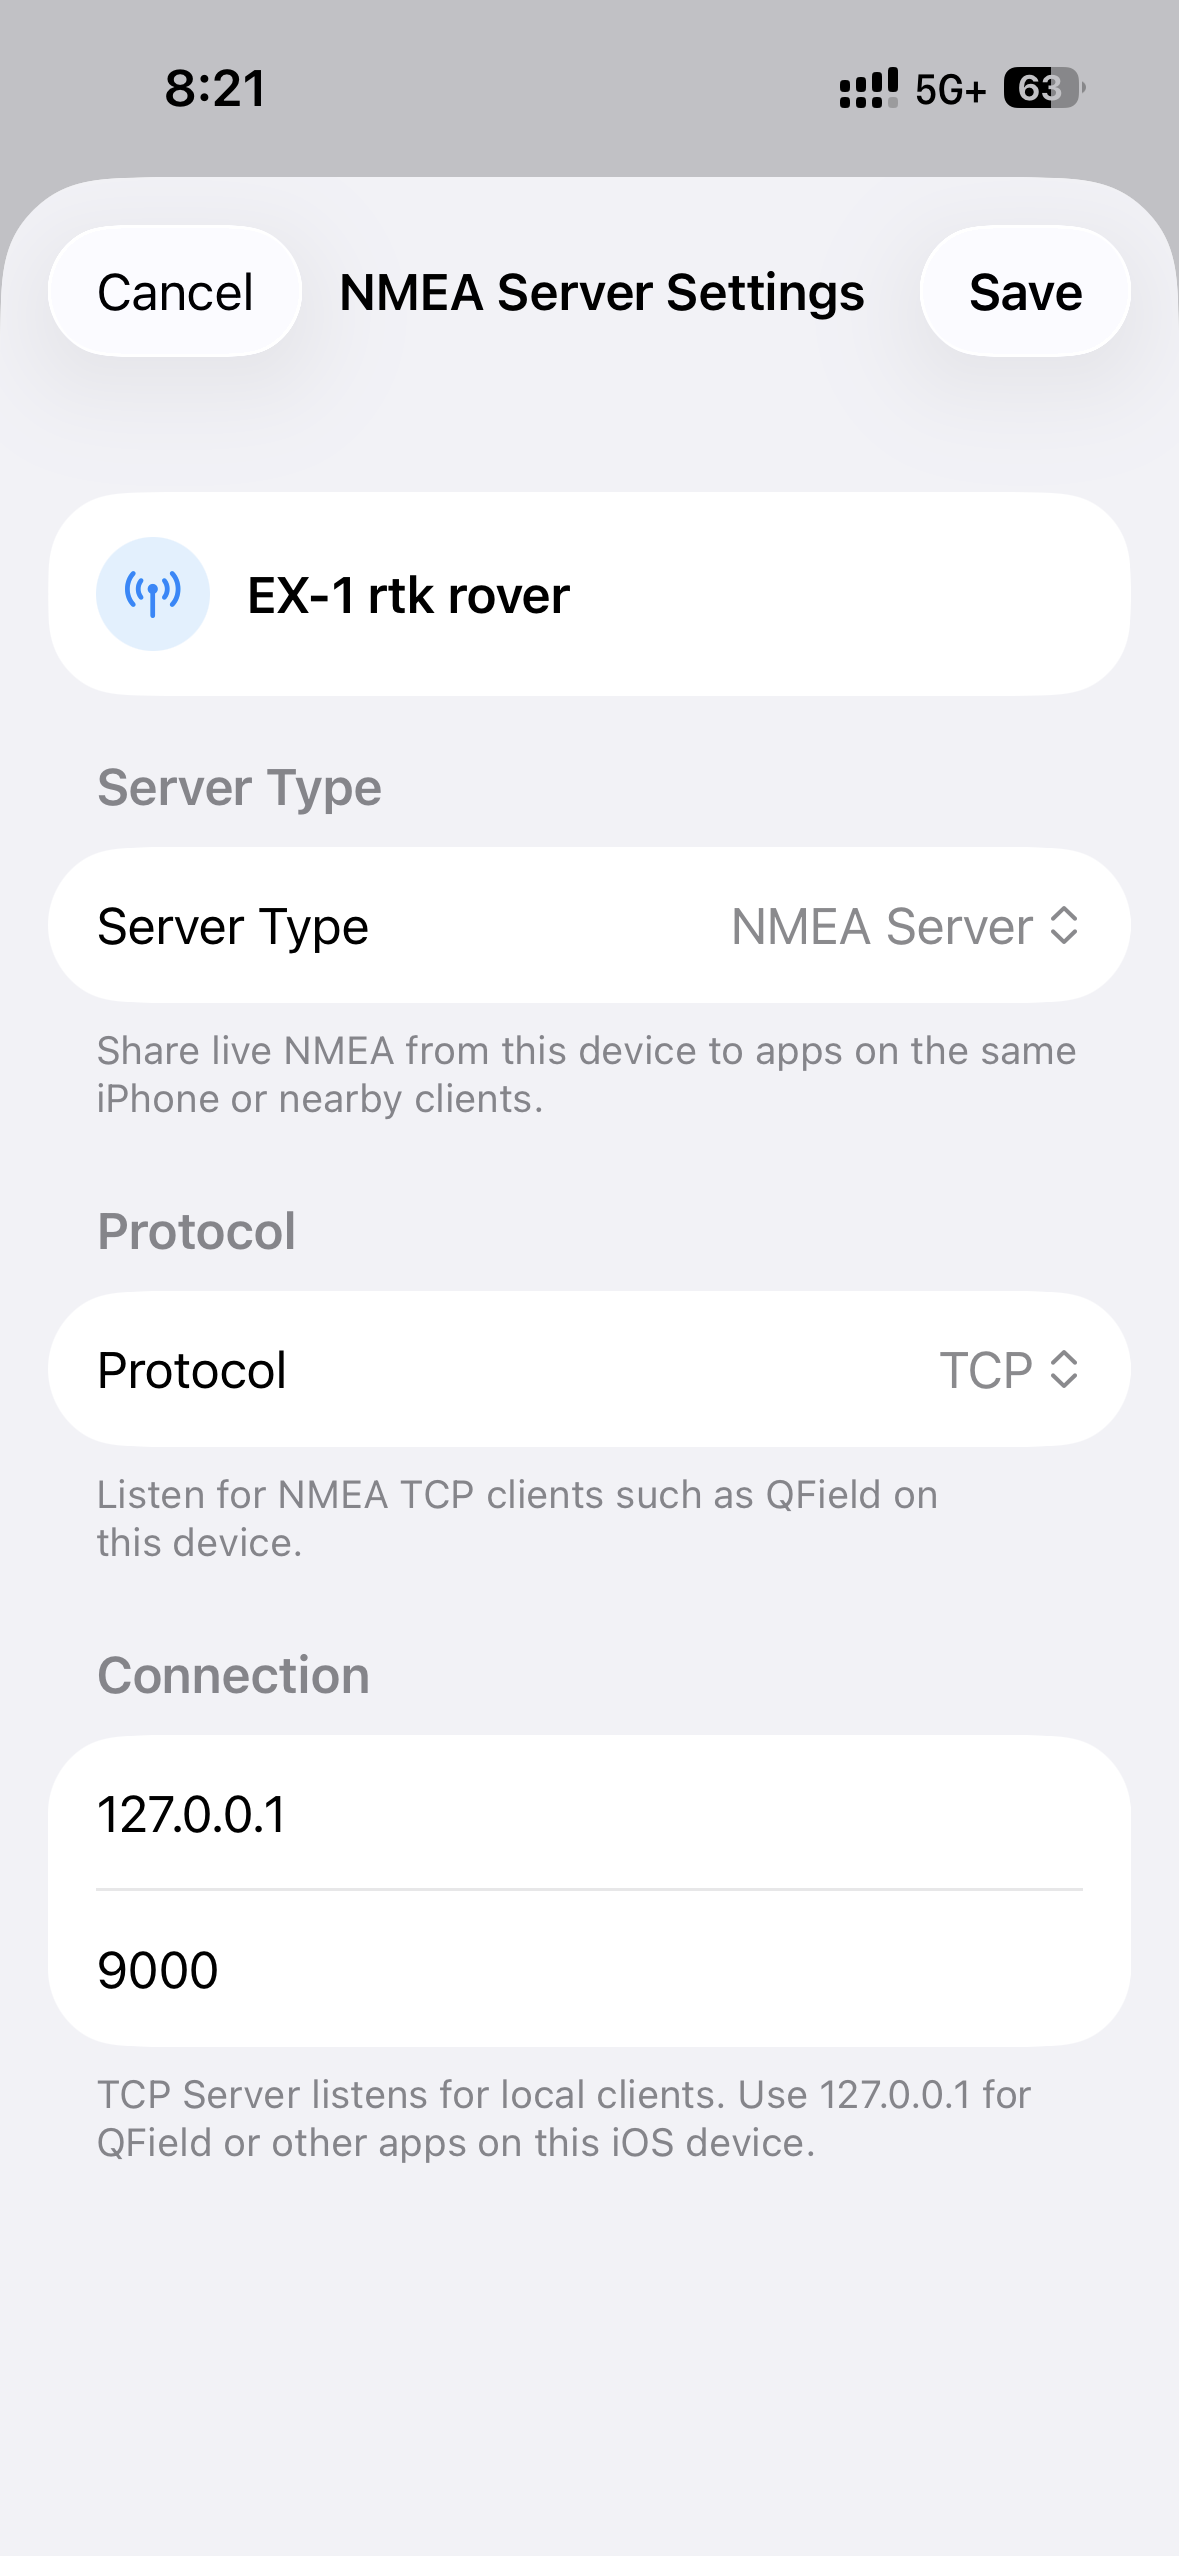
NMEA Server Settings: Type=NMEA Server, TCP, 127.0.0.1:9000.
2.3 Output Rate (P-70 / P-9)
Some models can change the receiver NMEA / position output rate on the Dashboard and save it to the device (persists across power cycles, per model flow):
| Model | Rates | Notes |
|---|---|---|
| P-70 Ultra | 1 / 5 / 10 / 20 Hz | Choose on Dashboard → Apply; persist with Save … to Device (labels follow the App) |
| P-9 Race | 1 / 5 / 10 / 25 Hz | Same idea: set in-app and save to device |
| EX-1 / P-7 | — | This App does not provide that Output Rate UI |
About EX-1: Output rate cannot be changed in this App; it is set by factory defaults or other configuration tools.
Tip: Higher rates suit fast motion and denser sampling, but use more battery, Bluetooth bandwidth, and storage. Daily point survey is usually fine at 1 Hz. Top rates may show a performance warning in the UI.
Relation to Collect Data: This is the receiver output rate. For a denser logged track, raise Output Rate here first, then choose Raw Update Rate under Collect Data → Record Track (9.5). 1 Hz and other Collect Data choices are logging thinning on the App side and are independent of Output Rate.
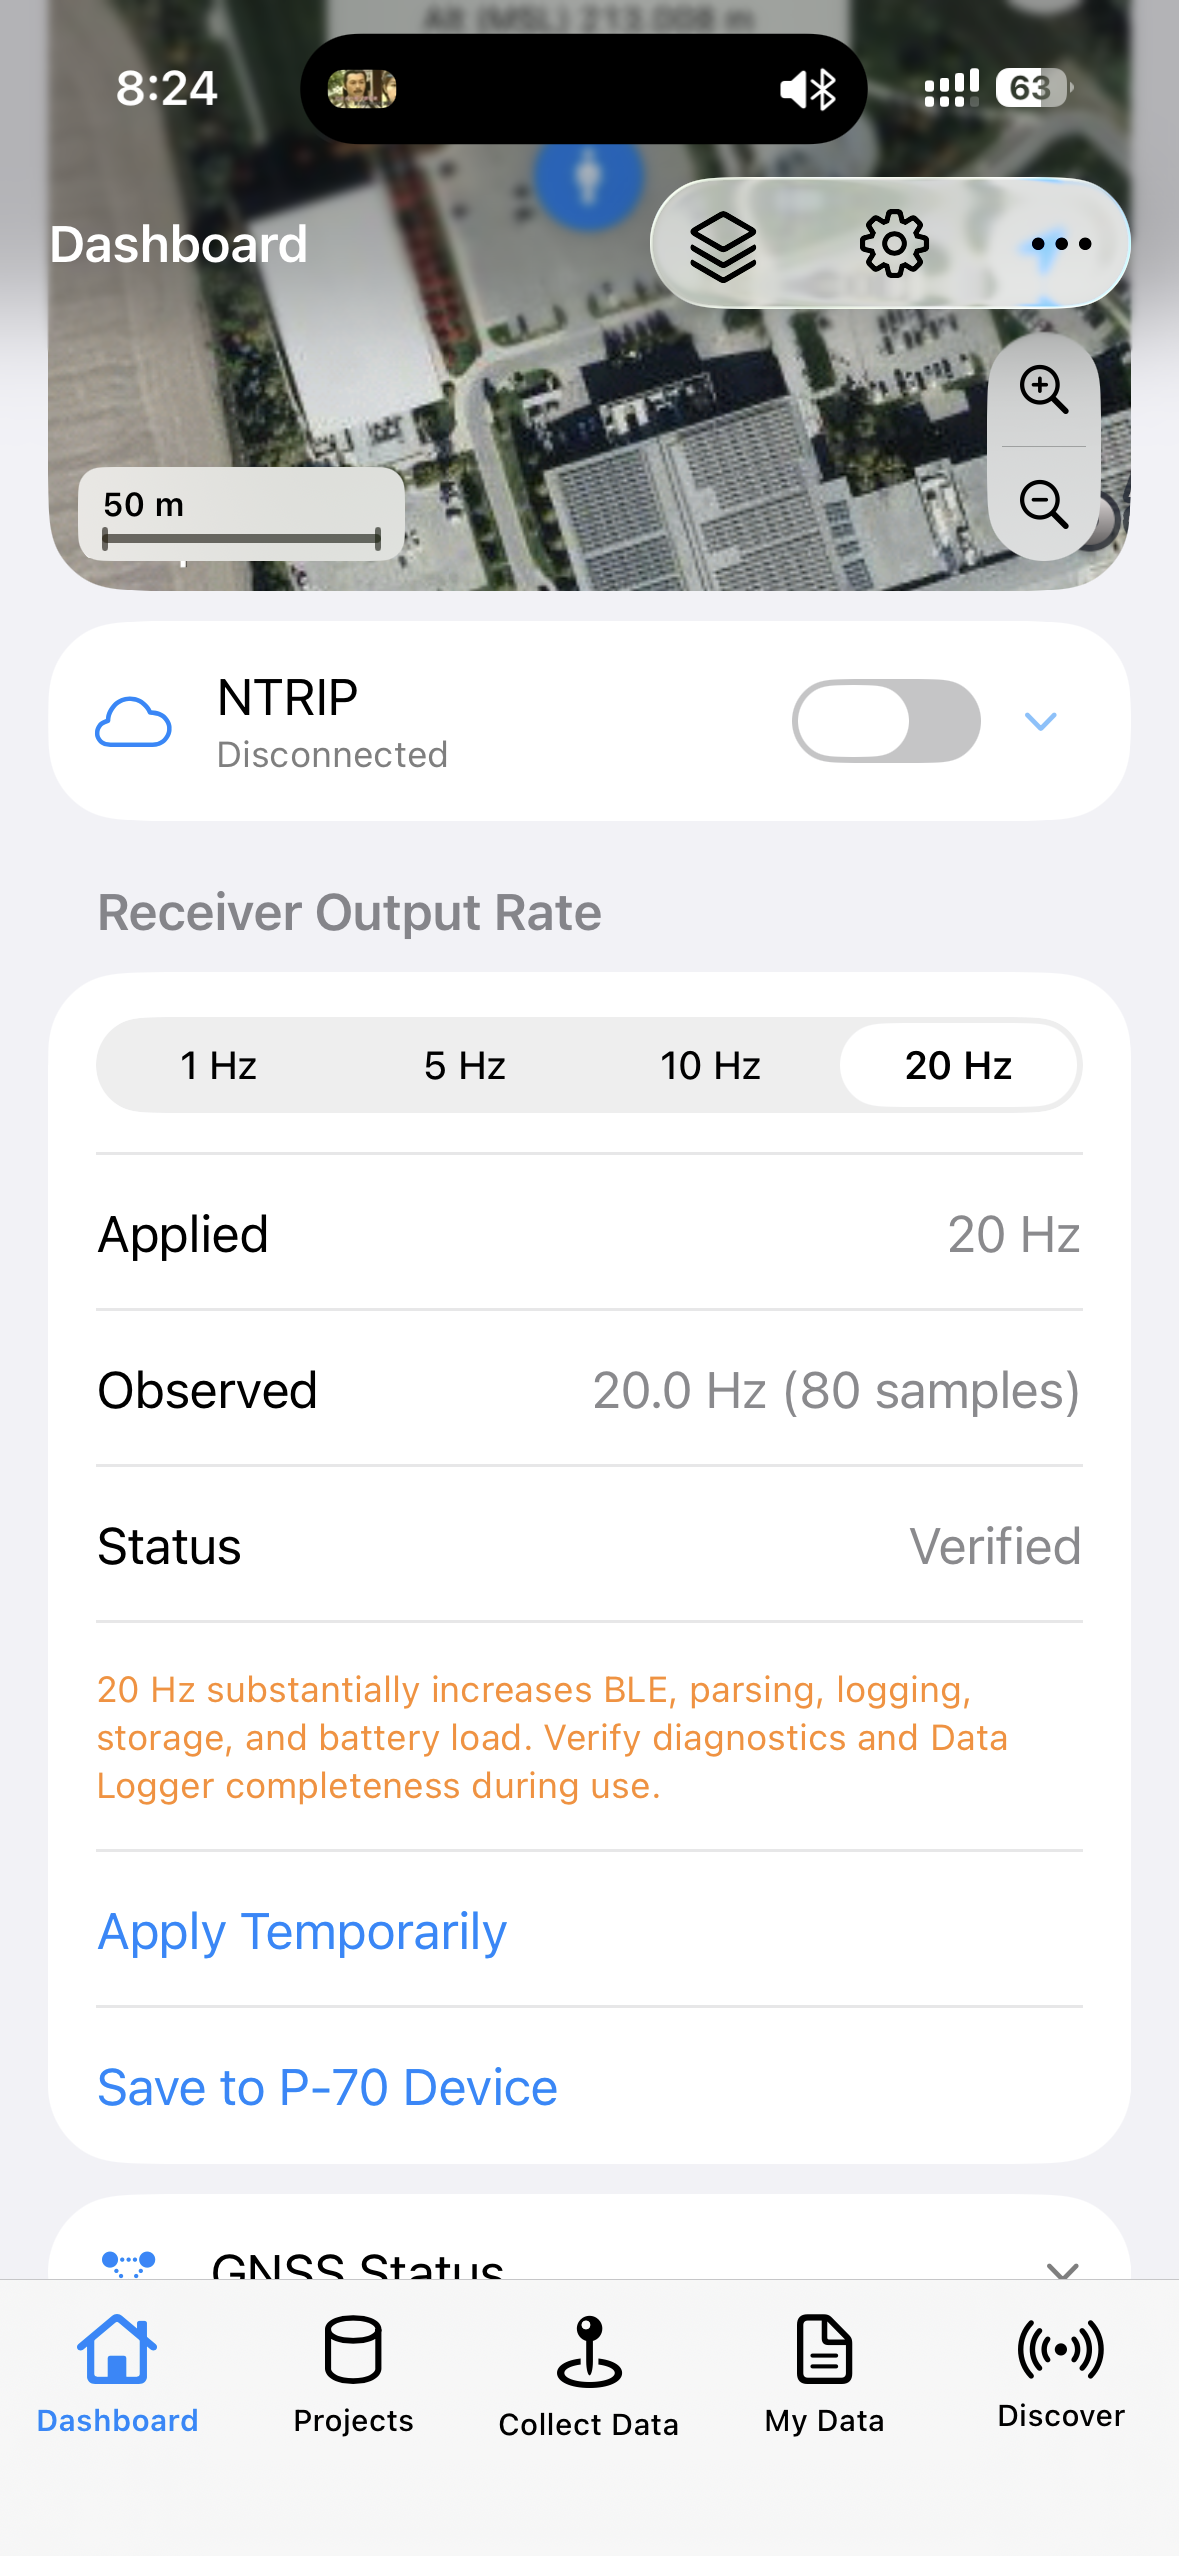
P-70 Dashboard Output Rate and Save to Device.
Chapter 3: Dashboard
After a successful connection you see that device’s Dashboard (Rover or Base layout depends on role).
3.1 What you see
Typical content:
- Live position and map follow (Apple Maps / MapKit; standard or satellite, place labels on/off)
- GNSS Status (collapsible): lat/lon, altitude (MSL), Fix, HDOP/VDOP, hAcc/vAcc, speed, heading, satellites, message counters, etc.
- NTRIP toggle (if RTK is configured)
- NMEA Server toggle and status (if Server Type is NMEA Server)
- P-70 / P-9: Output Rate controls (see 2.3)
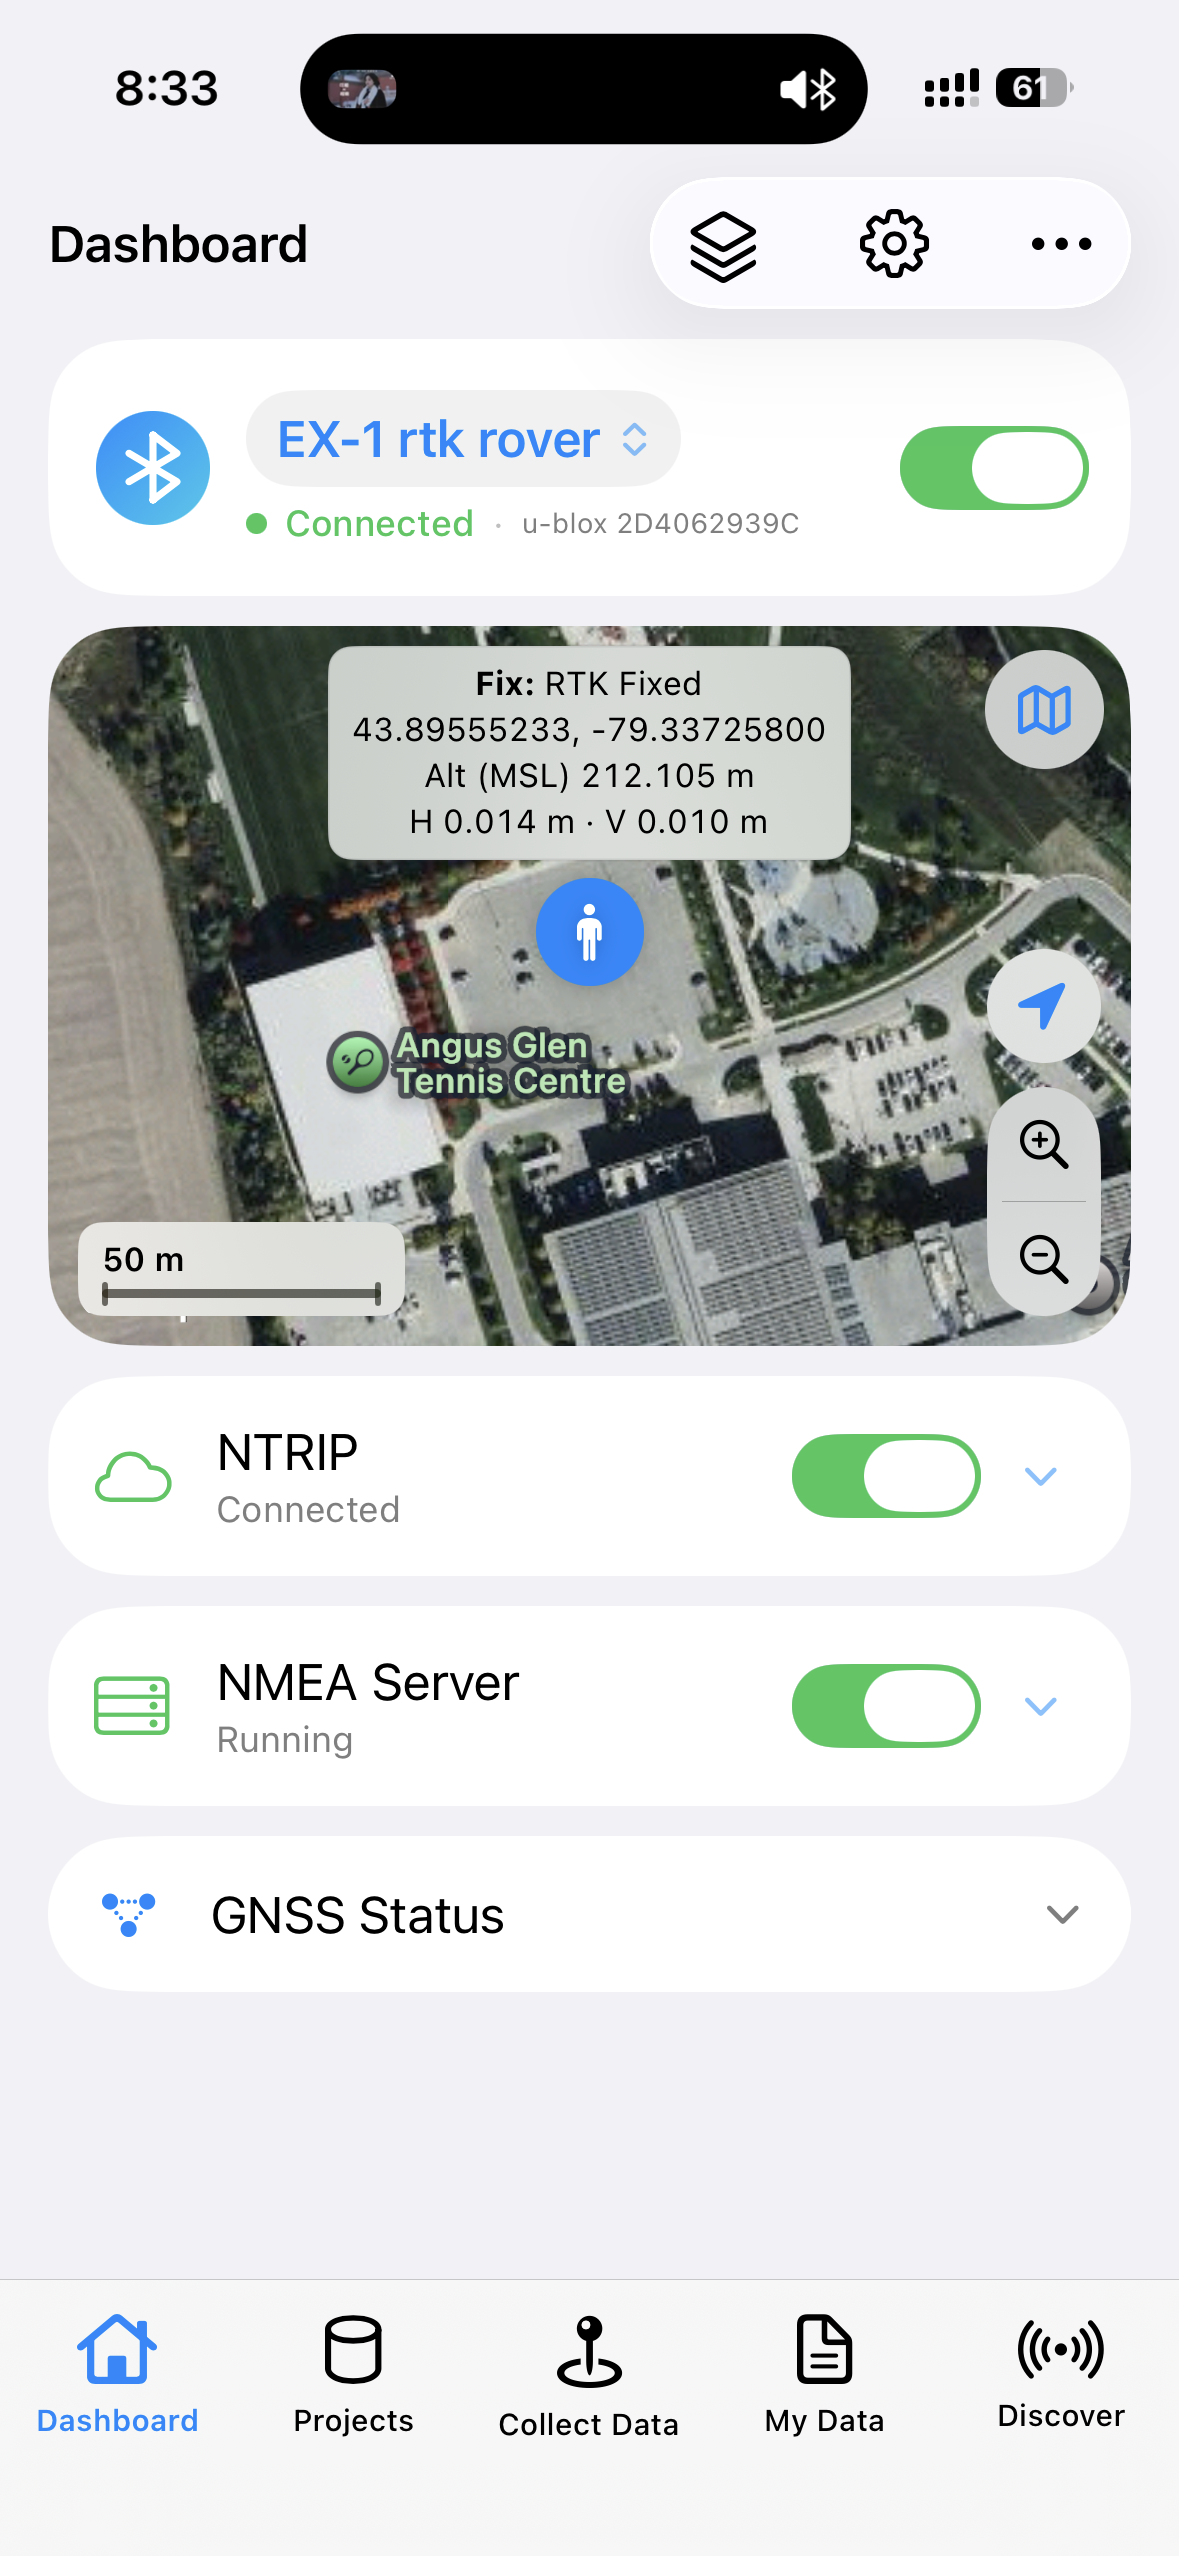
EX-1 Rover Dashboard overview (Status expanded, Apple Maps visible, Fix preferred).
3.2 Connection switch and automatic reconnect
At the top of each device Dashboard:
- Connect switch: On = you want this receiver linked; Off = disconnect (manual disconnect does not trigger auto-reconnect).
- Status line: Connected (green) when BLE is up and streaming; Reconnecting… (orange) during auto-reconnect (see 1.4).
- Cancel: While auto-reconnect runs, the footer shows Auto-reconnect in progress and Cancel to stop trying.
- Connection settings: Dashboard
…→ Connection has two independent toggles: Auto-reconnect (Bluetooth; see 1.4) and NTRIP Server auto-reconnect (Base upload to caster; see 5.6).
During auto-reconnect the map placeholder reads BLE link lost — Reconnecting… (with attempt progress), not “BLE connected — waiting for GNSS data”.
3.3 Rename Device
Rename from the device menu to change the display name (Bluetooth advertised name is unchanged). Useful for labels like “East site EX-1” or “Warehouse spare”.
3.4 Delete Device
Removes the saved entry from Device List.
If connected, disconnect first, then delete.
3.5 Logs and diagnostics
| Name | Purpose |
|---|---|
| GNSS Log Console / GNSS Receiver Log | Raw NMEA from the receiver over Bluetooth (can pause) |
| NTRIP Log Console | NTRIP connection / data logs (wording differs for Rover vs Base) |
| Diagnostics | No separate “Diagnostic Log” menu; related info for P-70 etc. appears under GNSS Status |
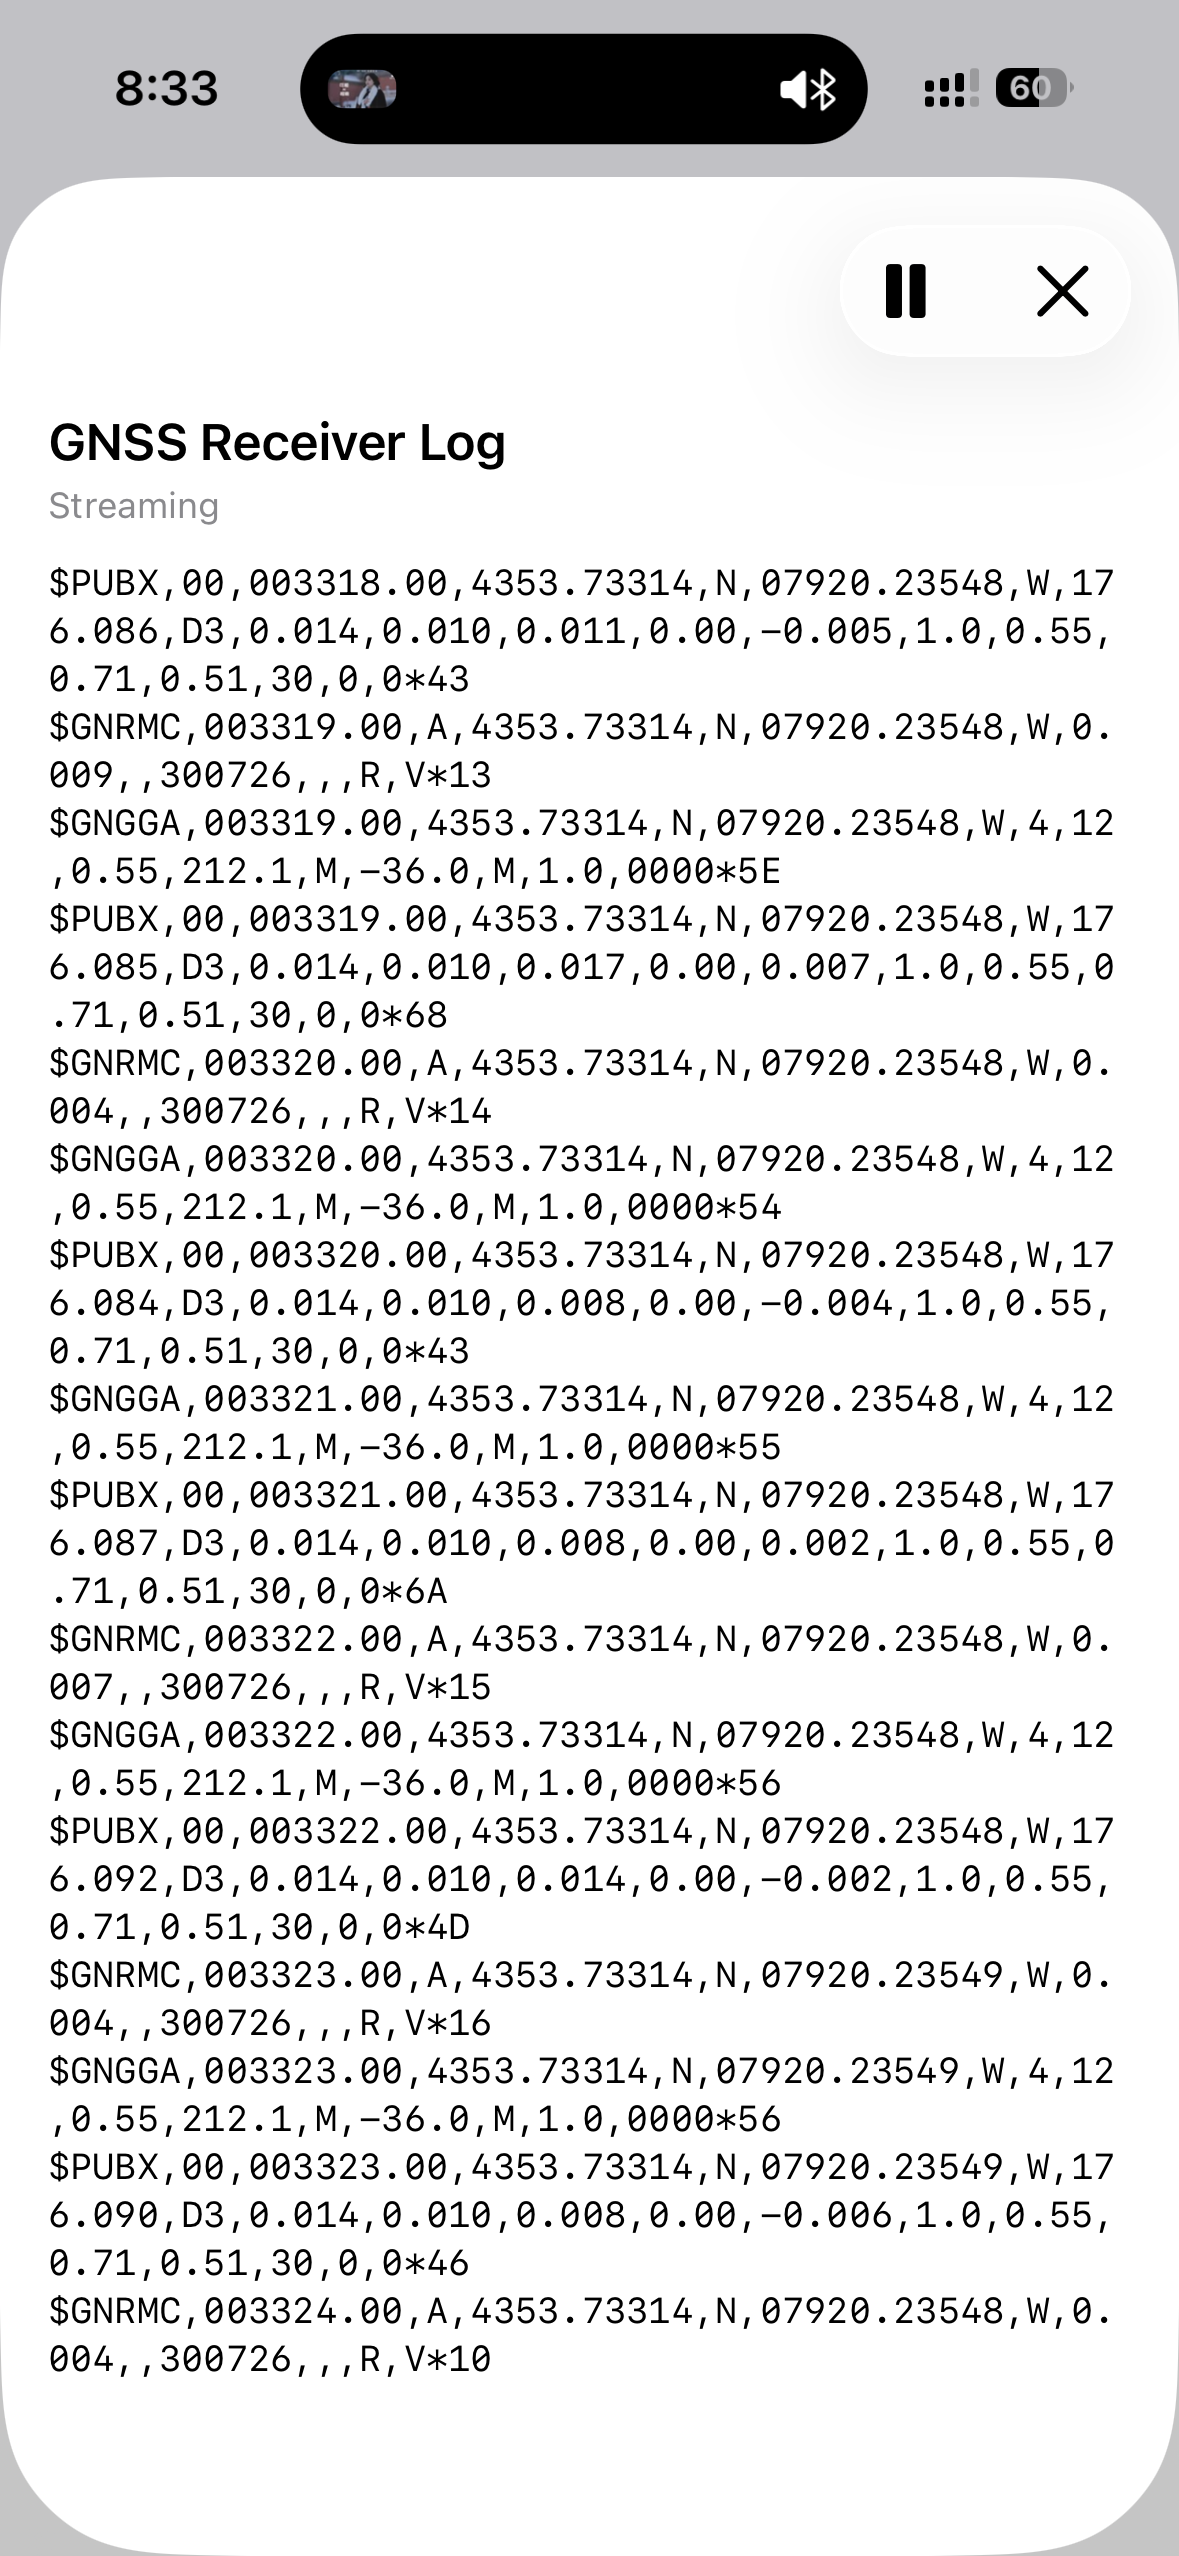
GNSS Receiver Log with scrolling NMEA lines.
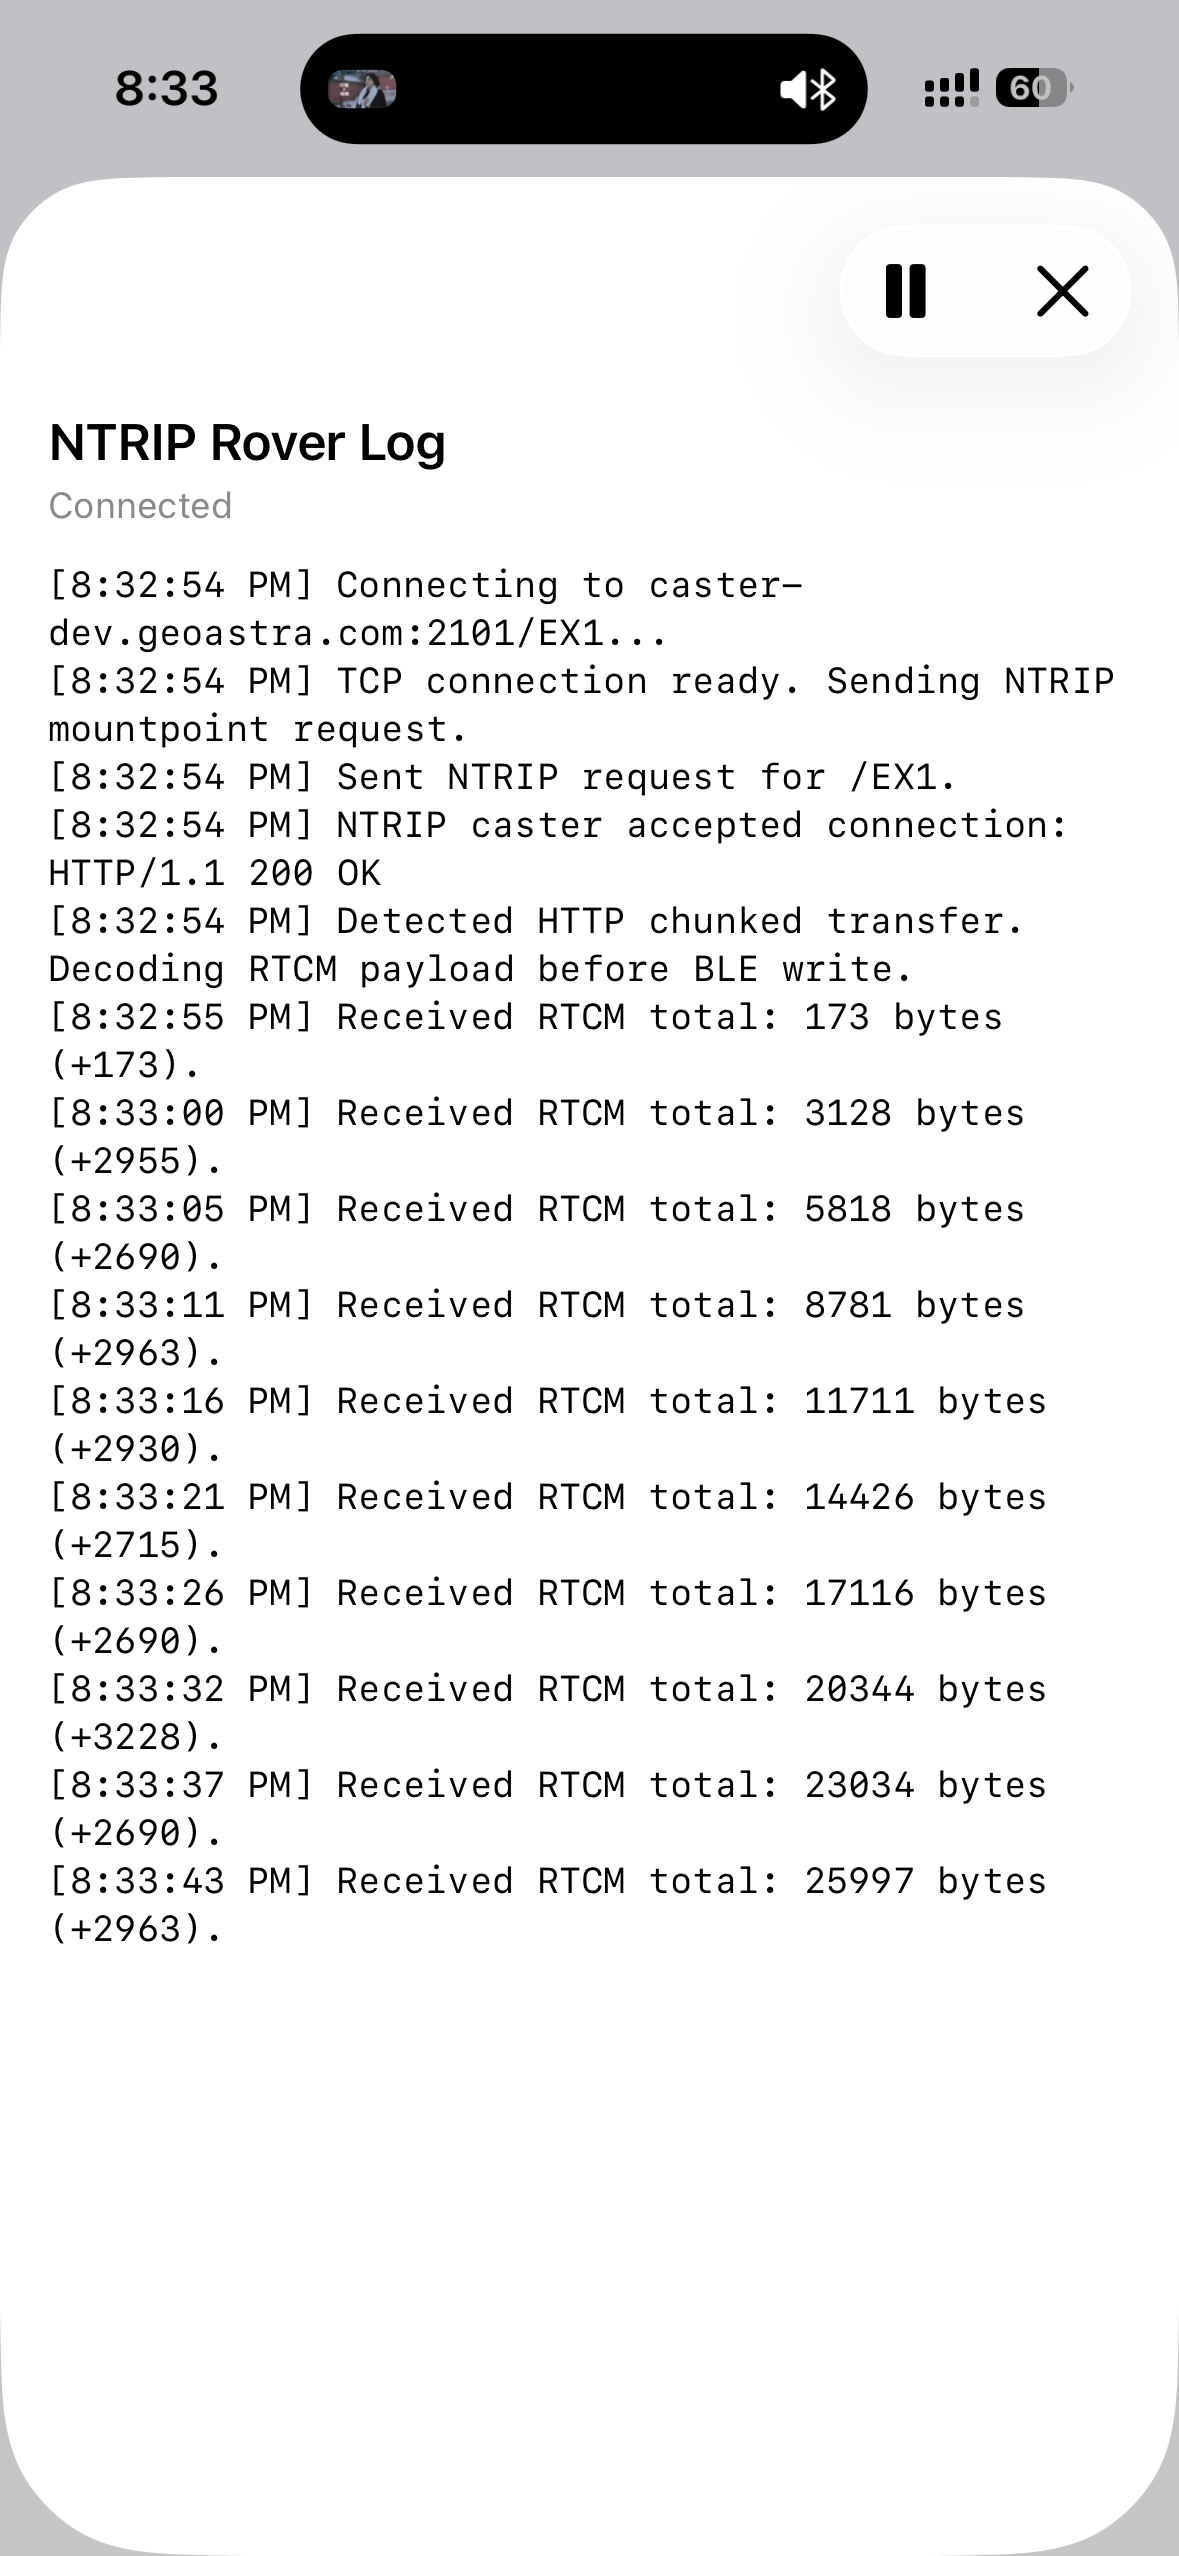
NTRIP Log (more representative when Rover is connected to a caster).
3.6 How to read GNSS Status (for beginners)
| Field | Meaning |
|---|---|
| Fix | Solution type, e.g. GPS Fix, DGPS, RTK Float, RTK Fixed (usually ideal) |
| Satellites | Satellites used in the solution; more is often better (geometry also matters) |
| HDOP / VDOP | Horizontal / vertical dilution; smaller is better for geometry—not a meter error by itself |
| hAcc / vAcc | Estimated horizontal / vertical accuracy in meters; smaller is better. This App prefers receiver-reported estimates (below) |
| Altitude | Usually MSL-related in this App; see 2.1.5 knowledge card for vs ellipsoidal height |
Knowledge card: why hAcc / vAcc beat “HDOP × factor”
Many simple apps estimate meters from HDOP × a rule of thumb—that is only geometric rough guessing.
This App prefers receiver-reported hAcc / vAcc (meters):
- EX-1: from u-blox UBX
- P-70: from HPPOSLLH (and related high-precision position output)
- P-9: from the vendor proprietary protocol
These usually track the receiver’s internal filter / RTK solution better, and are more useful for “can I survey / stake out now?”
3.7 Multi-device: Device List
Device List can store multiple receivers. The list … menu also provides:
| Action | Notes |
|---|---|
| Import Devices | Import a device config package (creates new entries; does not overwrite by identity) |
| Export Devices | Export device configs; optionally exclude passwords (default) or include passwords |
| Delete All Devices | Clears the list (irreversible; confirm) |
| Compatible GNSS List | Registered compatible models and notes |
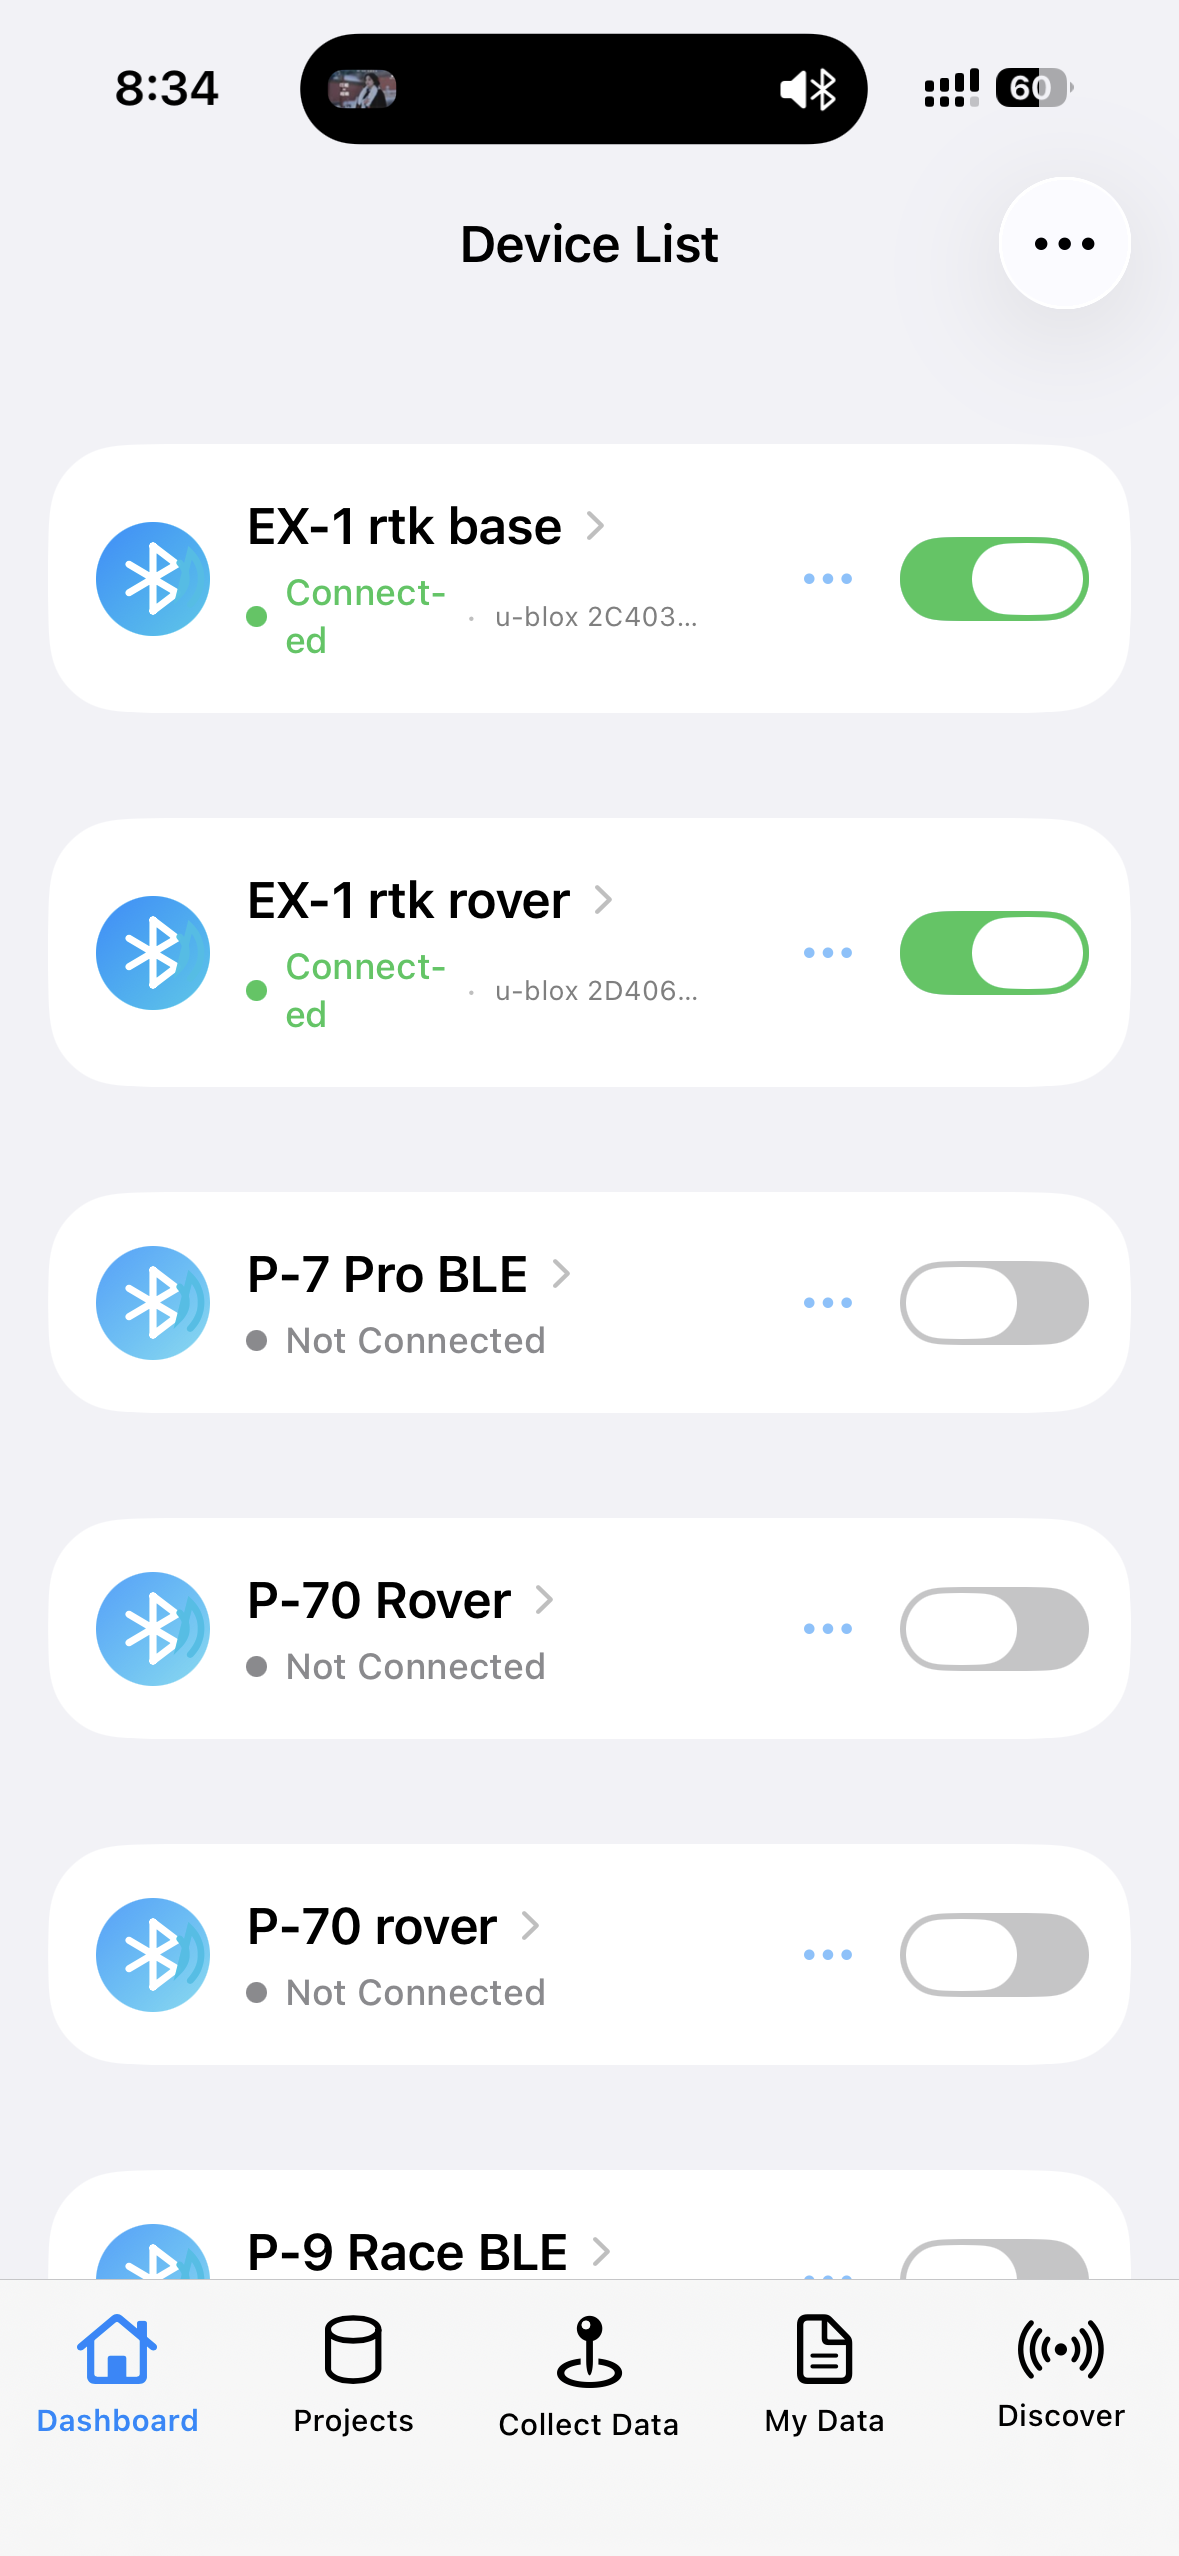
Device List with at least one EX-1.
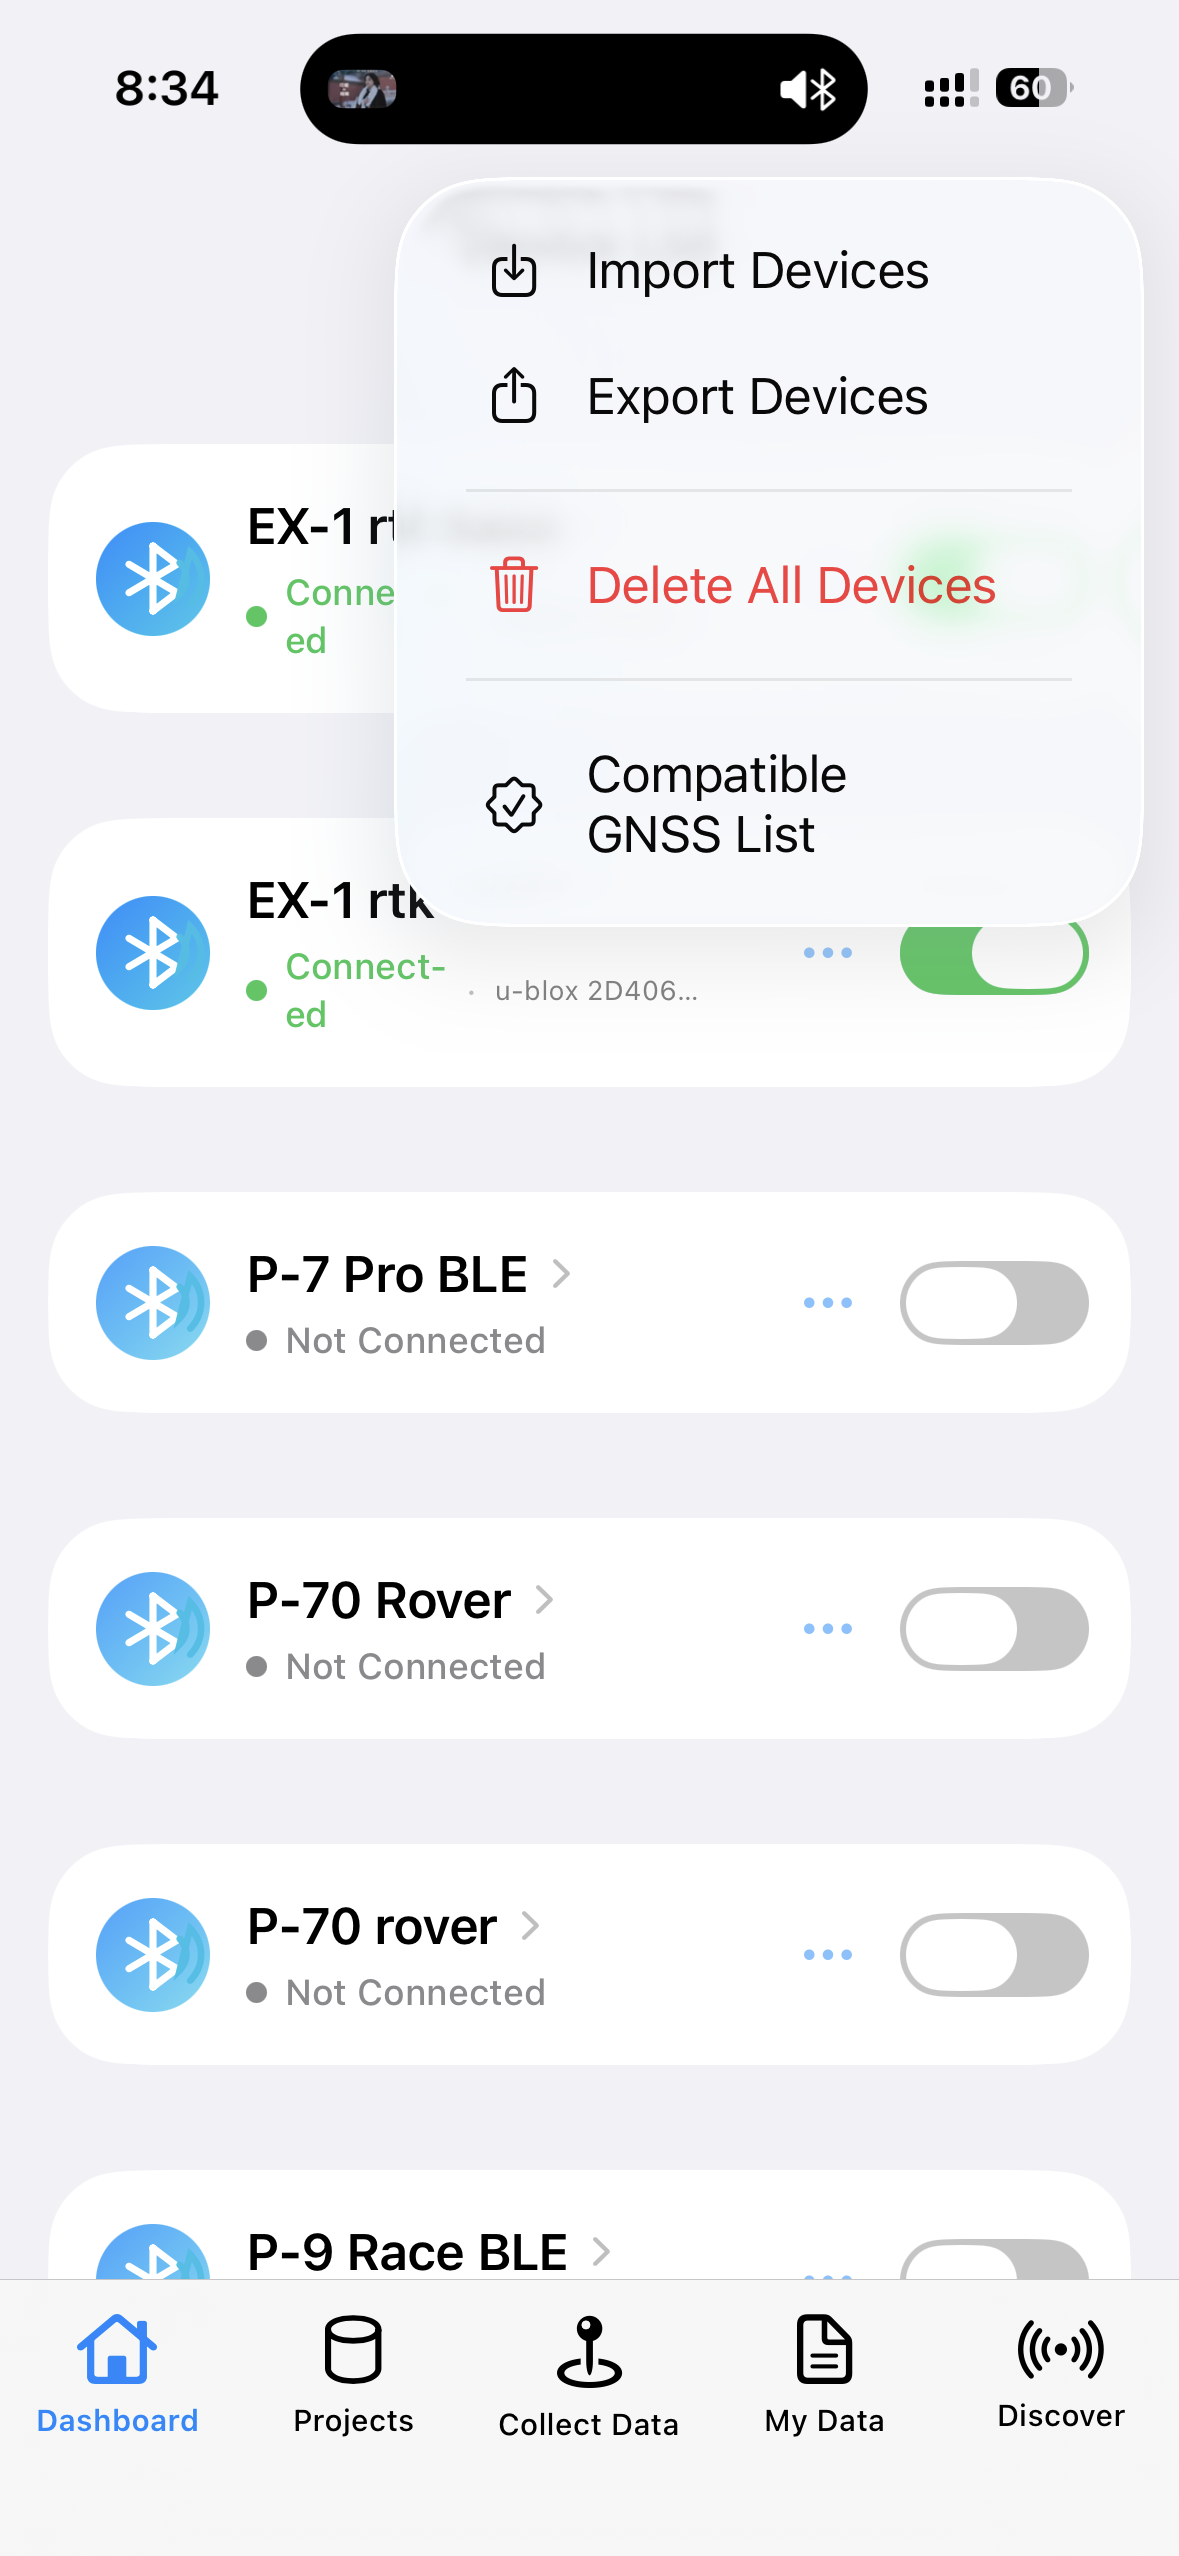
Device List … menu: Import / Export / Delete All.
Chapter 4: Share NMEA with other iOS apps
4.1 Typical scenario
You want iOS apps that support TCP NMEA to use the Columbus external GNSS instead of the iPhone GPS.
Common examples:
- QField
- ArcGIS Survey123
- ArcGIS QuickCapture
Industry trend: On iOS, external GNSS rarely injects into system location, so “consume NMEA over TCP/UDP inside the app” is becoming the common industrial pattern. More surveying / GIS / field apps are expected to add the same support. If the peer app can connect to
127.0.0.1(or its documented address) and port, it can work with this App’s NMEA Server.Setup example: Below and Appendix C use QField; Survey123 / QuickCapture usually follow the same idea (TCP address + port in positioning / external GNSS settings).
4.2 Recommended steps (TCP, most common)
- Connect the receiver in this App; confirm NMEA and a live fix.
- Open NMEA Server Settings:
- Server Type = NMEA Server
- Protocol = TCP
- Host = 127.0.0.1
- Port = 9000 (or your chosen port)
- Turn on NMEA Server on the Dashboard (if shown).
- In QField / Survey123 / QuickCapture (or another TCP NMEA app), set external GNSS / NMEA input to:
- Host
127.0.0.1 - Same port as above
- Host
- On this App’s Dashboard, confirm a client is connected (TCP shows client status when available).
4.3 Notes
- The other app and this App must run at the same time (or keep background behavior as that app requires)—data comes from this bridge.
- This is on-device sharing, not uploading coordinates to the internet.
- On port conflict, stop NMEA output on another device or tap Replace.
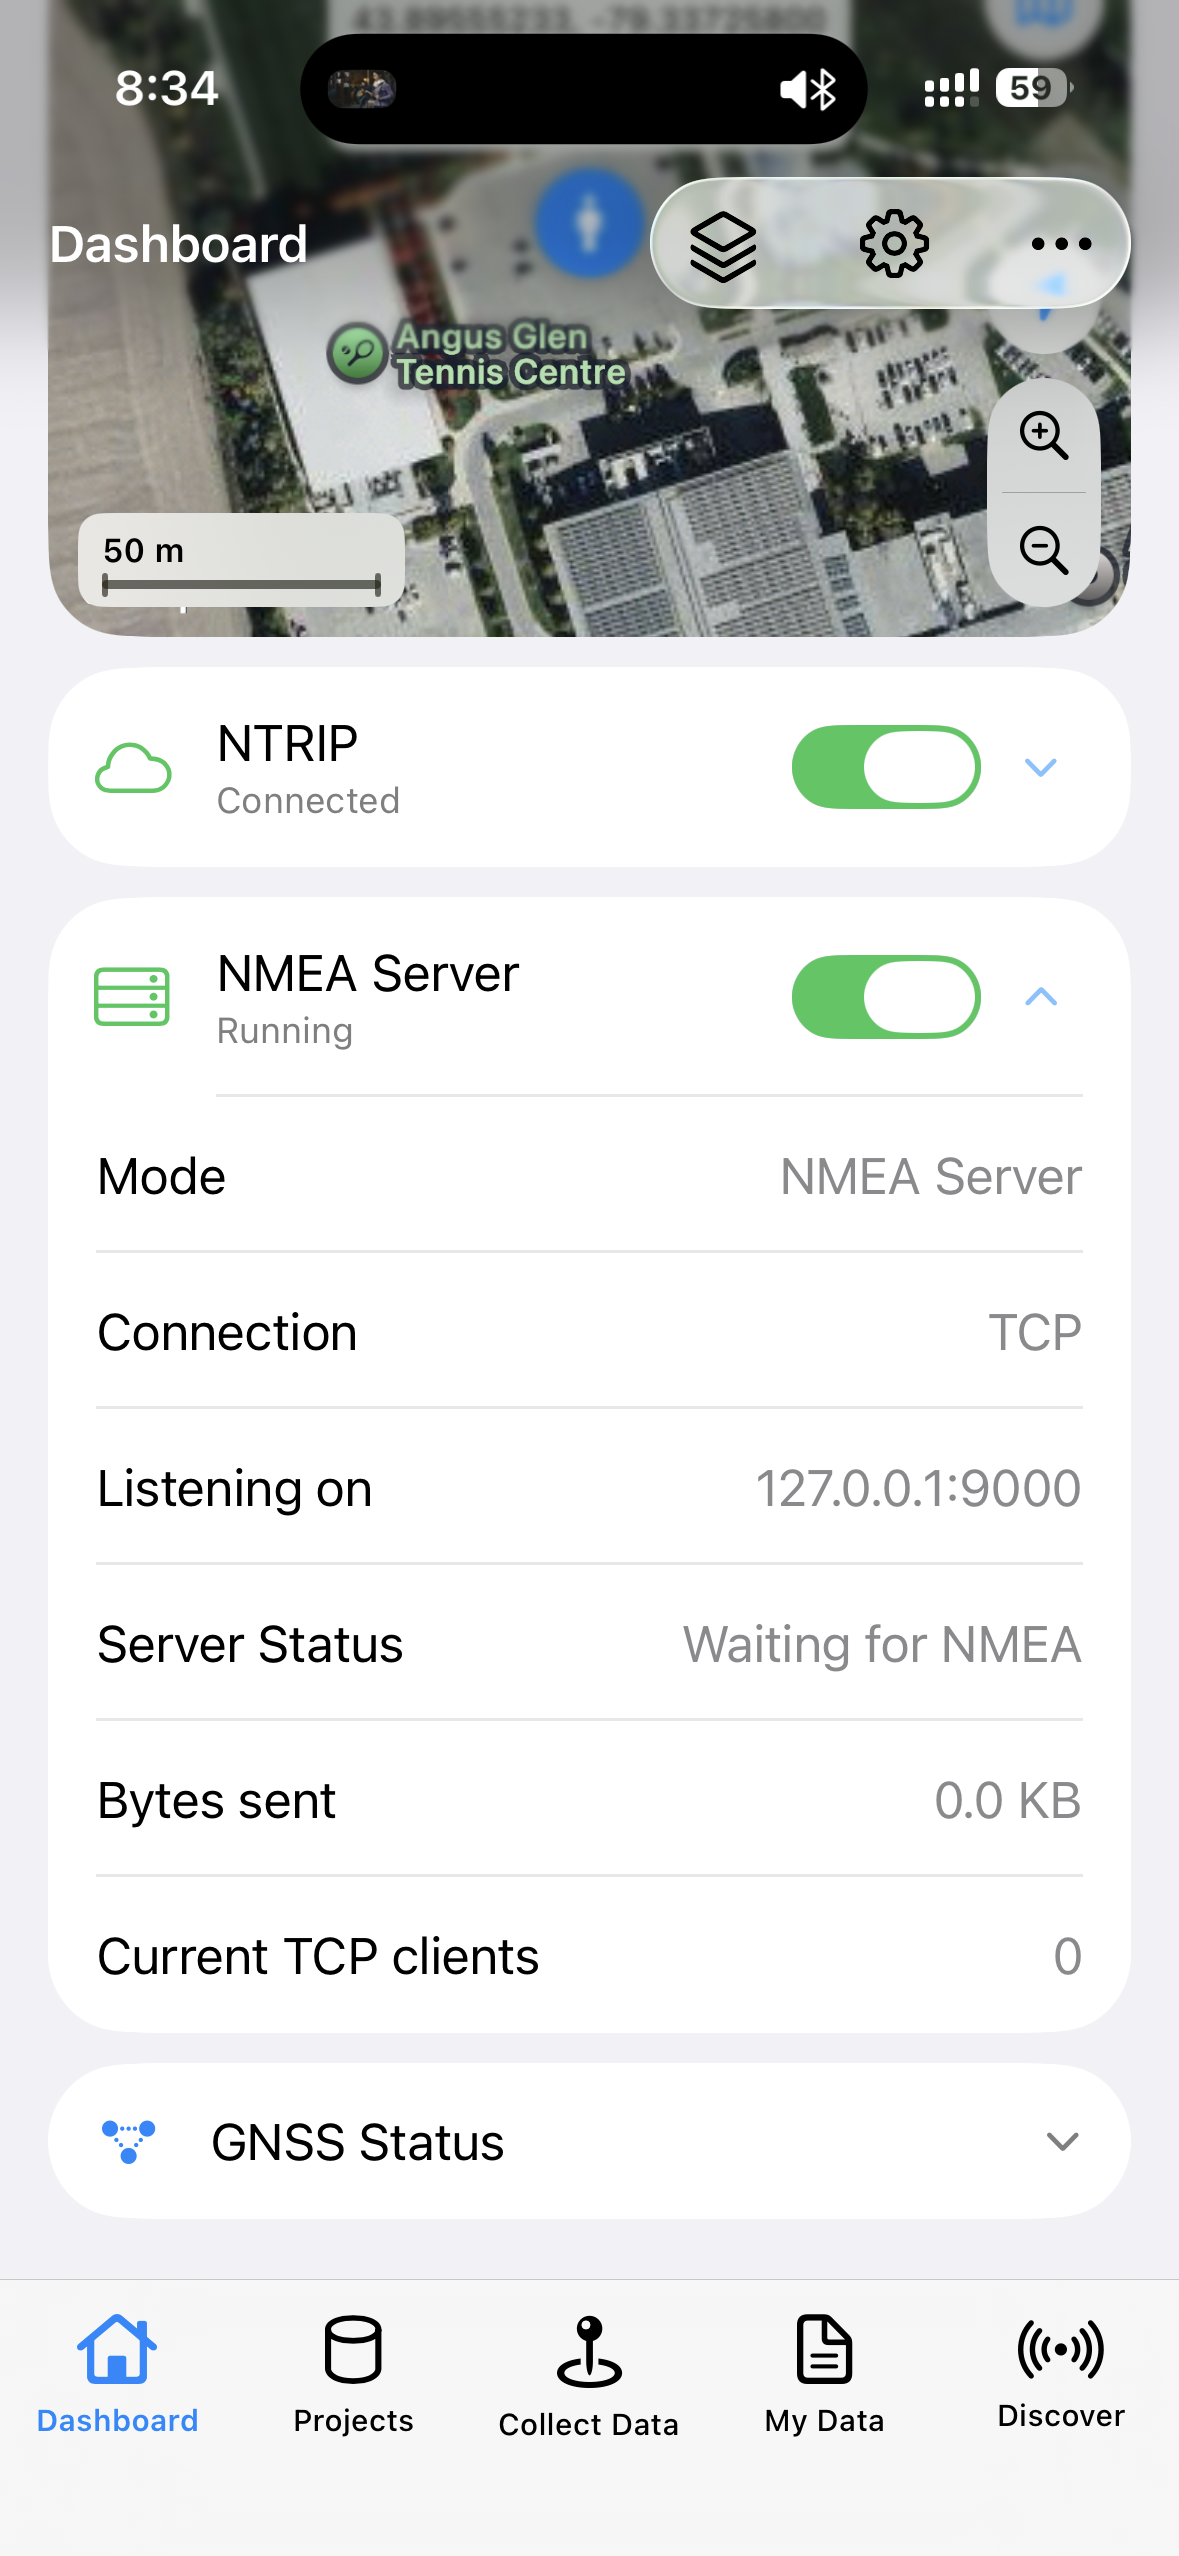
Dashboard with NMEA Server on and TCP client connected (if available).
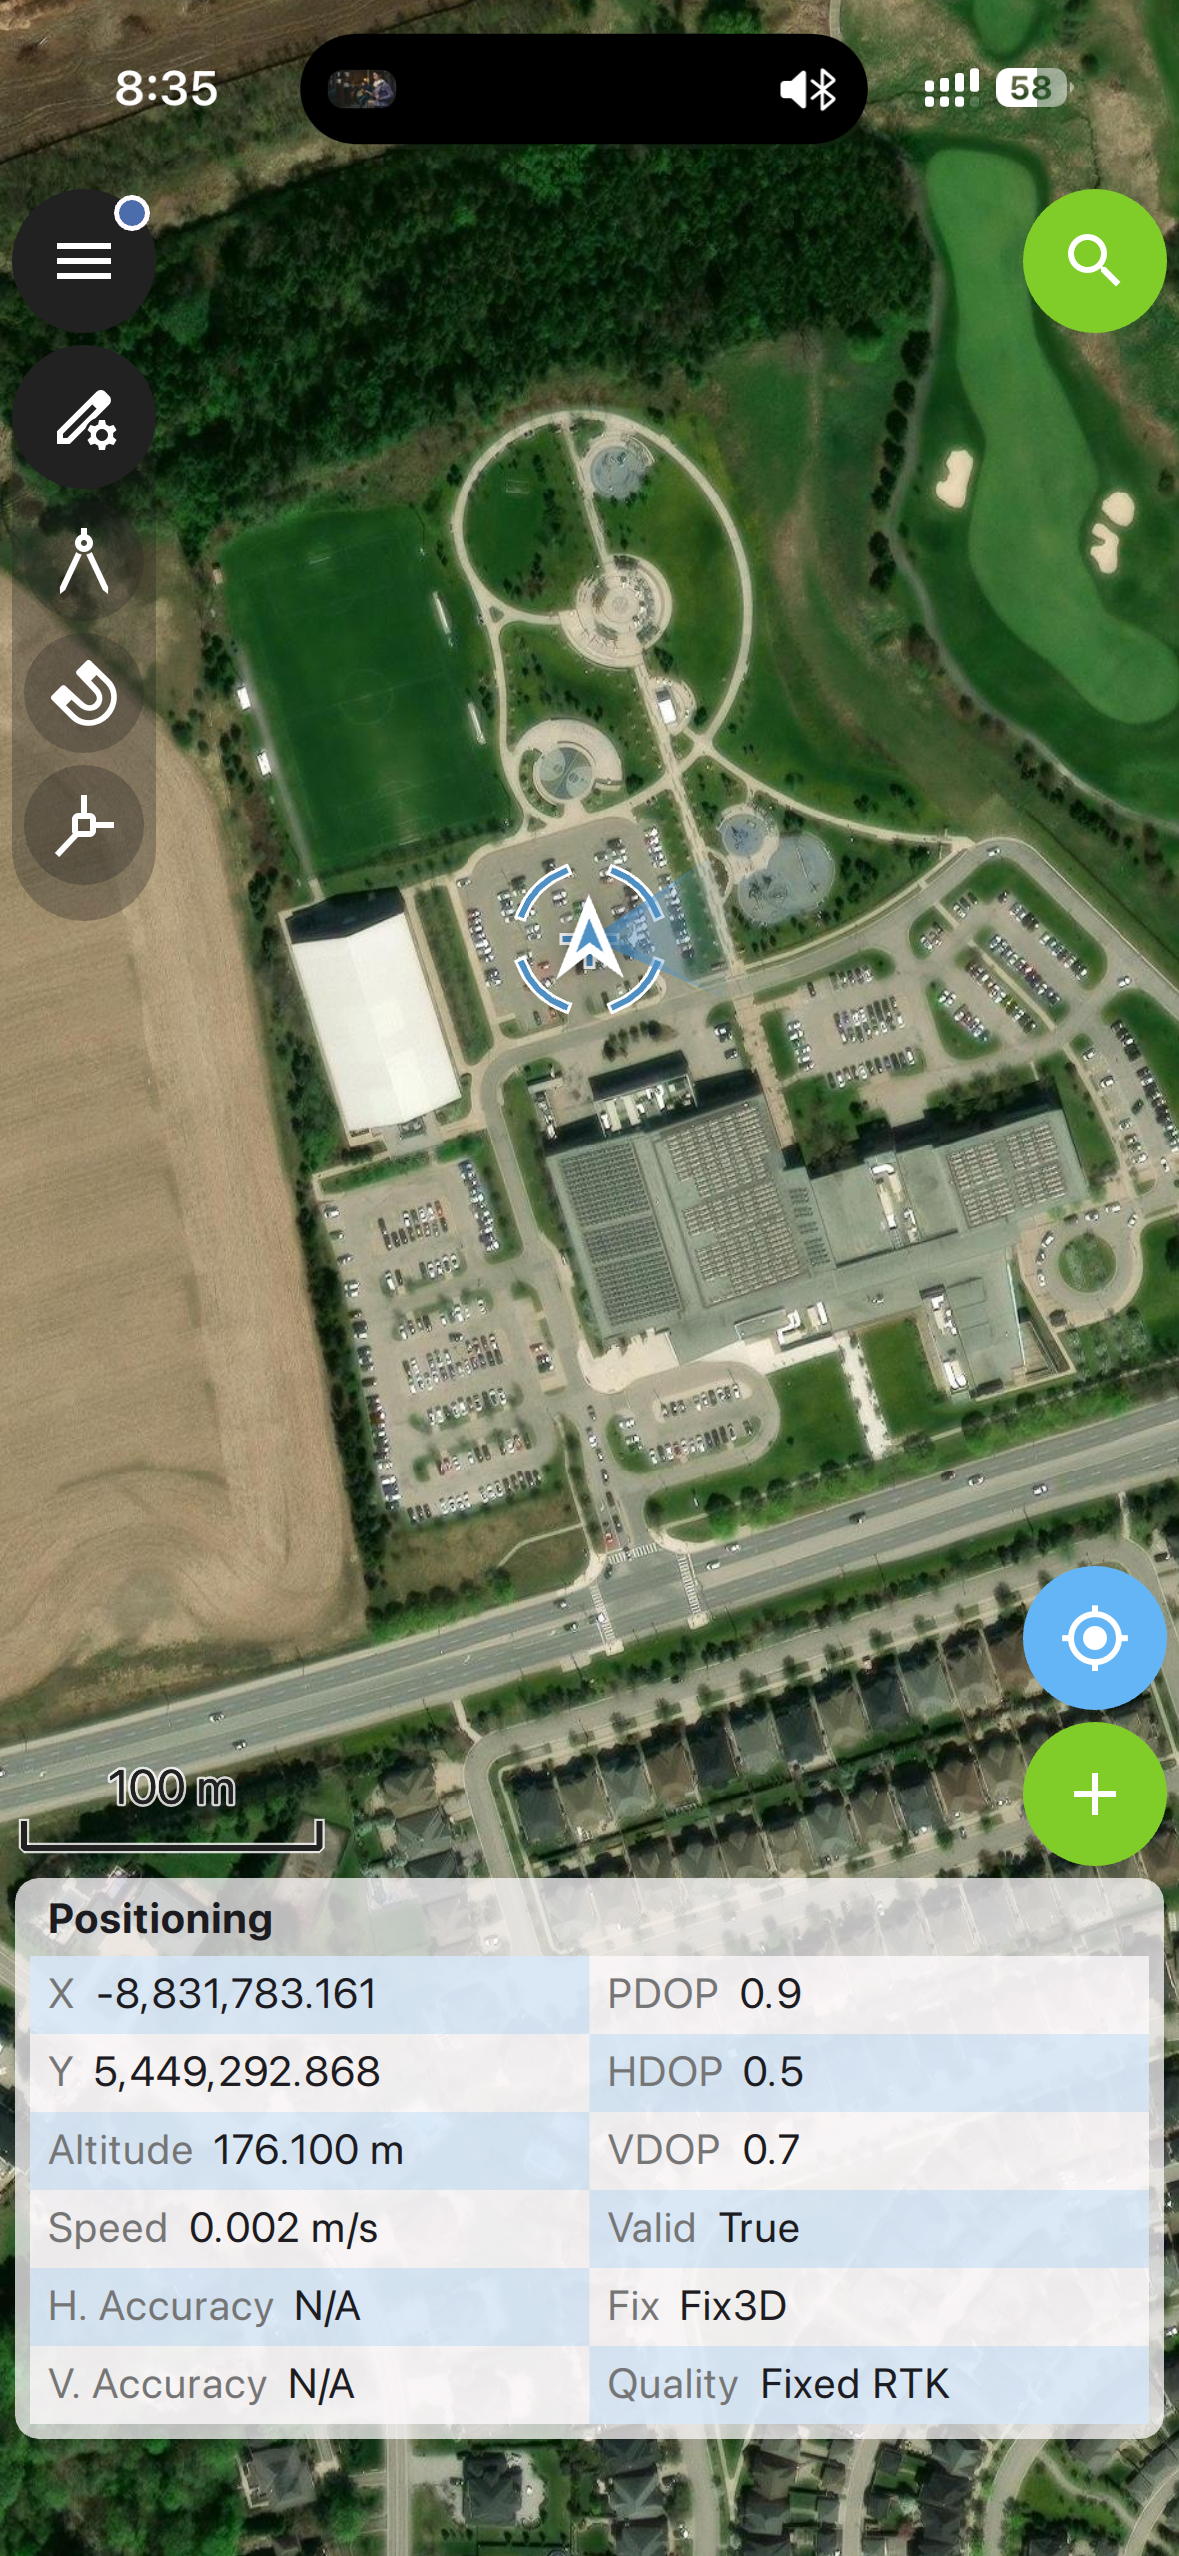
See Appendix C (QField Positioning / TCP settings).
Chapter 5: RTK Base
5.1 When to use Base
Use Base when you provide your own correction source or upload Base corrections to an NTRIP caster.
5.2 How an NTRIP Caster turns your Base into “your own CORS”
An NTRIP Caster is an internet correction relay:
- Your RTK Base (via this App’s NTRIP Server) uploads RTCM to a Mount Point;
- Your RTK Rover (or other users’ Rovers) as NTRIP Clients download corrections from the same caster;
- No radio required for that hop, not limited to short range—one Base can serve many Rovers. That is “turning your Base into your own CORS / reference service.”
If you do not have a caster yet, Sign-up for a free commercial-grade account at https://geoastra.com/ (see landing-ntrip-caster); then copy mount-point credentials from the Dashboard into this App’s NTRIP Server settings.
5.3 EX-1 Base quick flow (concept)
- Fix the unit, stabilize the antenna, clear sky.
- RTK Settings → RTK GNSS → Role = Base.
- Choose coordinate source:
- Known precise coordinates → Enter Fixed Position
- Unknown / average in place → Survey In
- Configure NTRIP Server (Host / Port / Mount Point / credentials).
- On EX-1: Apply Temporarily when needed; after verification Save Permanently.
- Return to Dashboard (Base view); confirm Survey-in / fixed status and NTRIP upload.
5.4 P-70 Base notes
P-70 Base uses Receiver Managed Survey-in: choose Receiver-managed in RTK Settings; the receiver drives Survey-in / lock while this App handles connection, NTRIP upload, and status. Fixed coordinates can also be entered and saved to the device (follow in-app labels).
5.5 What you see during Survey-in
Dashboard may show Base accuracy, elapsed time, and Stop Survey-in (model/mode dependent).
Only after criteria are met should the Base coordinates be used as a differential reference (follow receiver and configuration).
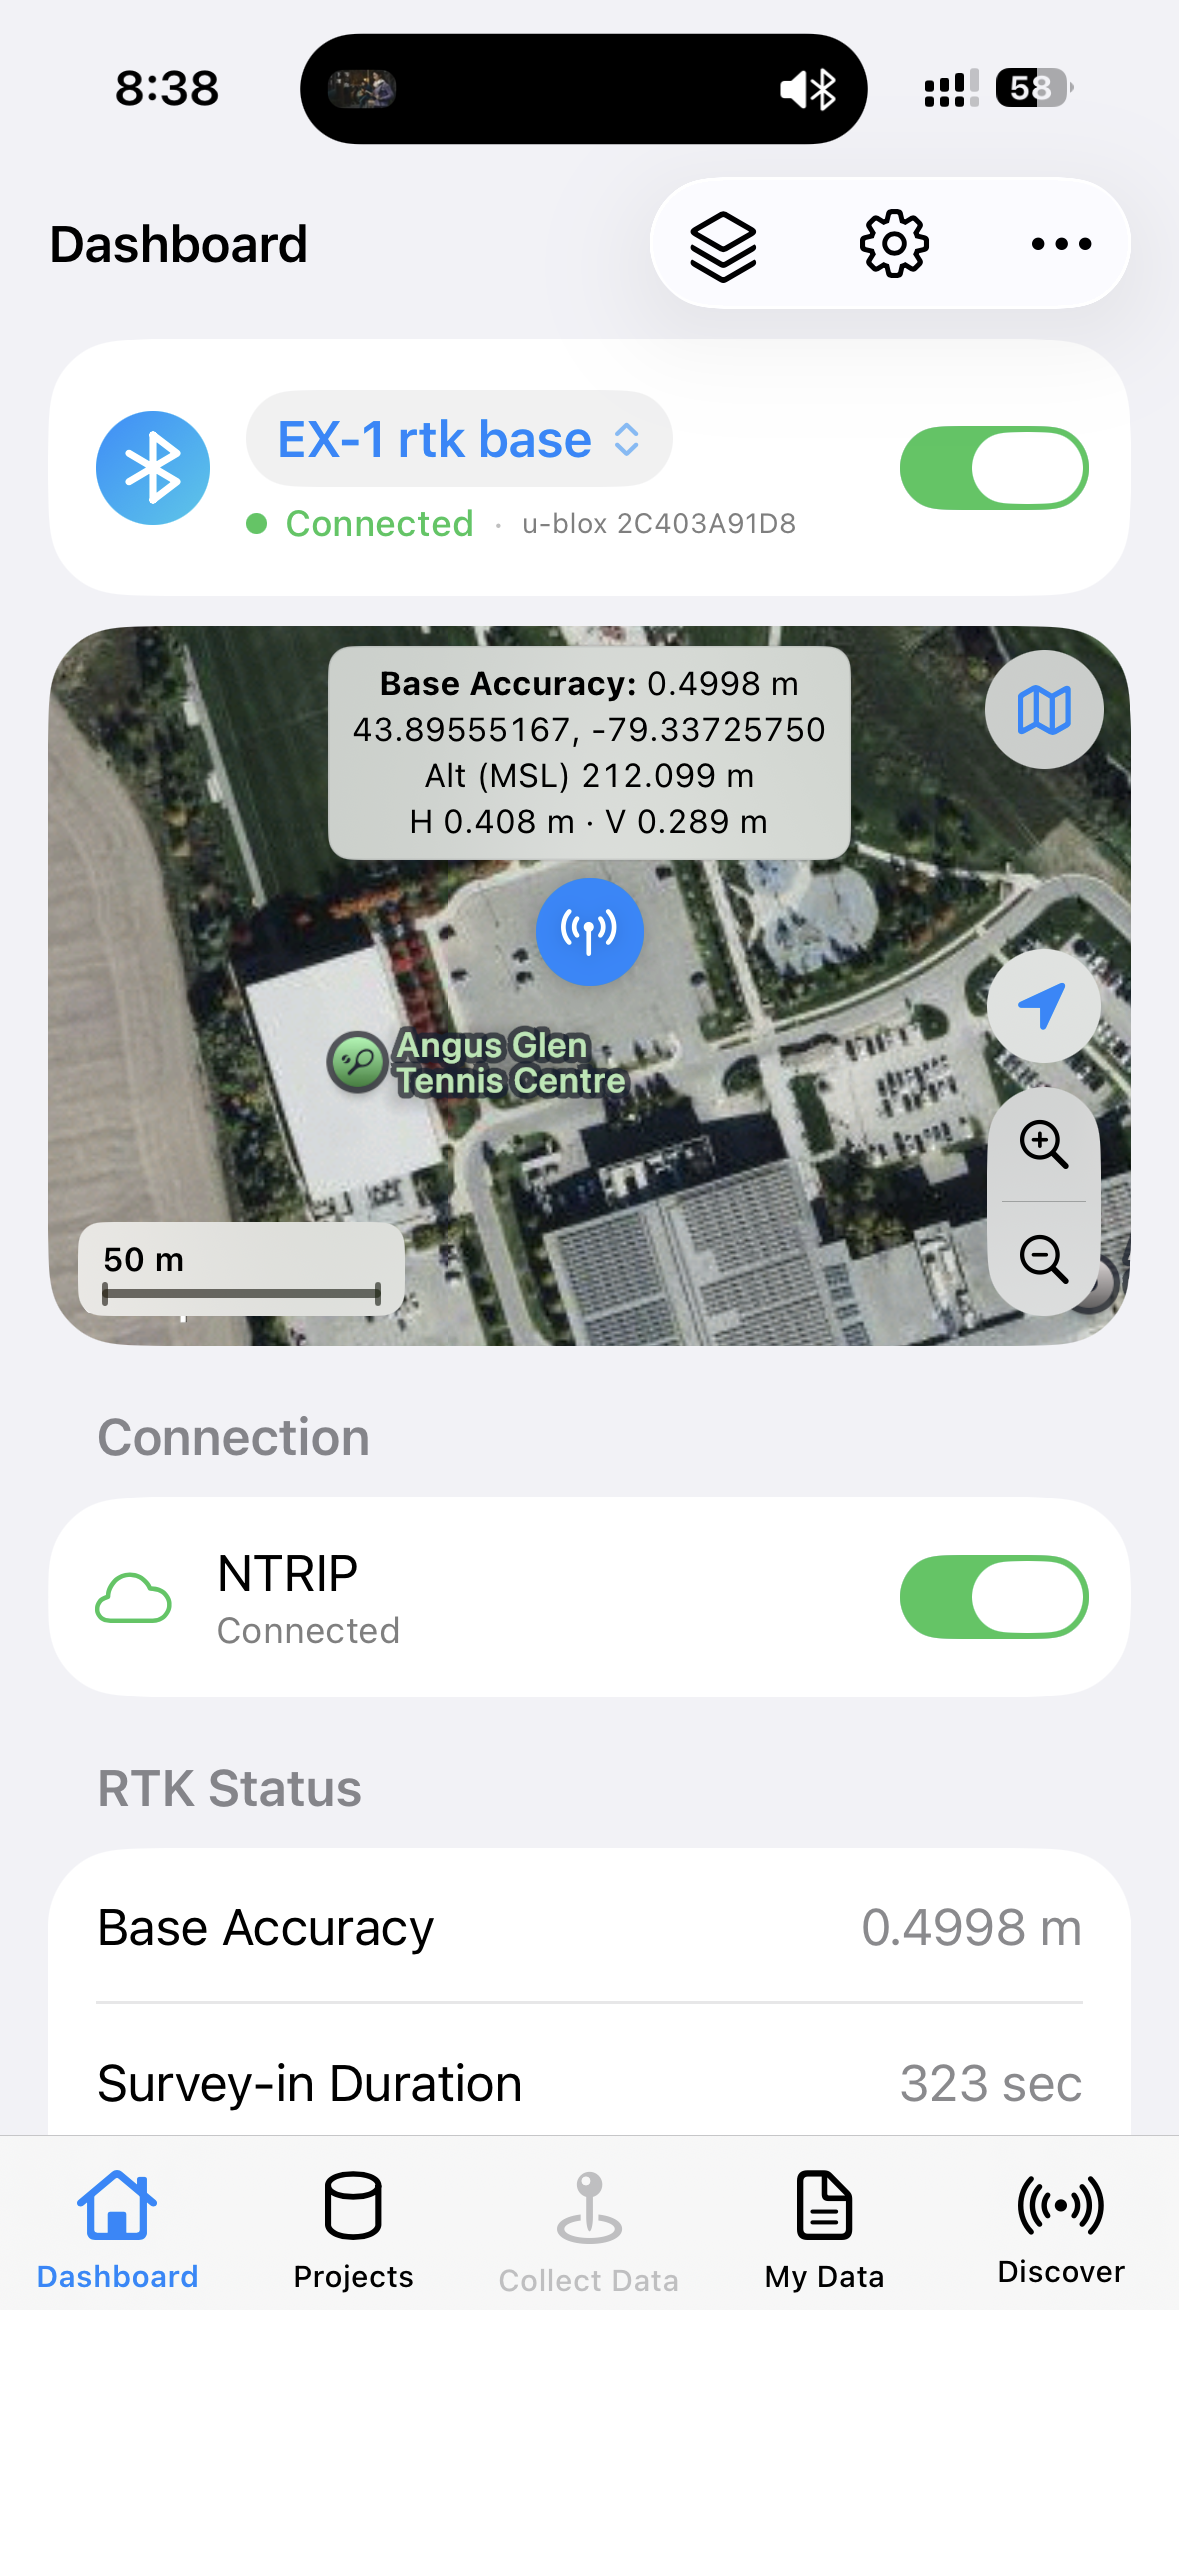
EX-1 Base Dashboard (Survey-in in progress or fixed).
5.6 NTRIP Server auto-reconnect after unexpected loss
After the Base NTRIP Server has connected to the caster and started uploading RTCM, if the caster, phone network, or TCP link drops unexpectedly, this App (iOS / Android, EX-1 / P-70) can automatically try to reconnect and resume uploading.
| Topic | Behavior |
|---|---|
| When it runs | Only after a successful first connection, then an unexpected loss—for example caster closed the session, network changed, upload write failed, or the App returned to the foreground and found the session dead |
| When it does not run | You manually turn off the Dashboard NTRIP toggle; initial caster connection failures (bad credentials, mount point, incomplete settings); receiver is no longer in Base mode |
| What is retried | TCP / NTRIP session only—no new Survey-in or receiver Base coordinate rewrite; pending RTCM is discarded while waiting (the receiver keeps producing new data; upload resumes after reconnect) |
| Protocol | Same as the first connect: NTRIP v2 POST first, then NTRIP v1 SOURCE fallback if rejected |
| Backoff | About 5 s → 15 s → 1 min → 5 min (then every 5 min) |
| Time window | Retries for 3 hours from the unexpected loss; then stops, shows gave-up status, and notifies you to check the Base device and network |
| BLE loss | If phone–receiver Bluetooth also drops, NTRIP reconnect pauses the clock; resumes after BLE is back (works with 1.4) |
| Foreground | When the App becomes active again, it checks immediately and retries if the window is still open |
| UI | Dashboard NTRIP toggle stays On; status may show Reconnecting to caster… (attempt 2) or next try in 45s, etc. |
| Notifications | Local notifications on unexpected loss, restored upload, and 3-hour give-up (if the OS allows notifications) |
| Logs | NTRIP Log Console records each scheduled attempt and outcome |
| Setting | Dashboard … → Connection → NTRIP Server auto-reconnect (default On); independent from Bluetooth Auto-reconnect |
How this differs from Bluetooth auto-reconnect:
- 1.4 restores phone ↔︎ receiver Bluetooth after an unexpected drop.
- This section restores phone ↔︎ NTRIP caster upload when that link drops while Bluetooth may still be fine.
- Both can apply: BLE loss pauses upload; caster-only loss is retried by this feature.
How to stop: Turn off the Dashboard NTRIP toggle, or disable NTRIP Server auto-reconnect under Connection.
Chapter 6: RTK Rover
6.1 When to use Rover
Field survey, stakeout, and RTK fixed solutions: the Rover pulls RTCM from a caster.
Prepare CORS / NTRIP first: the Rover does not generate centimeter corrections itself—it must get RTCM from a CORS network or your own Base+Caster. Ask your provider for account, mount point, and port (see 2.1.4).
6.2 EX-1 / P-70 Rover quick flow
- RTK Settings → RTK GNSS → Role = Rover.
- Fill NTRIP Client (Host / Port / Mount Point / credentials from your CORS or NTRIP provider).
- Connect the device; turn on NTRIP on the Dashboard.
- Wait for Fix to reach RTK Float or ideally RTK Fixed.
- Then collect or stake out.
6.3 Can I survey yet?
| Status | Guidance |
|---|---|
| No Fix | Check antenna, sky view, Bluetooth |
| GPS Fix / DGPS | Navigation-grade; wait for RTK for high-precision work |
| RTK Float | Differentials present; usually better than single point, may still drift |
| RTK Fixed | Typically used for centimeter points / stakeout (still environment-limited) |
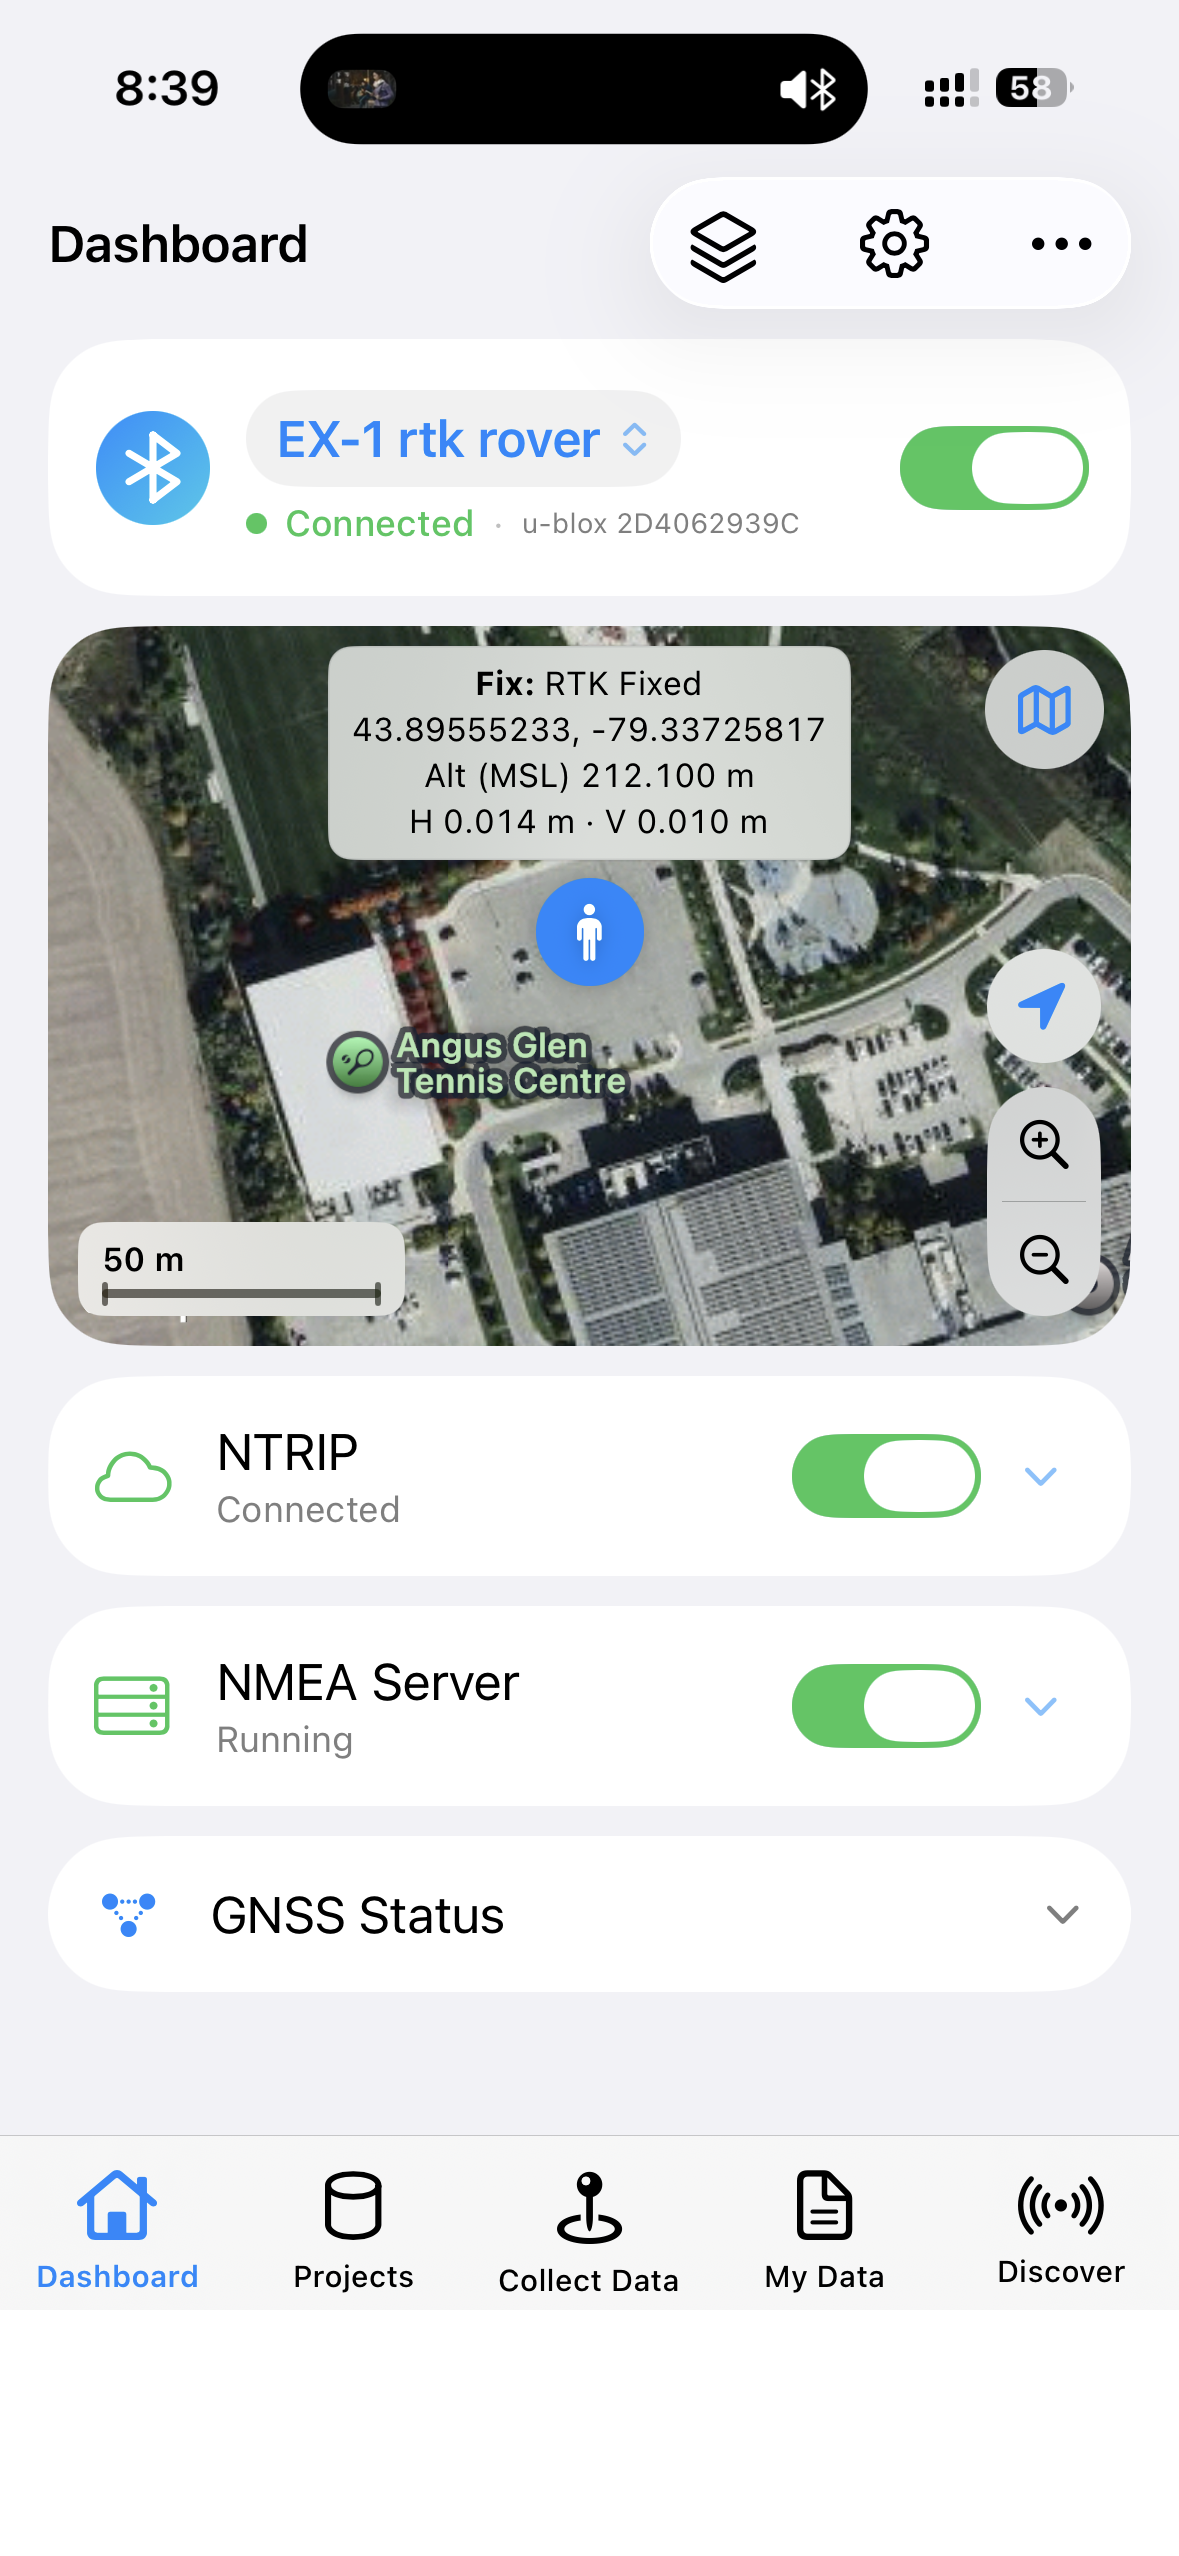
Rover Dashboard showing RTK Fixed with NTRIP connected.
Chapter 7: EX-1 vs P-70
Both support RTK Rover / Base, but Survey-in, permanent save, and Output Rate differ:
| Item | EX-1 | P-70 Ultra |
|---|---|---|
| BLE name (discoverable) | EX-1 NTRIP BLE |
P-70 Ultra NTRIP BLE |
| RTK Rover / Base | Supported | Supported |
| Survey-in | App Duration / Accuracy (mm) fields, etc. | Receiver Managed (Receiver-managed option) |
| Fixed coordinates | Supported; Apply / Save to receiver | Supported; can save to P-70 |
| Permanent write | Apply Temporarily / Save Permanently (UBX BBR/Flash) | Save … to Device (P-70 flow; follow UI labels) |
| In-app Output Rate | No (factory / other tools) | Yes: 1 / 5 / 10 / 20 Hz, savable |
| hAcc / vAcc source | u-blox UBX | HPPOSLLH, etc. |
Most screenshots and step-by-step examples use EX-1; for P-70 follow this table plus Receiver-managed in RTK Settings.
Chapter 8: Projects
8.1 What is a Project?
One Project = one local database file containing:
- Points
- Tracks
- Stakeout-related data
Only one Active project at a time.
Collect Data and My Data both read/write the Active project.
8.2 Common actions
| Action | Notes |
|---|---|
| New | Create an empty project |
| Tap a list item | Make it the Active project |
| Rename | Rename |
| Delete | Delete the project and all its data (irreversible) |
| Import Project | Import a previously exported .gpkg as a new project (does not auto-activate) |
| Export Project | Export a full GeoPackage for backup / archive |
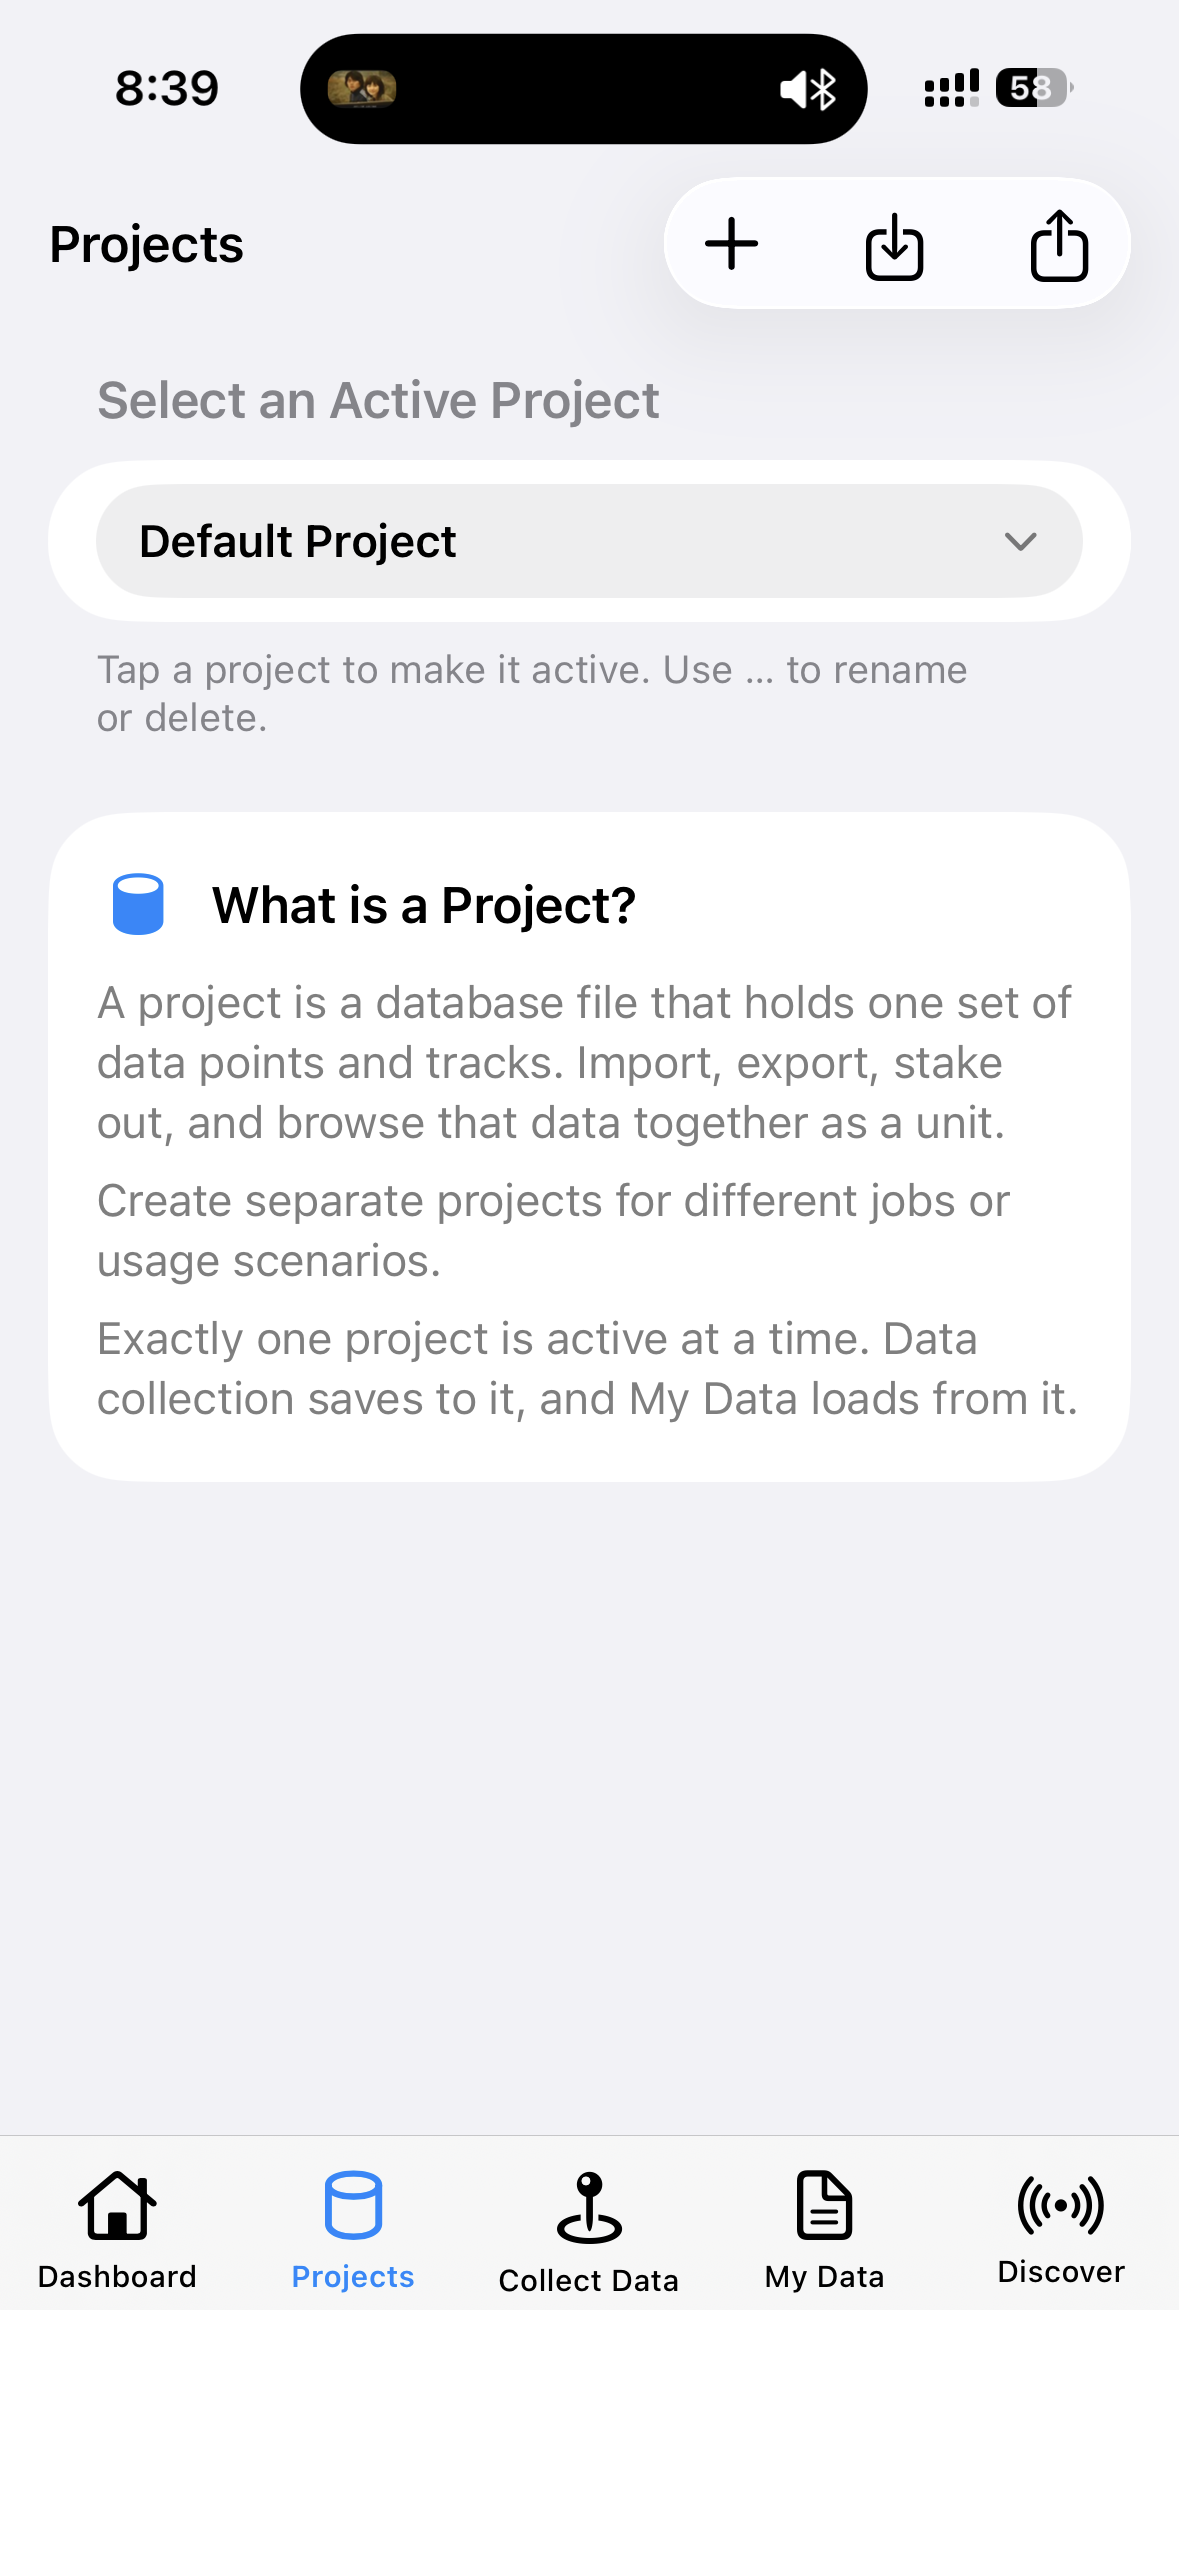
Projects page with an Active mark and at least one non-default project.
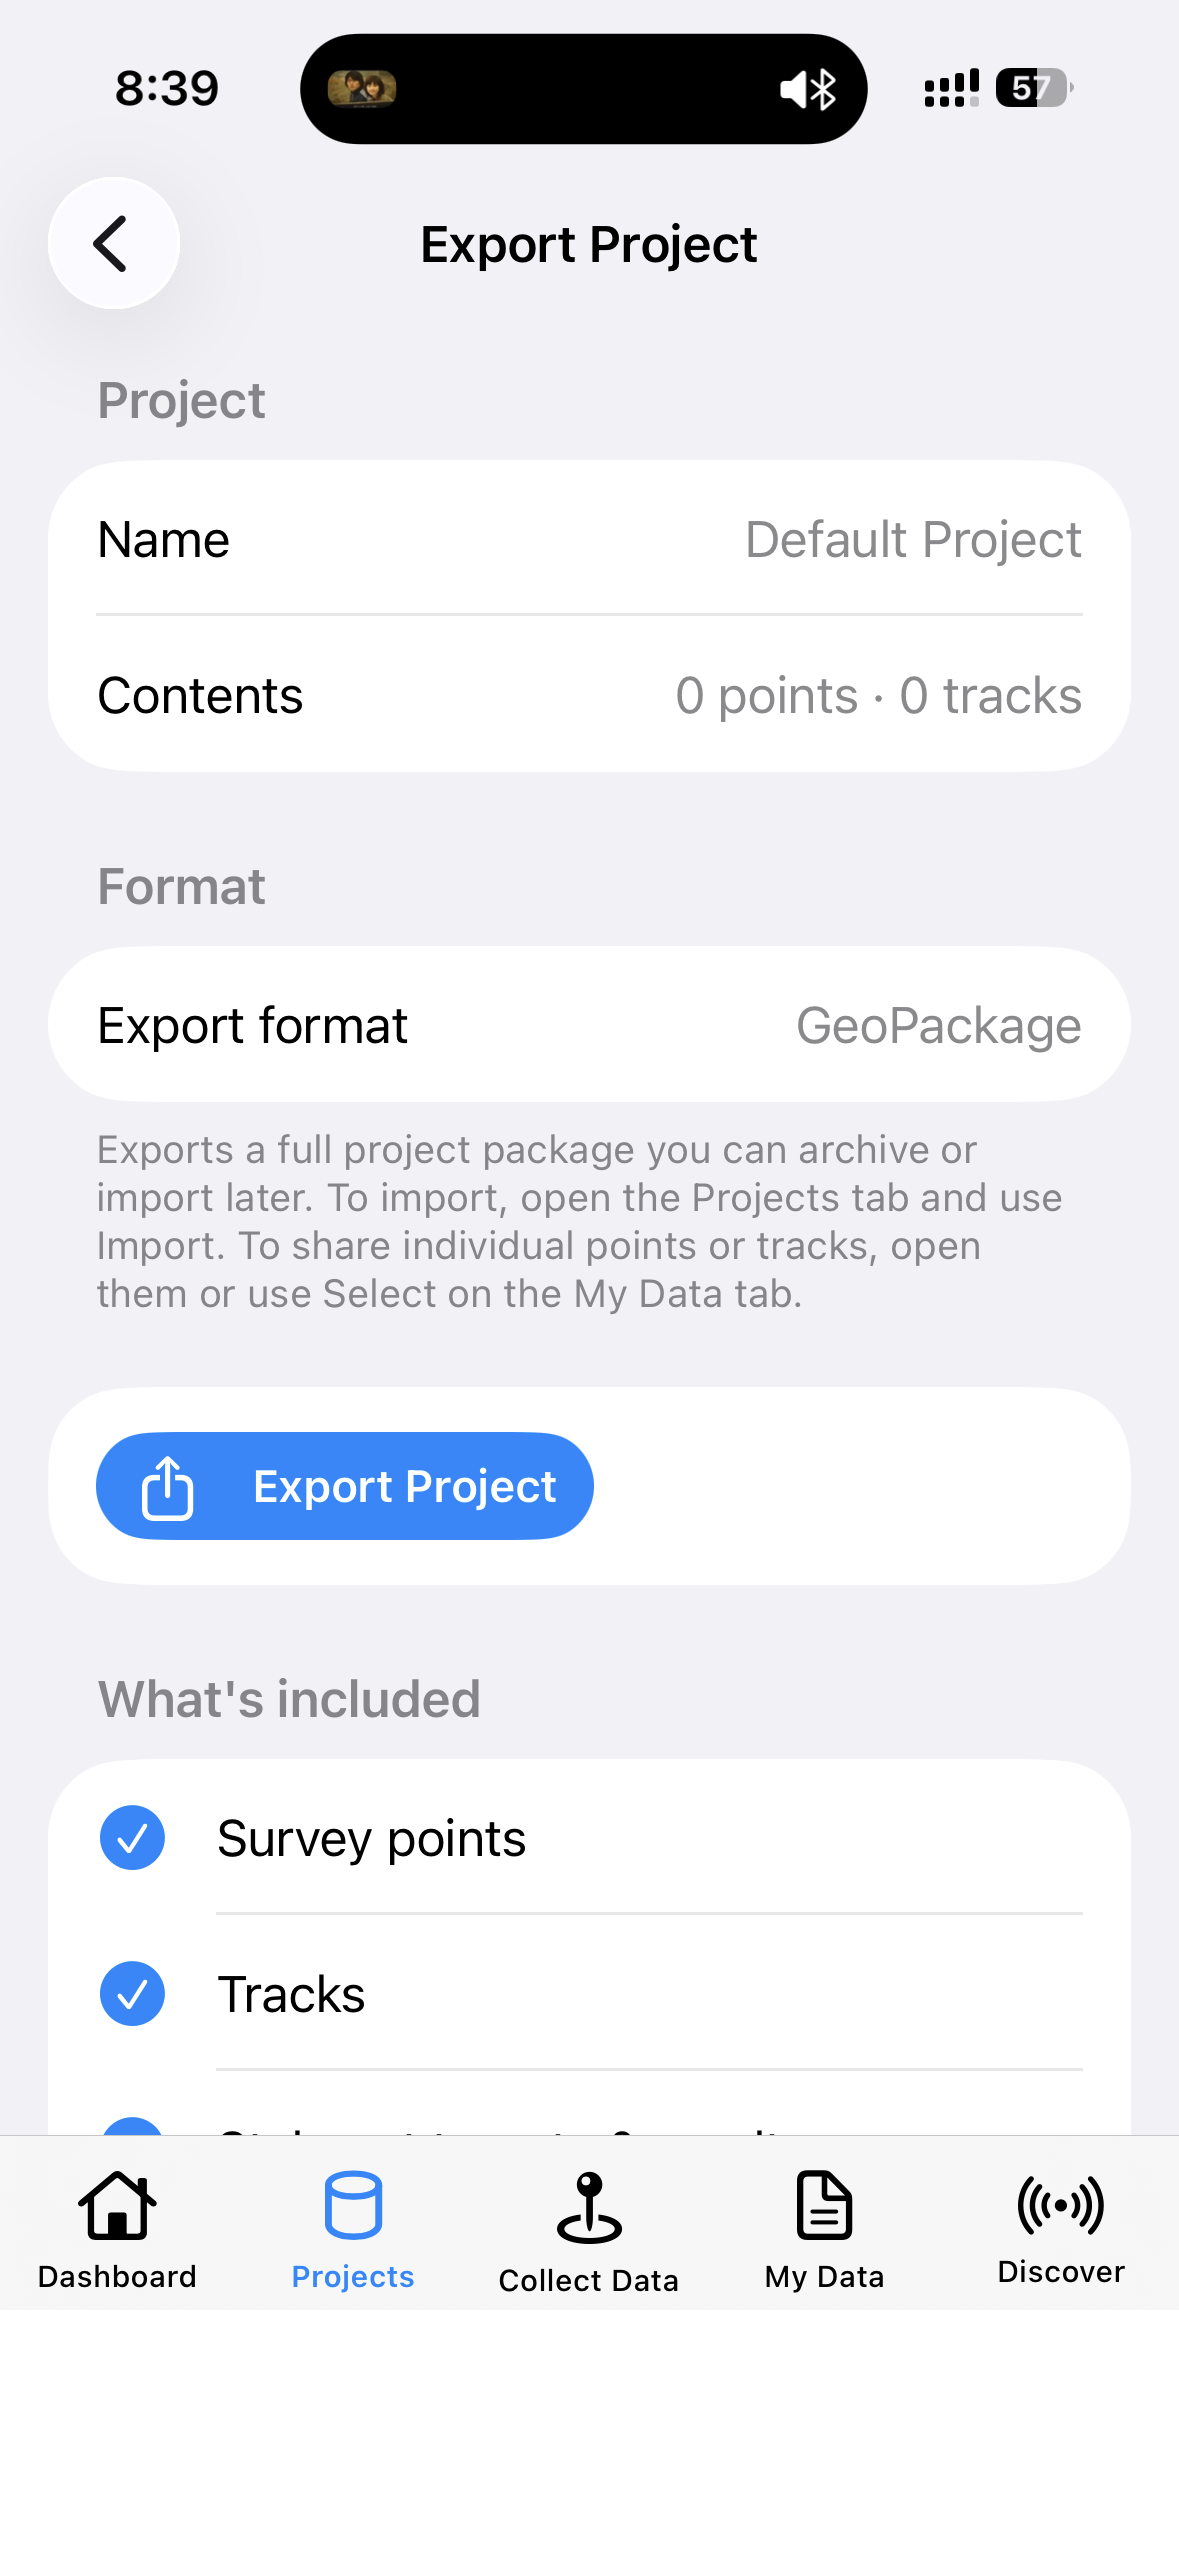
Export Project prepare / share UI.
8.3 Tips
- One site / client / field job → one project, to avoid mixing data.
- Export Project for backup when the job ends.
Chapter 9: Collect Data
9.1 When is it available?
All of the following must be true:
- An Active Project is selected
- Dashboard role is Rover (not Base)
Normal collection (live GNSS, Start Tracking / Start Observation) also requires:
- The receiver is connected
Exception — interrupted recovery: If a Collect Point or Record Track session was interrupted by a receiver disconnect in the same Active Project, Collect Data stays available without a connection so you can Finalize or Discard the saved data. If you switch to a different project, Collect Data is grayed out until you return to the project where the interruption occurred.
Otherwise Collect Data may be grayed out; tapping explains why. OK can jump to Dashboard to connect.
9.2 Status banner during collection
While a track or point collection is in progress, a banner appears at the top of the App:
| Banner | Meaning |
|---|---|
| Track Recording (red) | A track is being recorded |
| Point Collection (blue) | A point observation is in progress |
| Track Interrupted (orange) | Track recording stopped because the receiver disconnected |
| Point Interrupted (orange) | Point collection stopped because the receiver disconnected |
Tap the banner to return to Collect Data. During an interruption, this opens the recovery screen (see 9.6).
9.3 Two modes
Top switch:
- Collect Point: single survey point (optional short averaging)
- Record Track: continuous track points at a chosen rate
The page also shows Live GNSS Position and a map.
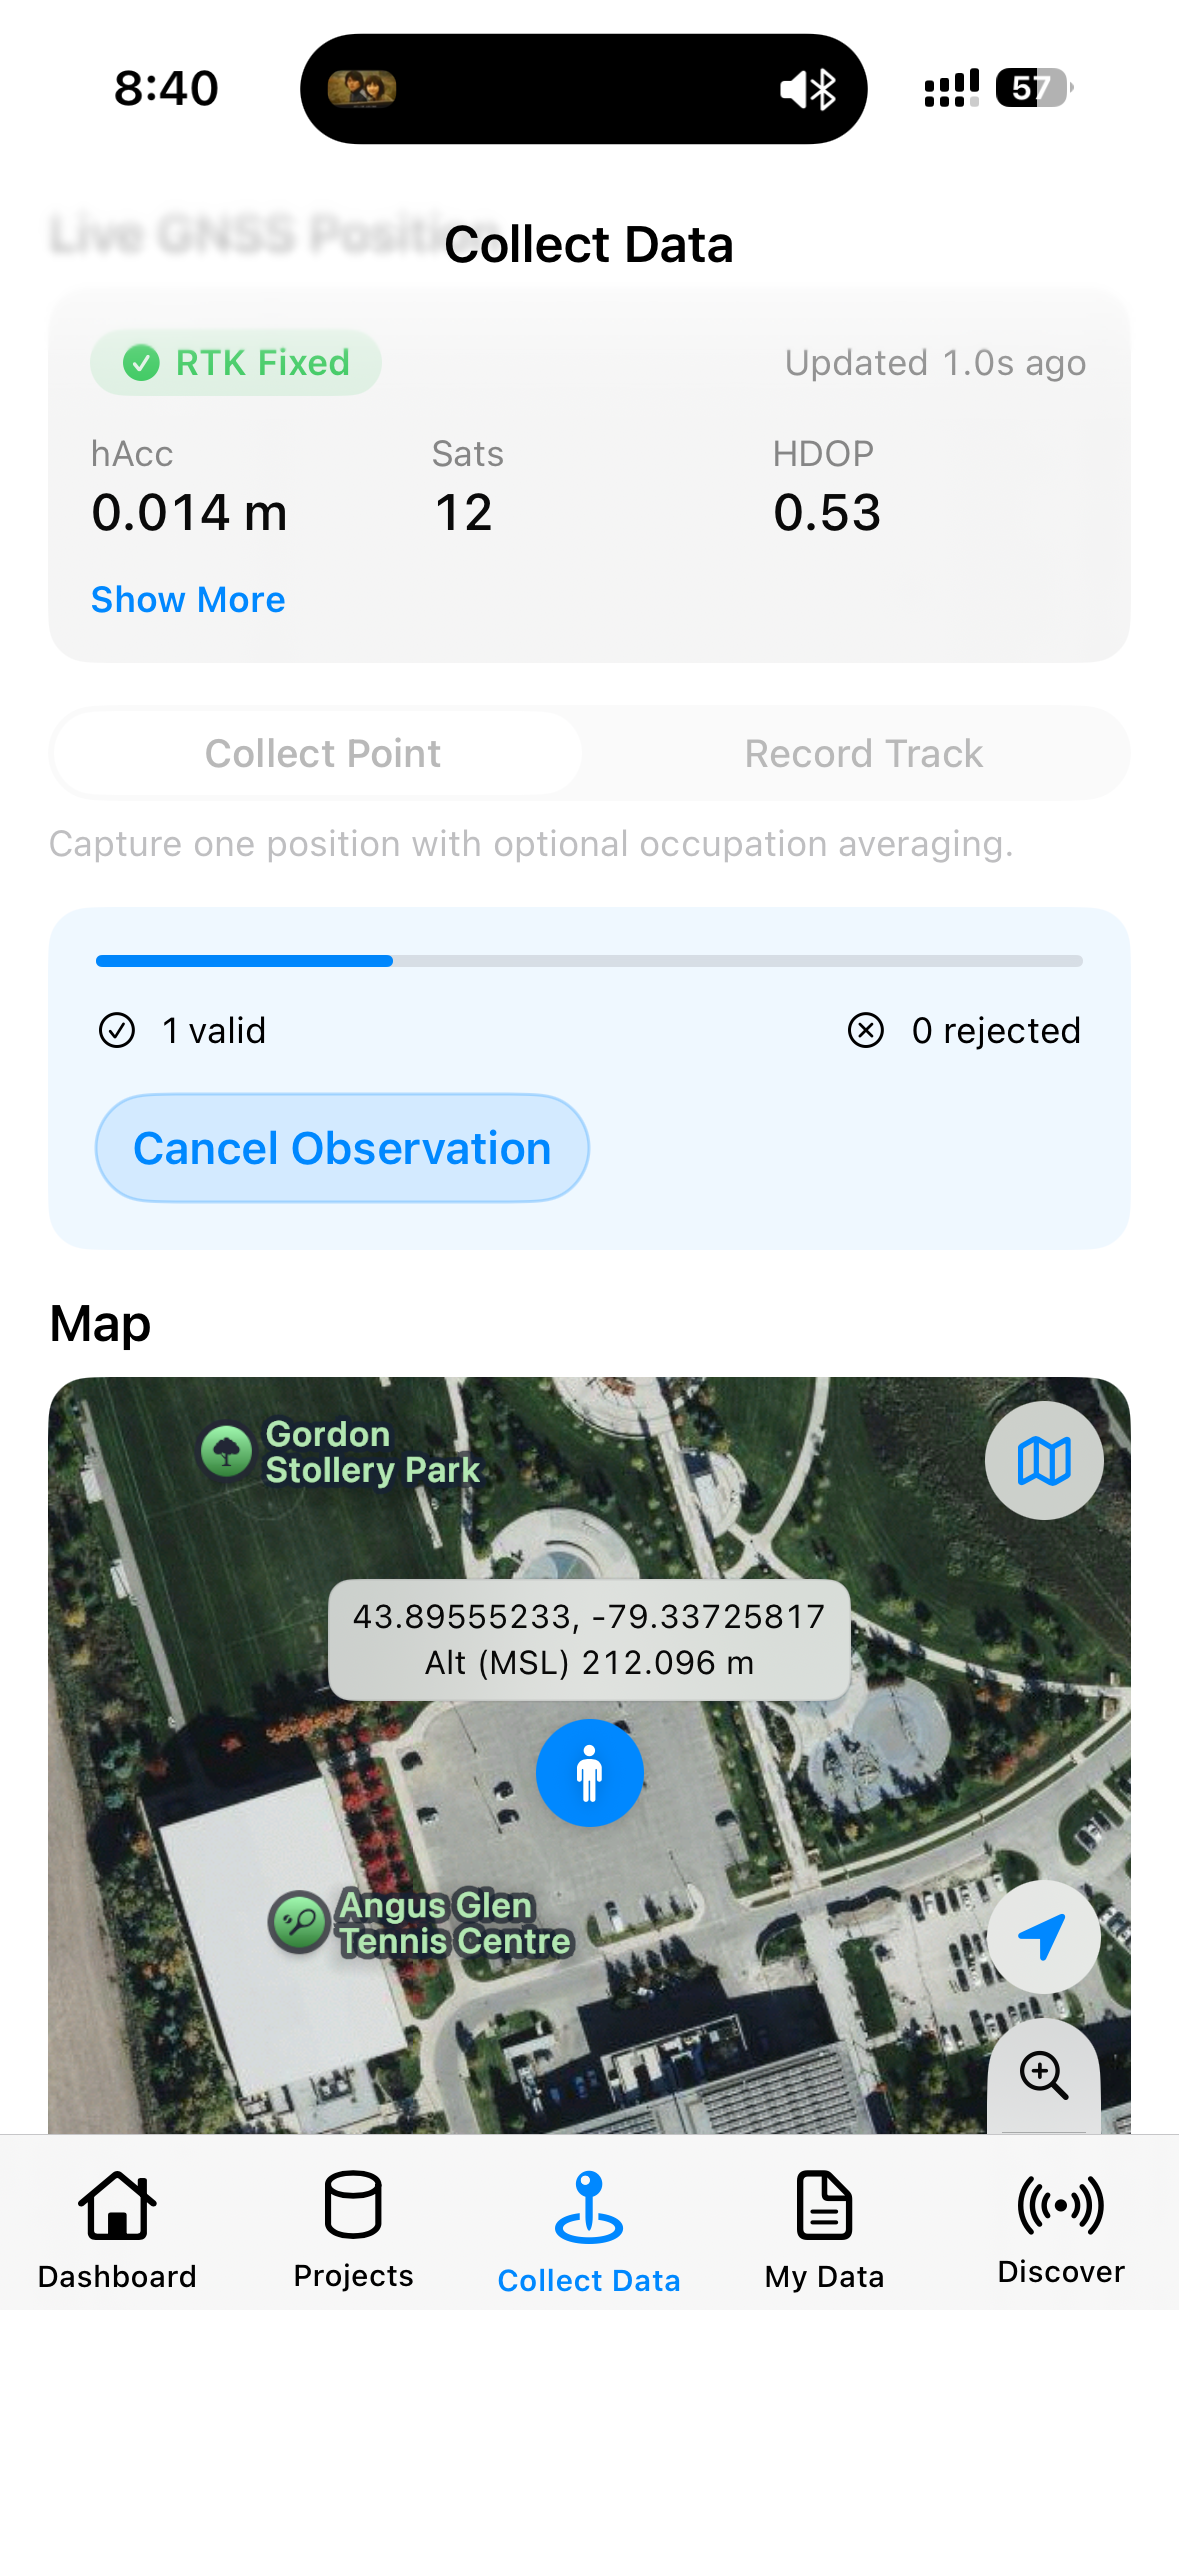
Collect Data in Collect Point mode with live coordinates.
9.4 Collect Point
- Enter name (optional; empty becomes something like
Point <timestamp>) and notes. - Set Occupation: 1–30 seconds, default 5.
- Tap Start … Observation.
- Wait: the App averages valid epochs and shows valid / rejected counts.
- Preview, then Save Point, or Retake / Cancel Observation.
Tip: For high-precision points, observe under RTK Fixed and keep the pole still.
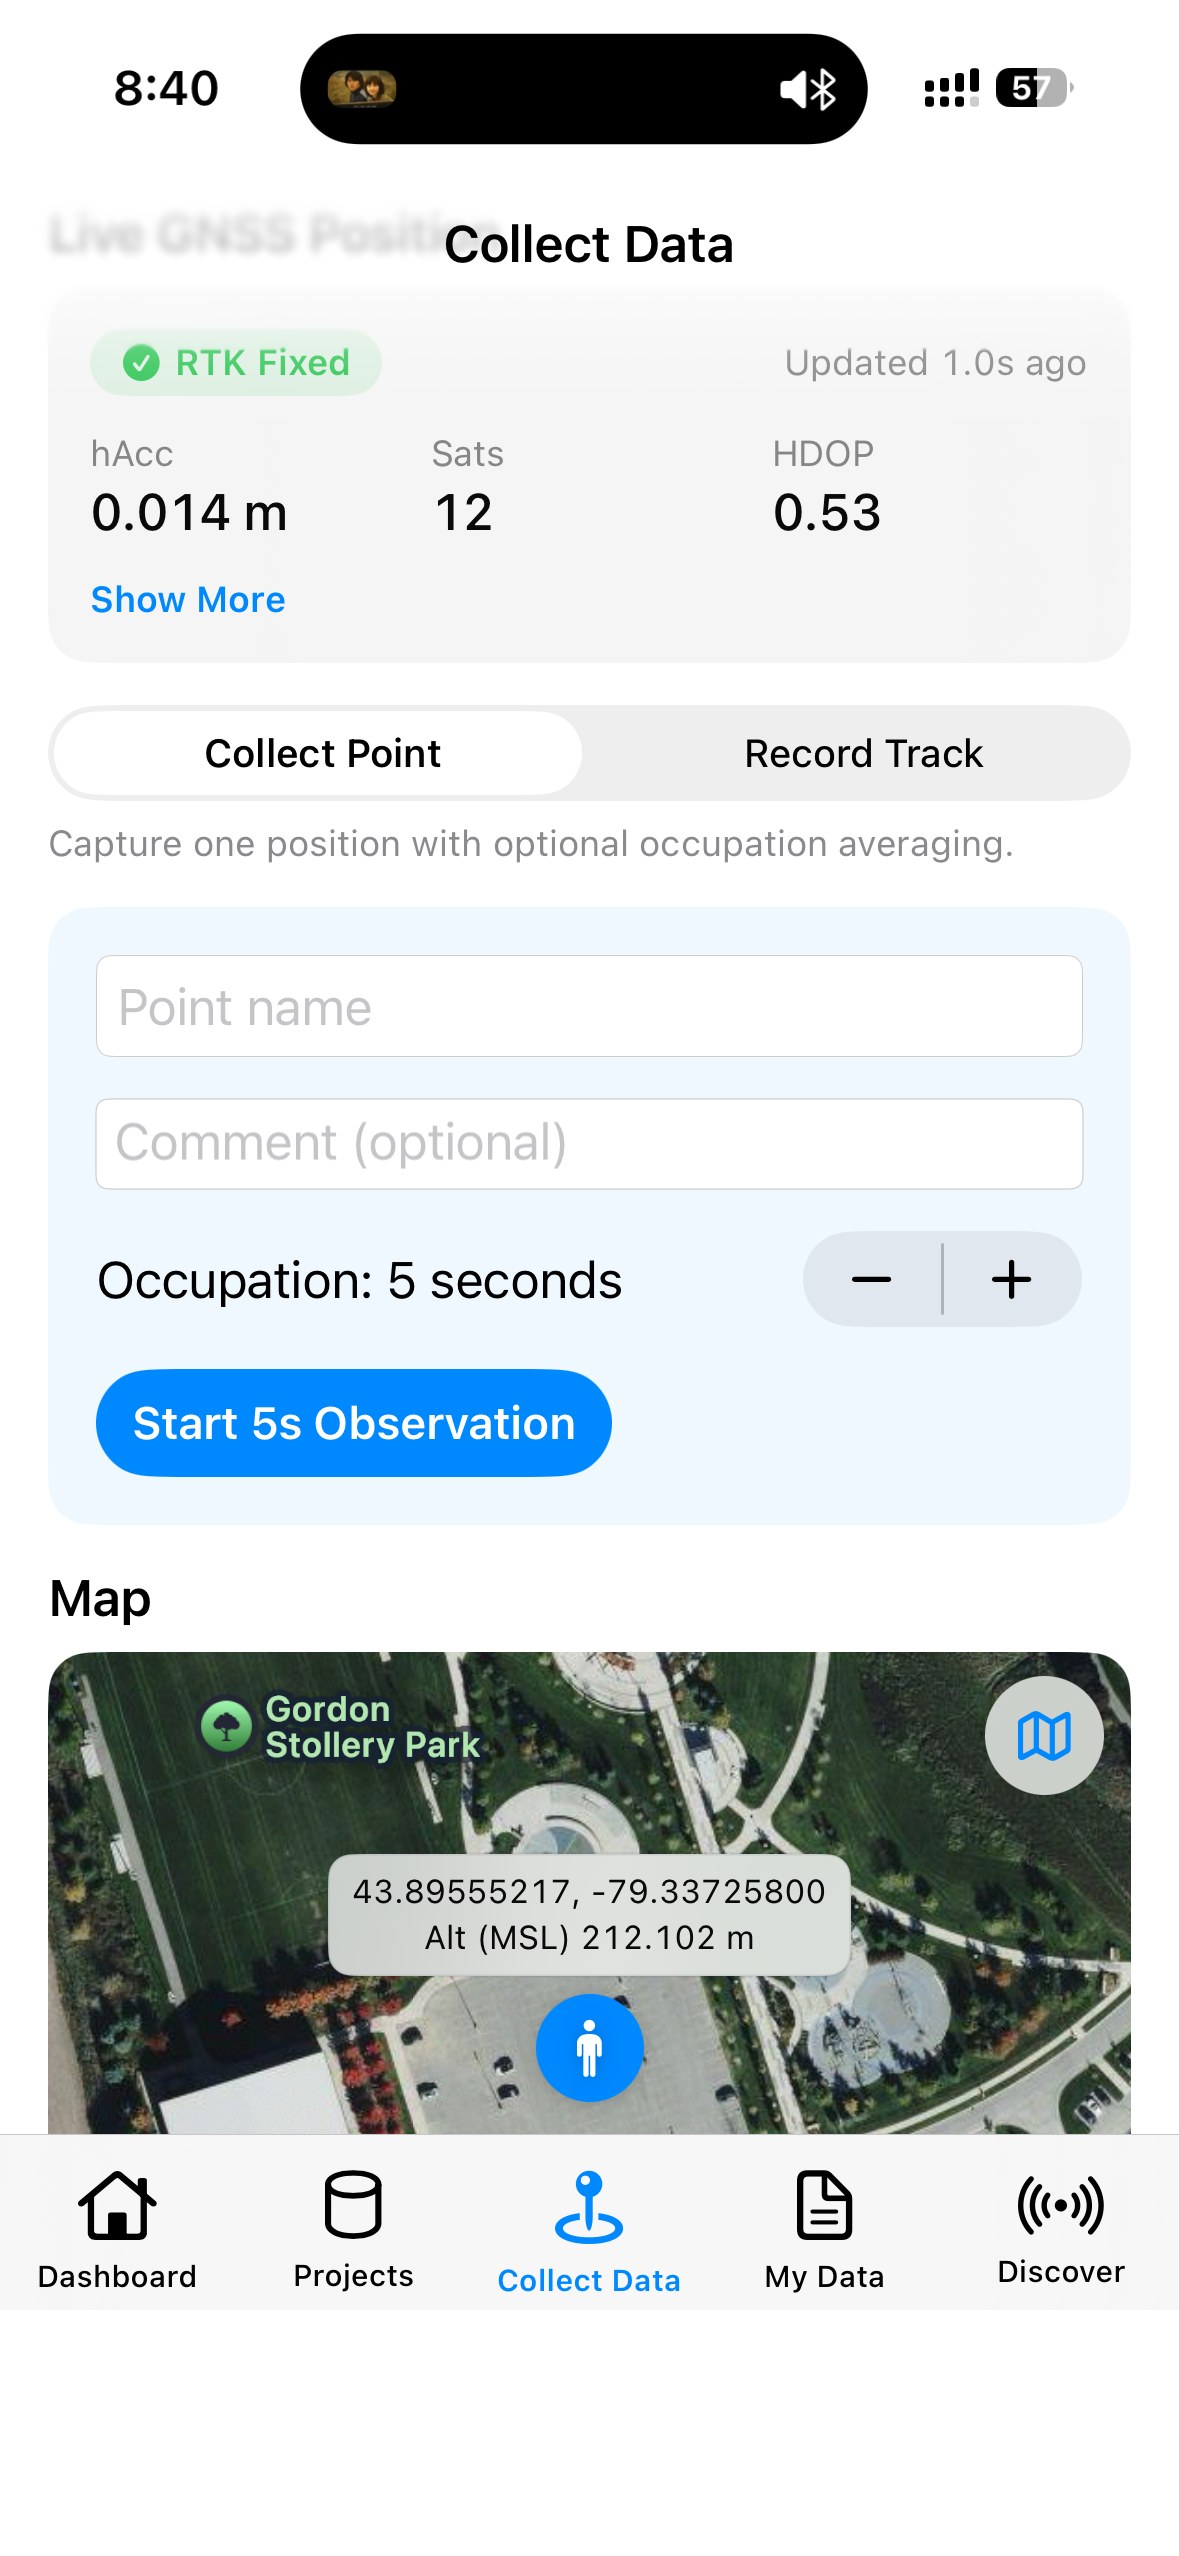
Observation in progress with progress and valid/rejected counts.
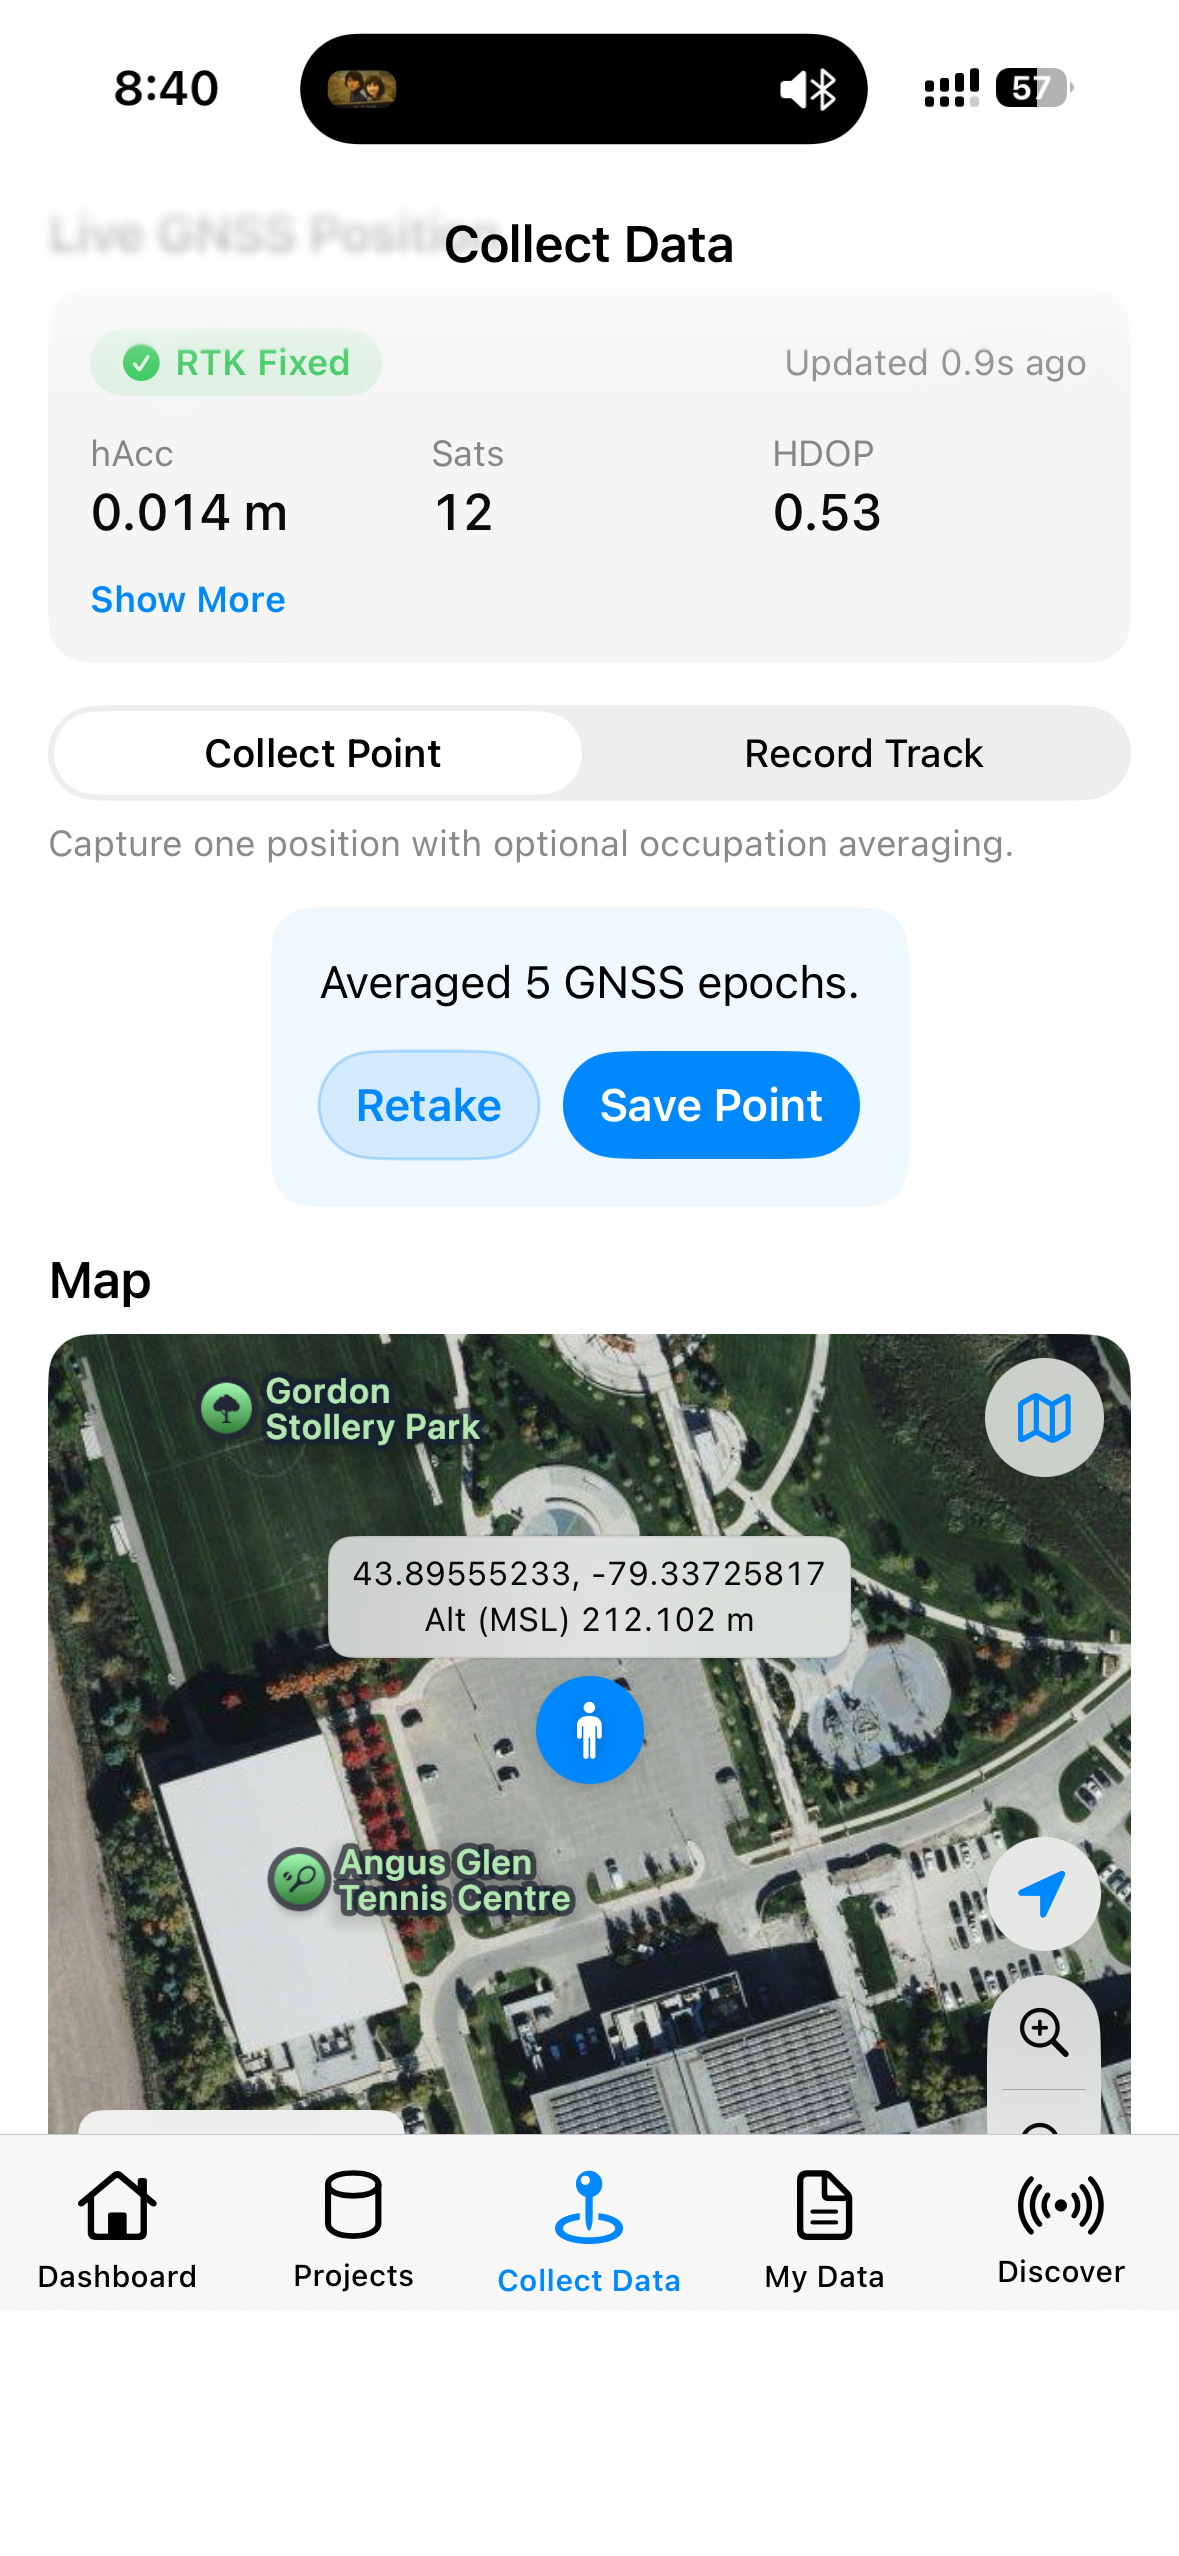
Observation finished, ready to Save Point.
9.5 Record Track
- Enter name and notes.
- Choose Frequency (default 1 Hz). Options include:
- Raw Update Rate — log every valid position from the current receiver stream with no time thinning; does not change the receiver Output Rate. For denser tracks, raise Output Rate on the Dashboard first. Selecting Raw shows an orange note about battery use and project size.
- 1 Hz / 0.5 Hz — thin by GNSS epoch time (not the phone’s receive time); an occasional +1 s gap is normal.
- Every 5 seconds … every hour — same GNSS-time interval logic.
- Choose Fix Level (minimum quality):
- Any fix
- DGPS+
- RTK Fixed
- Start Tracking → Pause / Resume / Stop.
- The UI shows Recorded samples (written to the track), Rejected samples (filtered out), distance, etc.
Output Rate vs Frequency
- Output Rate (Dashboard): how fast the receiver outputs fixes.
- Frequency (Collect Data): how many points the App logs. Raw keeps valid epochs; 1 Hz etc. filter by GNSS time—points skipped by the interval gate are not counted as Rejected.
What still counts as Rejected: fix below Fix Level, non-increasing GNSS time, or implausible jump (>150 m/s vs the previous point). With Raw + Any fix and a stable fix, Rejected should stay near zero.
If Bluetooth drops during recording, see 9.6 Interruption handling.
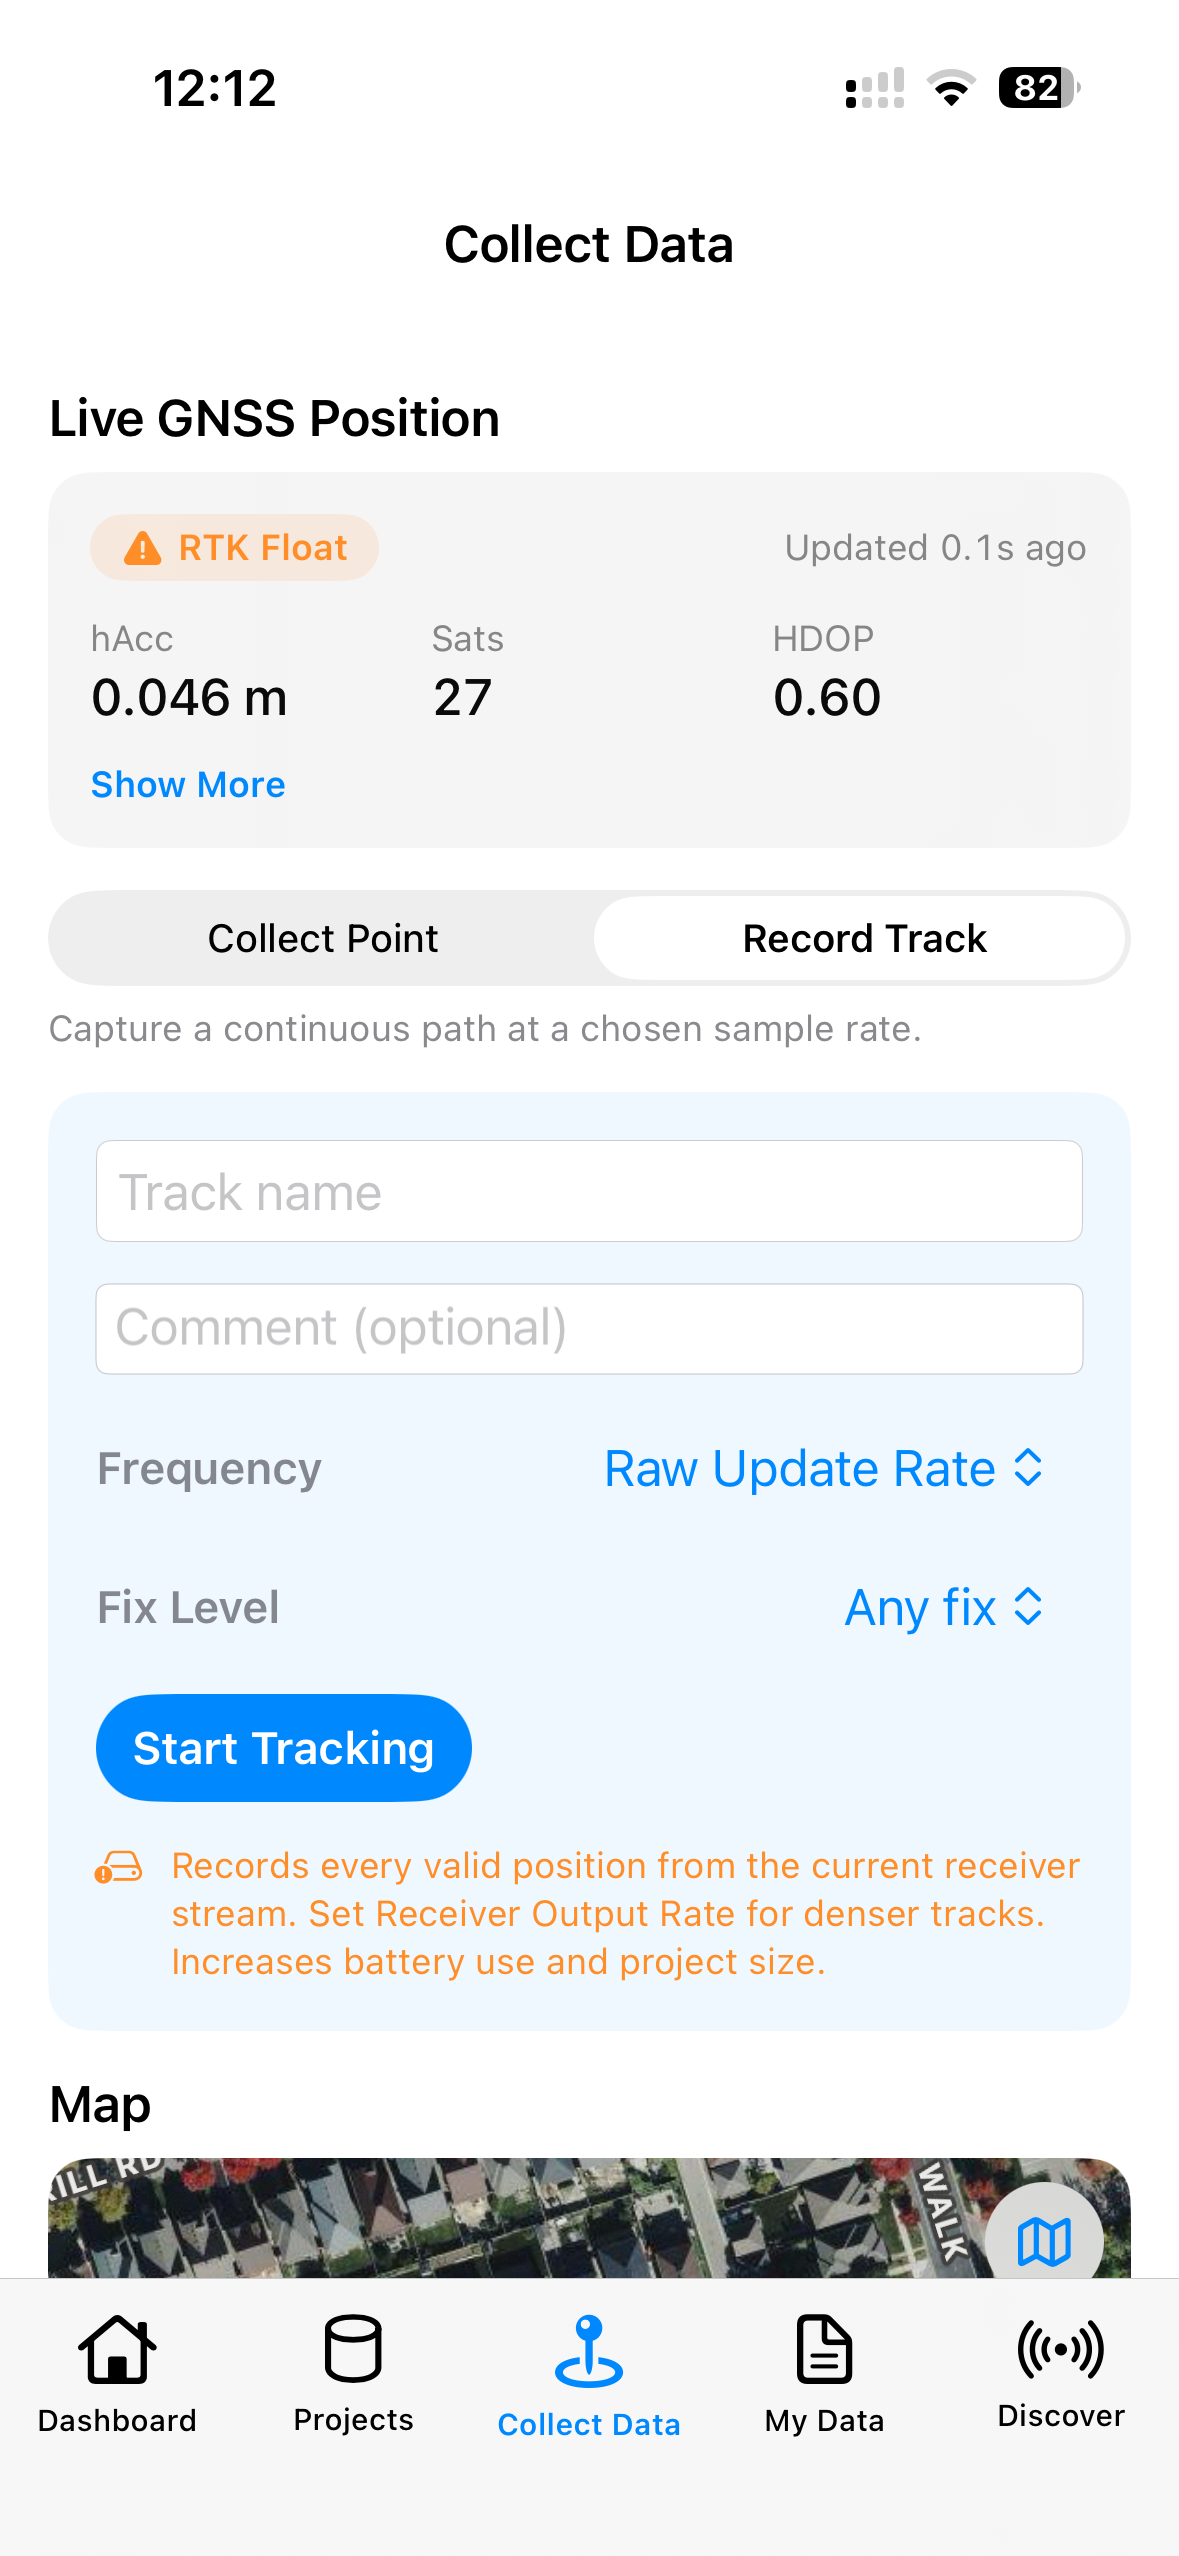
Record Track setup: Frequency = Raw Update Rate, orange note visible.
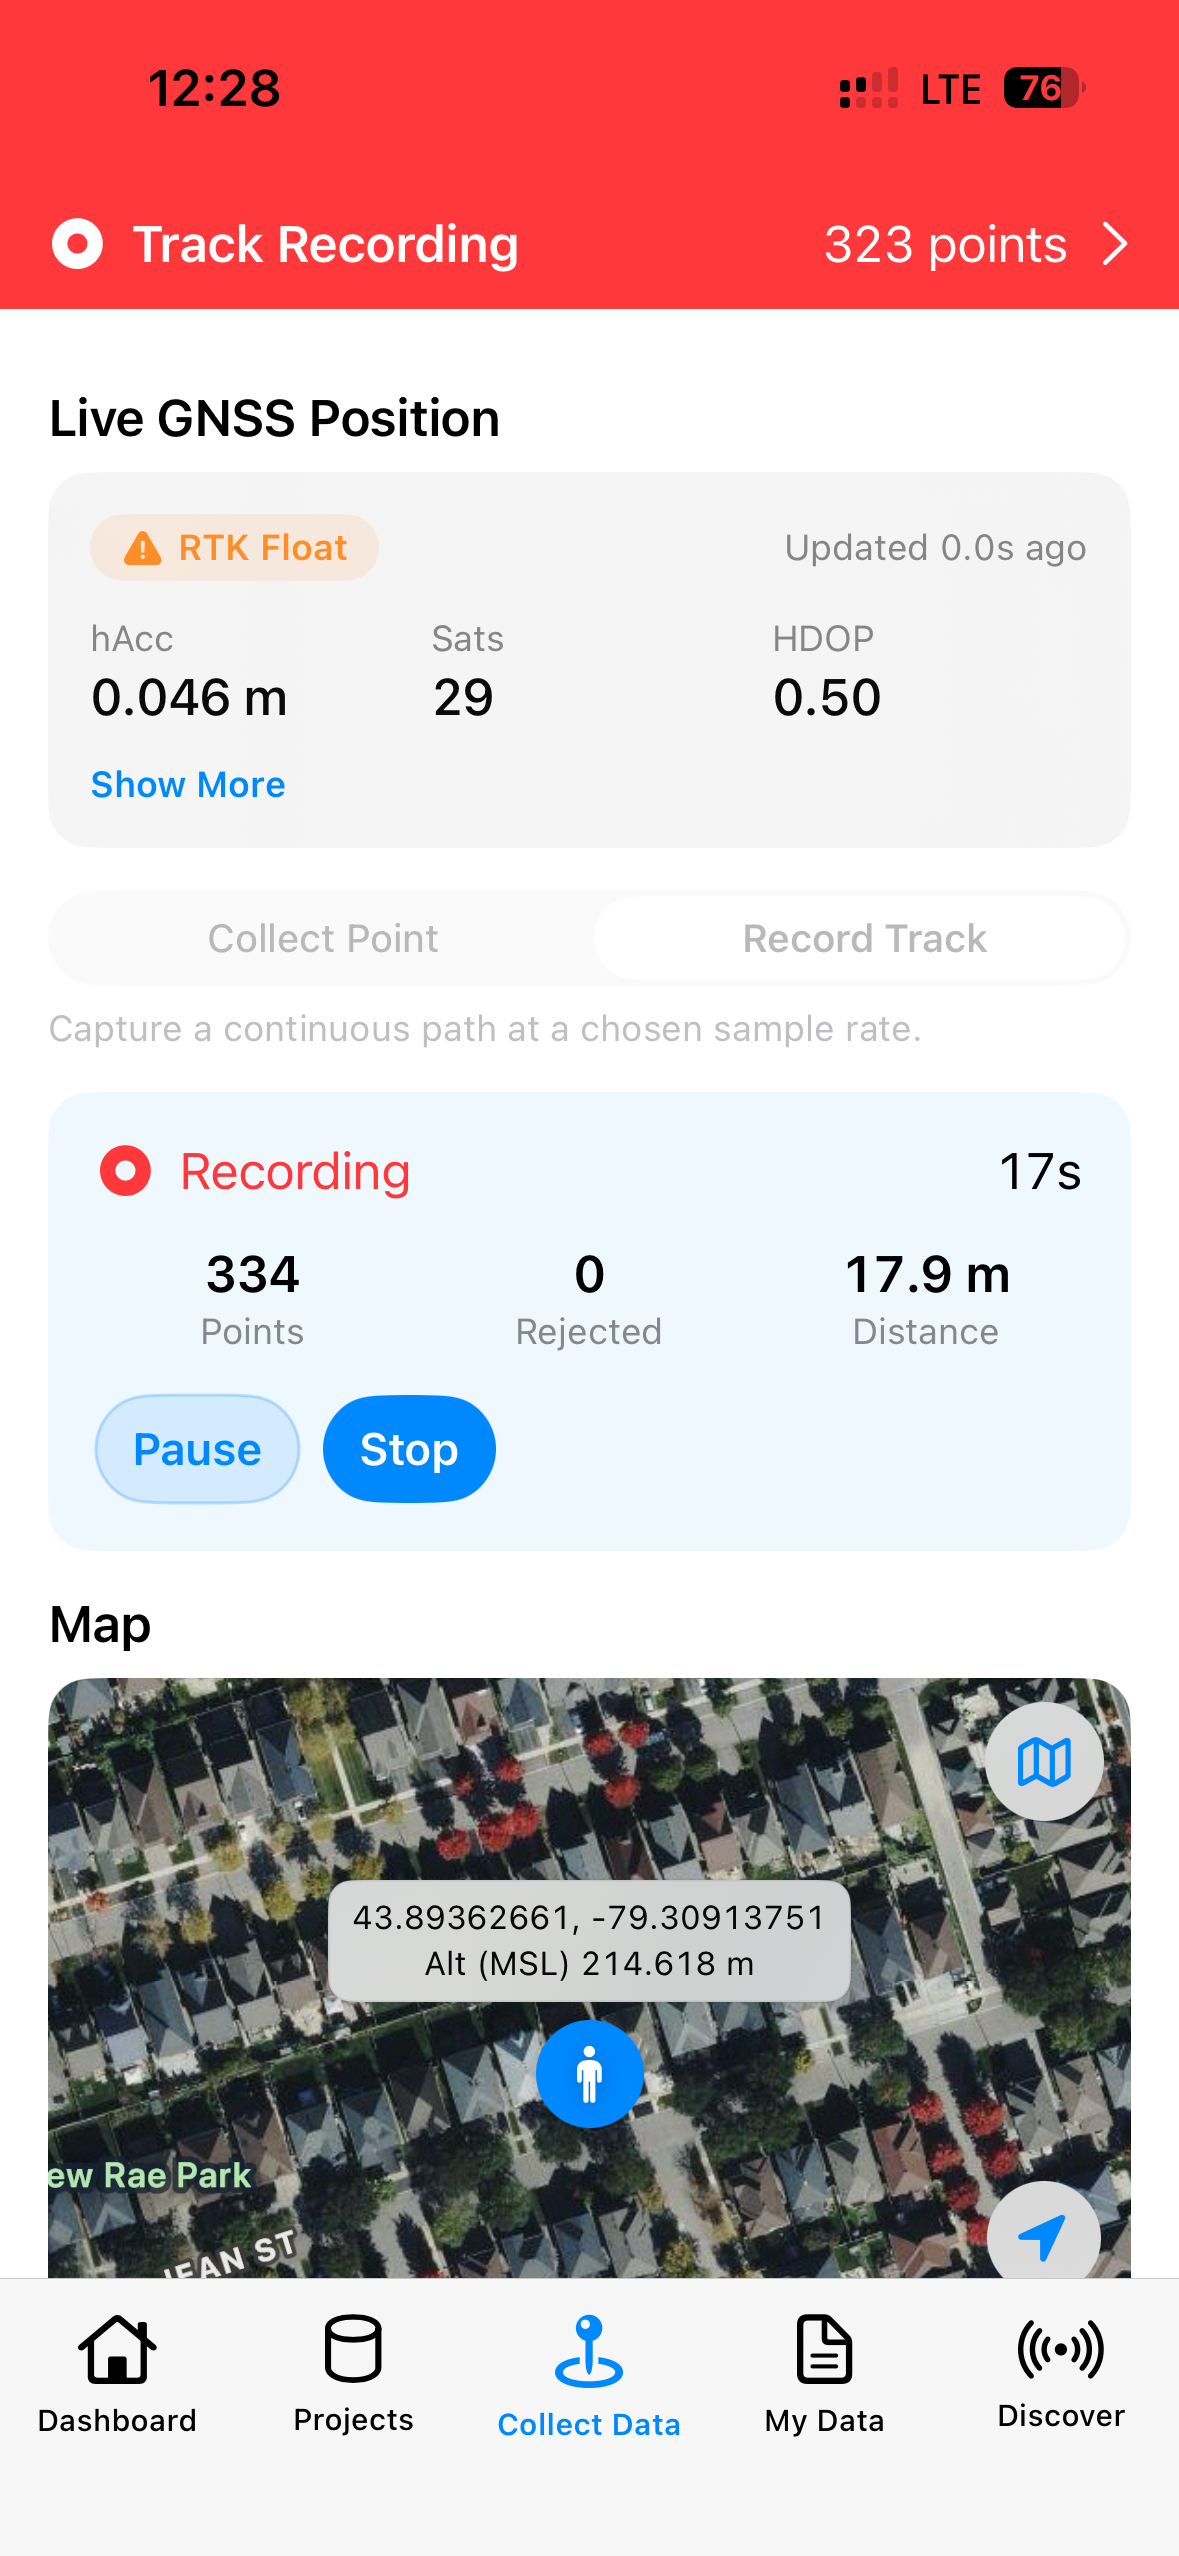
Record Track in progress (Raw example): Recorded samples should dominate; Rejected should stay low.
9.6 Interruption handling (receiver disconnect)
When Record Track or Collect Point is active and the receiver disconnects before you save, the App keeps the data collected so far on the device.
How to open recovery
- Tap the orange Track Interrupted or Point Interrupted banner, or
- Open Collect Data (enabled for the same Active Project even without a connection).
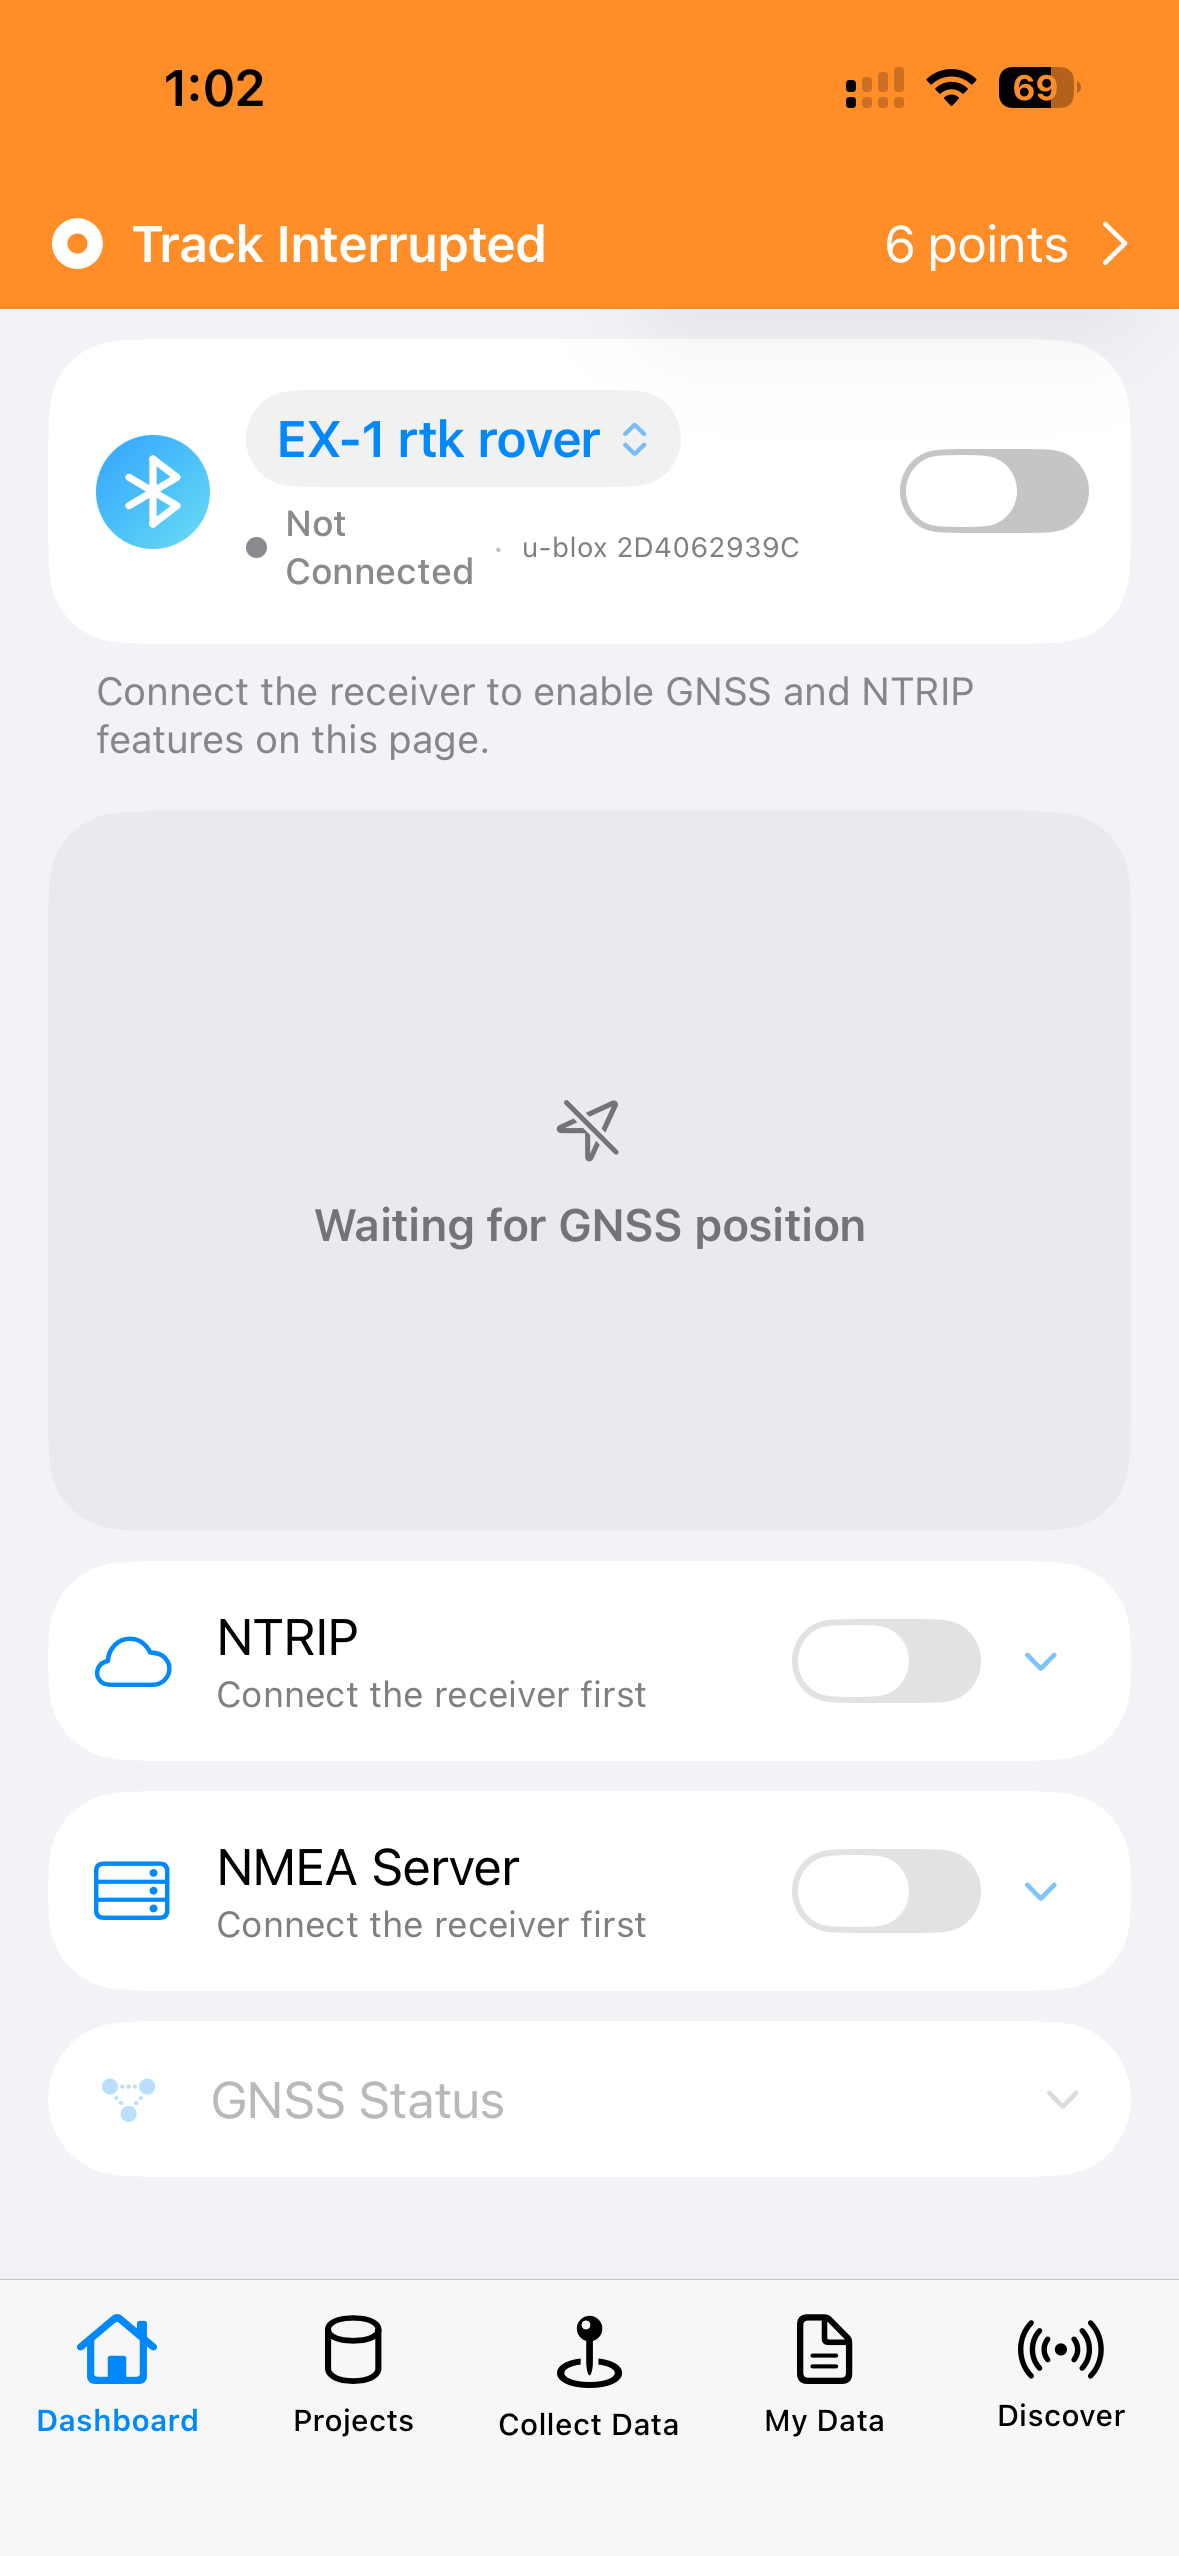
Orange interrupted banner at the top (tap to open recovery).
Recovery screen
- Explains that the receiver disconnected and your data is saved on the device.
- Shows a short summary (for example track point count and distance, or point epoch count).
- Finalize — saves the collection the same way as Stop (track) or Save Point (point), then opens the point or track detail page.
- Discard — deletes the unfinished collection after you confirm (cannot be undone).
- Resume is not shown on this screen. To continue the same track after a disconnect, reconnect the same receiver from Dashboard and use Resume on the normal Collect Data page.
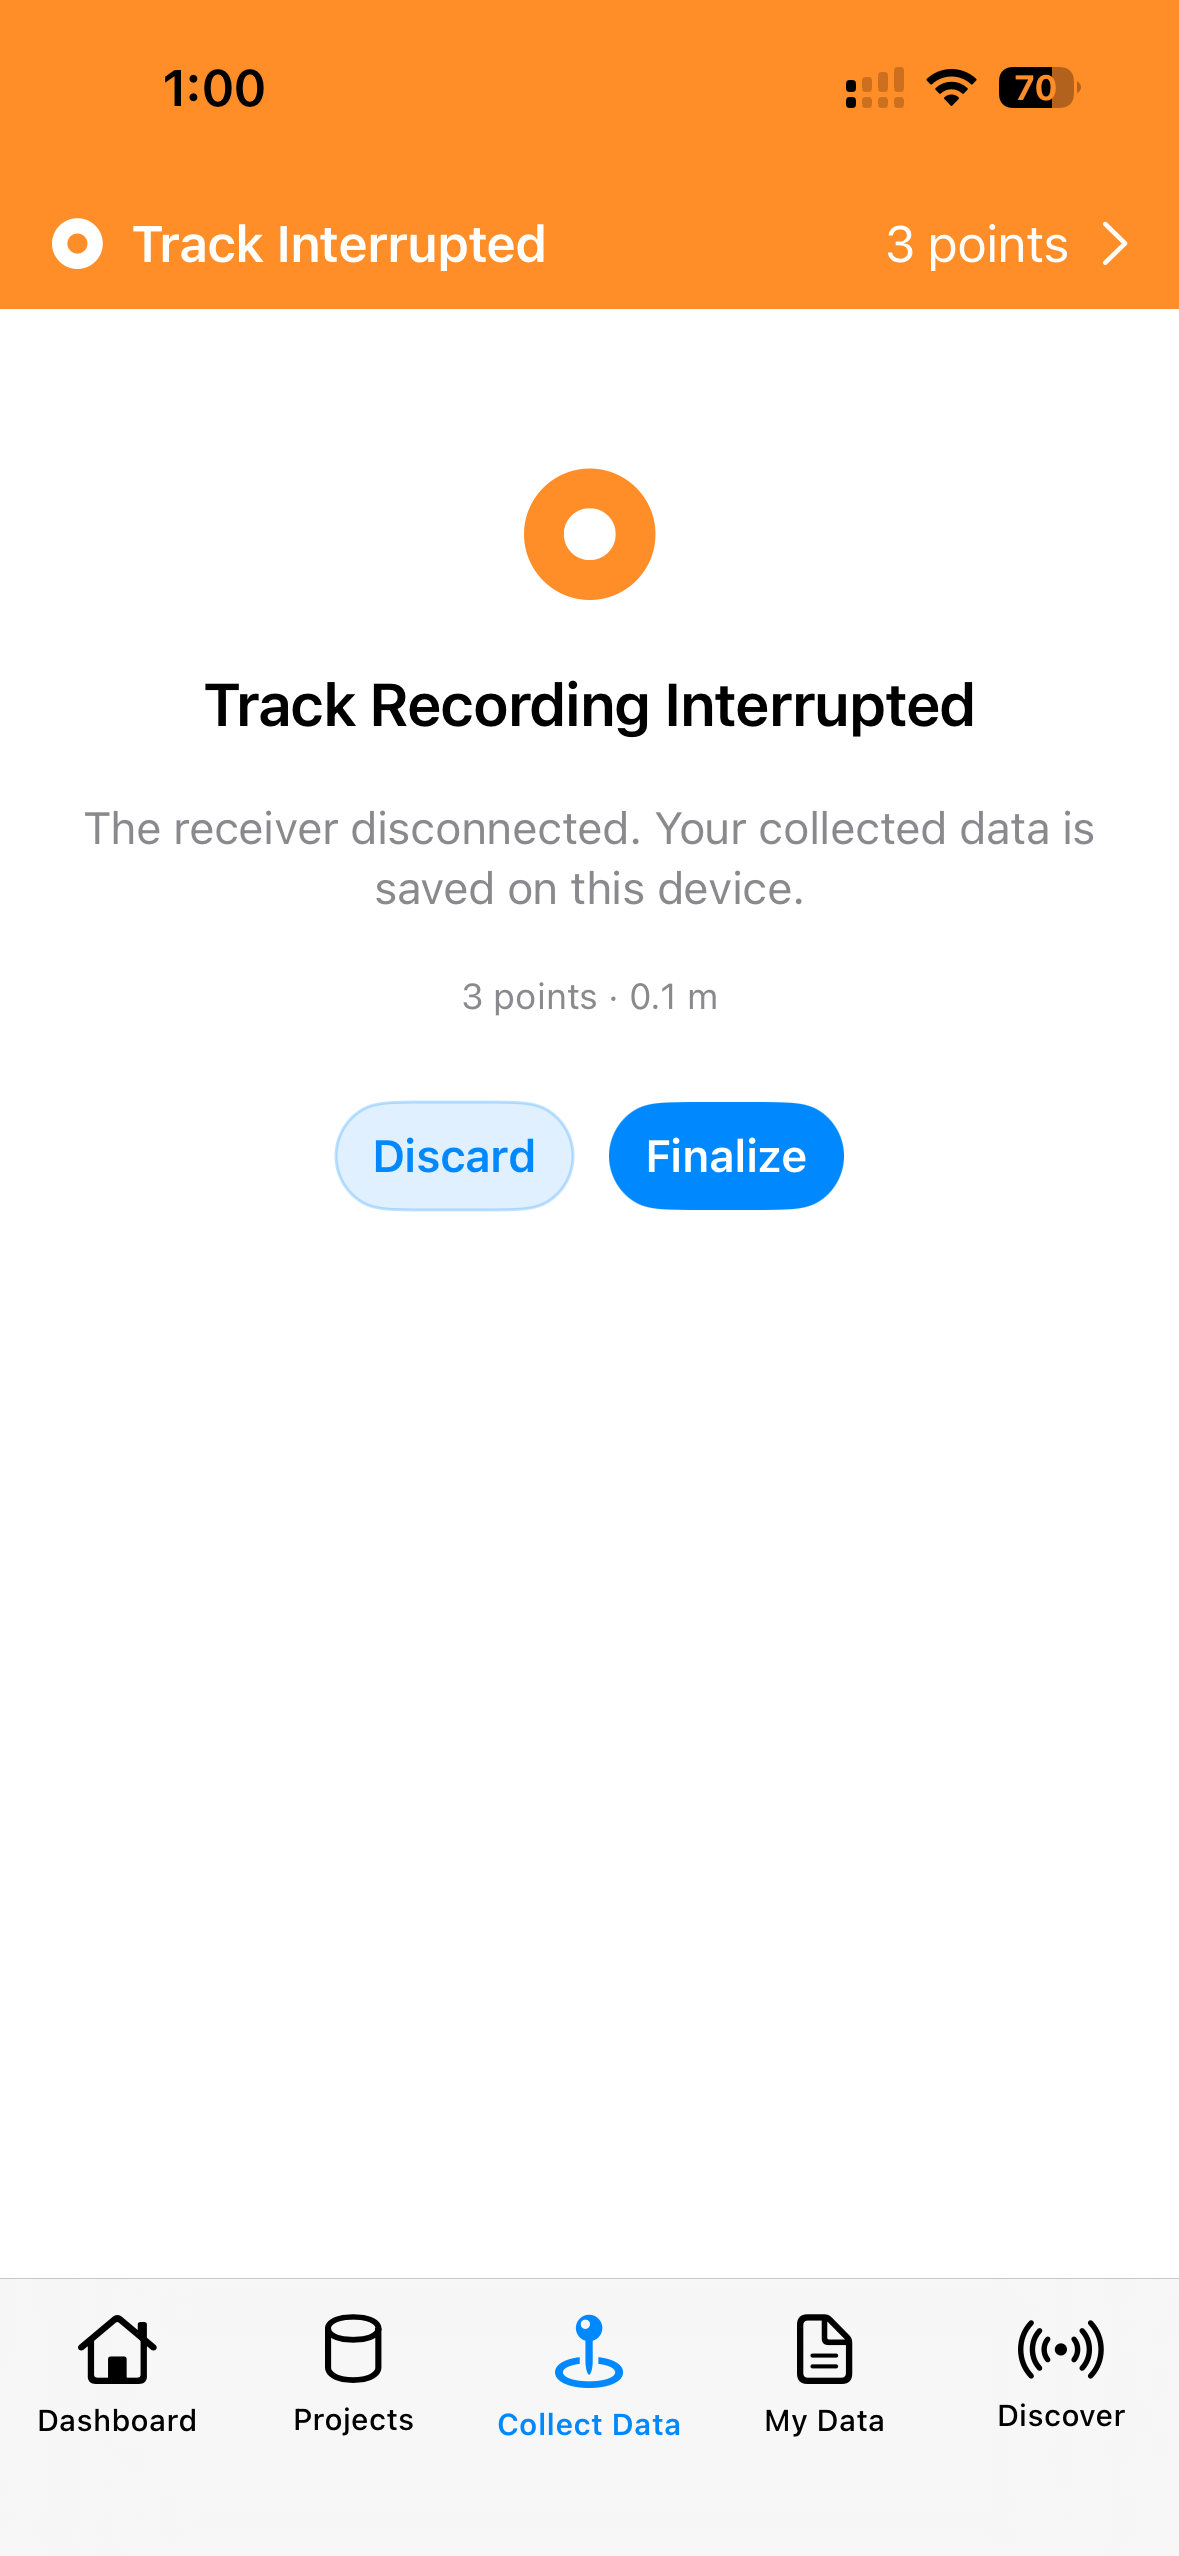
Recovery screen: Finalize or Discard without reconnecting the receiver.
Project scope
- Interrupted data belongs to the project where collection started.
- Switching to another project disables Collect Data until you switch back (or shows a message to switch to the original project).
Notes
- Finalize for an interrupted point observation requires at least one valid GNSS epoch.
- If the receiver is still connected when a track is interrupted, the normal Collect Data page may still show Resume in addition to Finalize / Discard.
- Automatic Bluetooth reconnect (see 1.4) does not resume an interrupted collection by itself—you still use Finalize / Discard / Resume as above.
Chapter 10: My Data
My Data browses and manages Points and Tracks in the Active project.
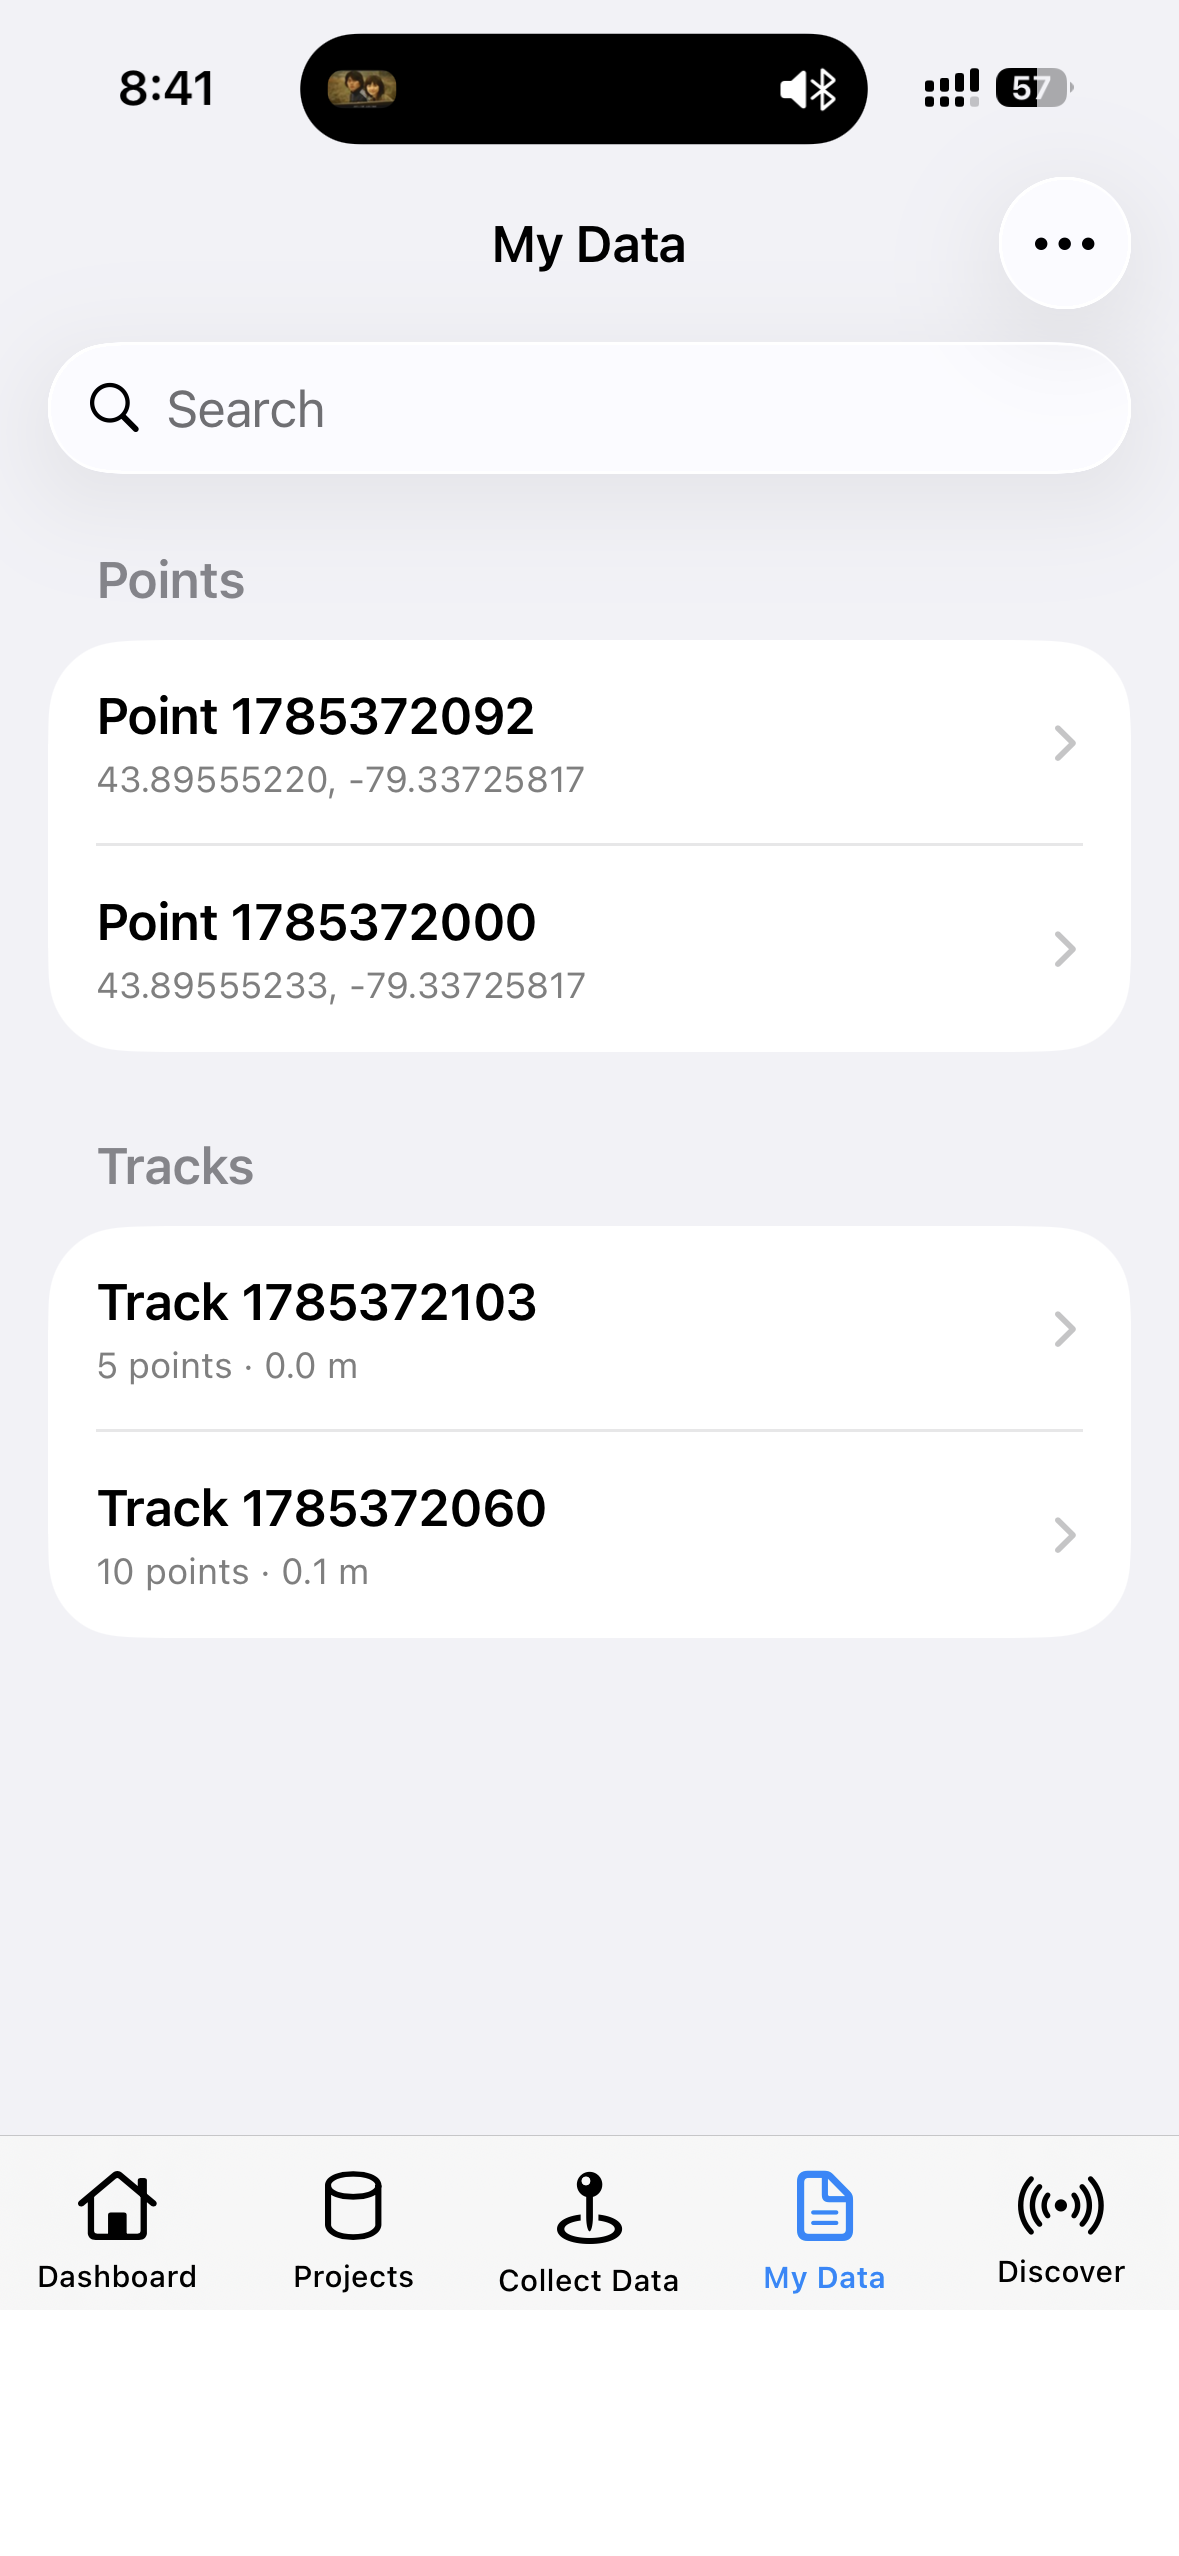
My Data list with Points and Tracks.
10.1 List page
- Search at the top
- Sections: Points / Tracks
- Top-right
…menu:
| Menu item | Purpose |
|---|---|
| Import Stakeout Targets | Import stakeout targets from CSV / KML / GeoJSON |
| Select to Export | Multi-select then export |
| Select to Delete | Multi-select then delete |
10.2 Import Stakeout Targets
…→ Import Stakeout Targets- Read the instructions → Import → pick a file
- Targets appear in Points (usually as imported points)
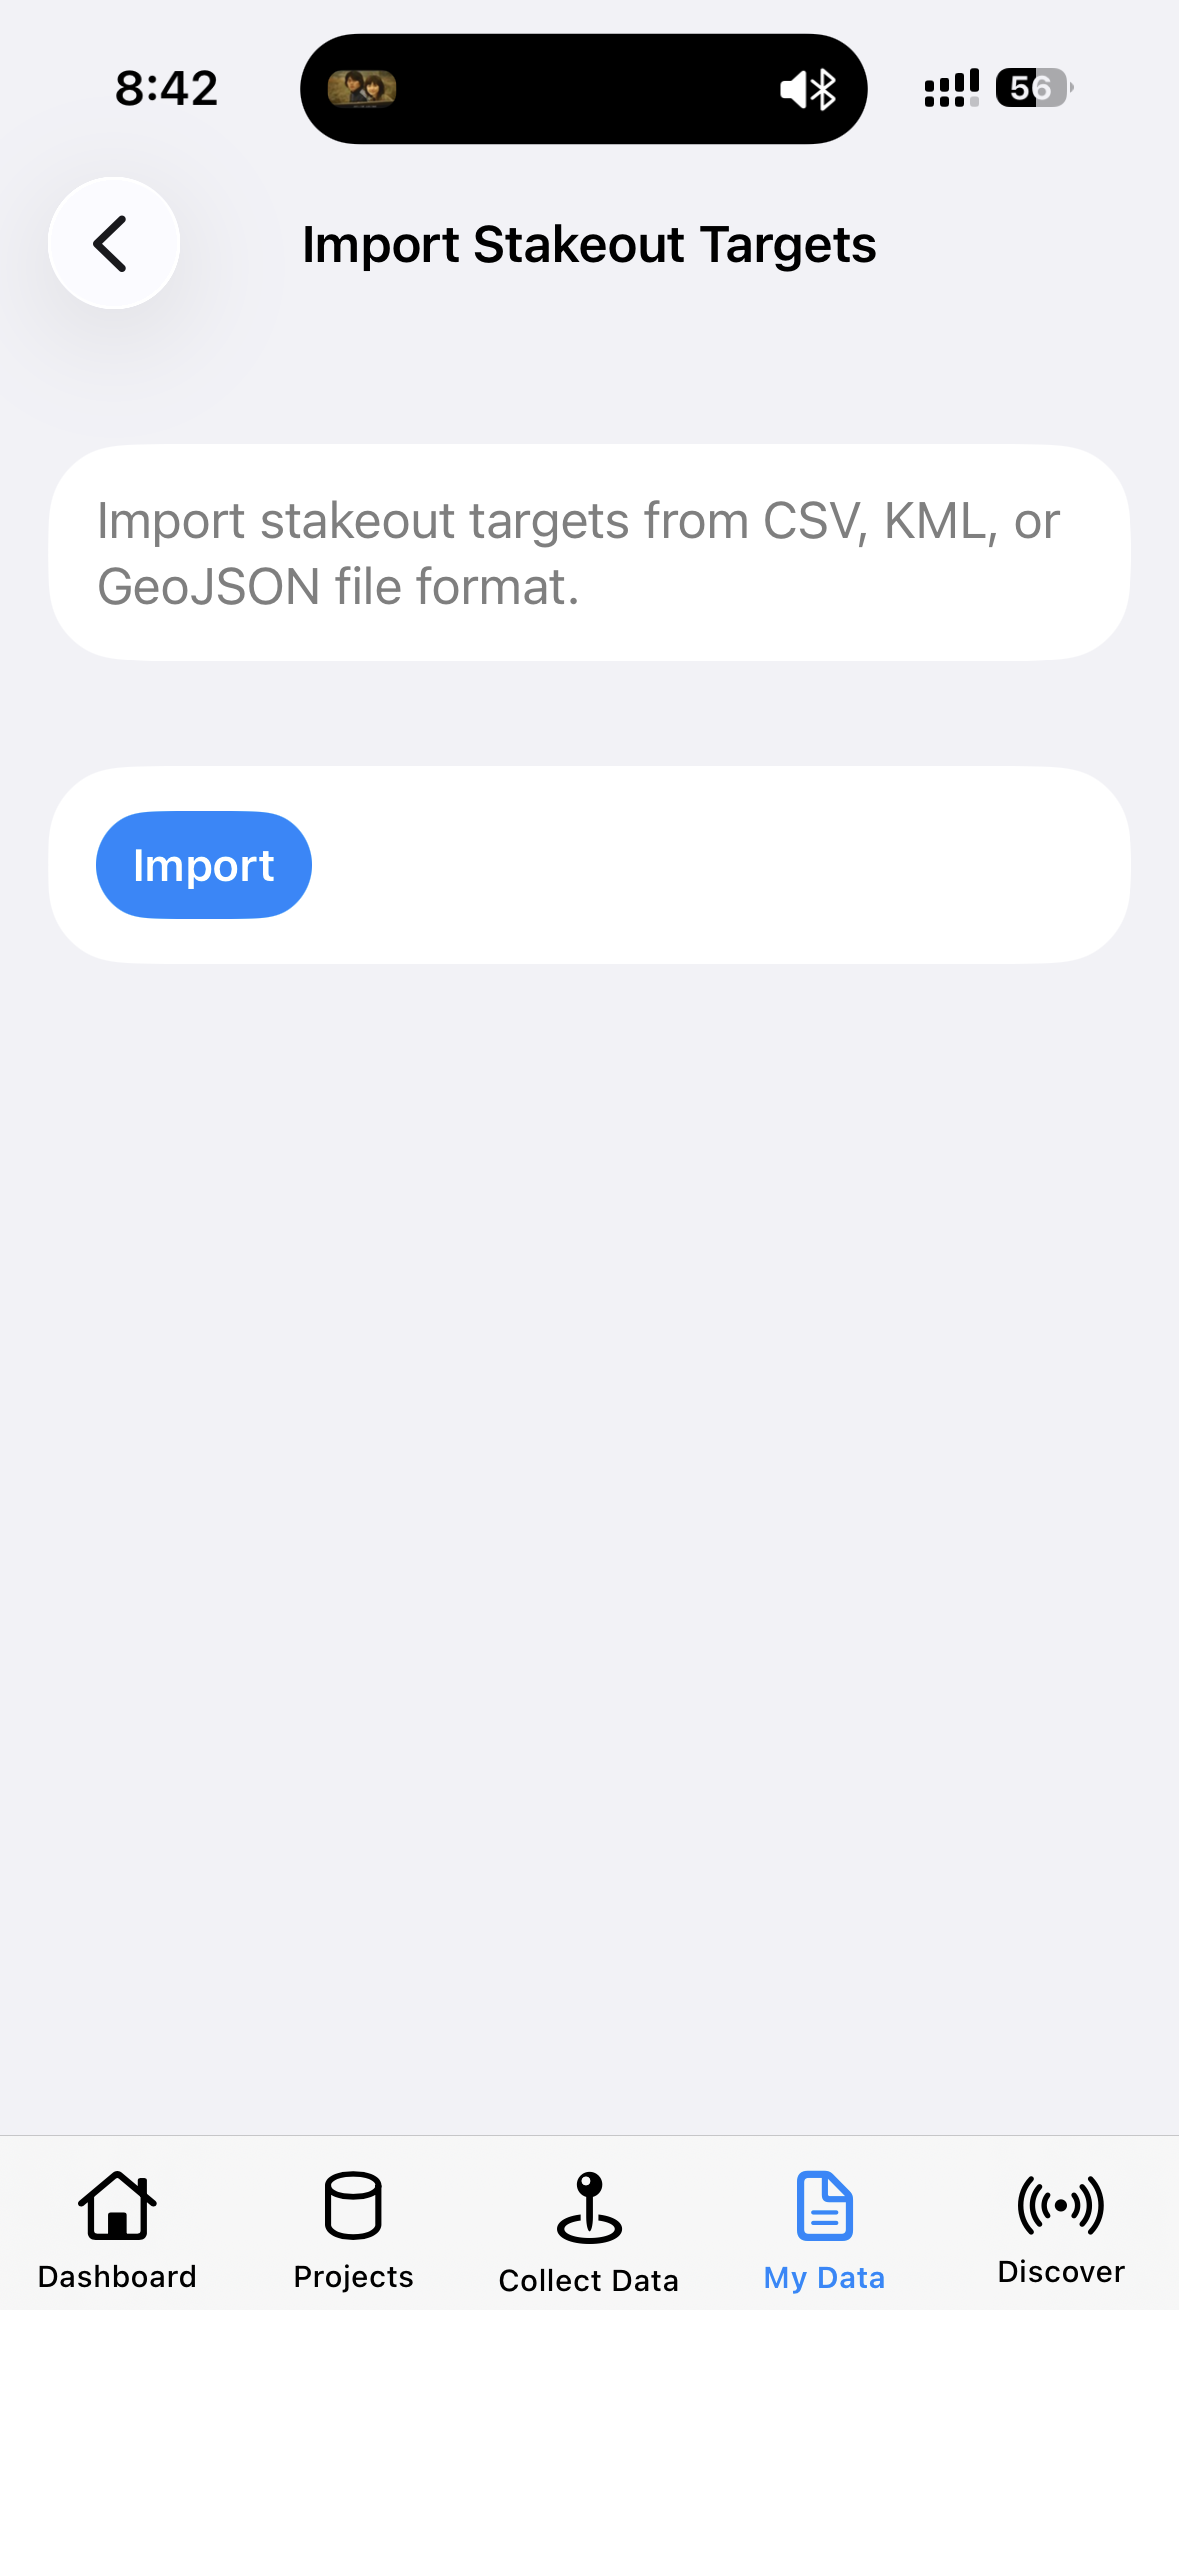
Import Stakeout Targets screen.
10.3 Select to Export / Select to Delete
- Enter selection mode (title becomes Select to Export / Select to Delete).
- Check points and/or tracks; Select All is available.
- Confirm Export or Delete at the bottom (delete asks again).
- Cancel exits selection mode.
After export, iOS Share Sheet opens—see 10.6.
Point export formats
When only points are selected: CSV, GeoJSON, KML.
| Format | Good for | Why exchange well |
|---|---|---|
| CSV | Excel / Numbers / custom tables | Universal tabular; easy edits, QC, GIS import |
| KML | Google Earth and many GIS / field apps | Very common landmark exchange format |
| GeoJSON | Web GIS, QGIS, cloud / developer pipelines | Open, structured, easy for software (see knowledge card) |
Track export formats
When only tracks are selected: GPX, GeoJSON, KML, CSV.
| Format | Good for | Why exchange well |
|---|---|---|
| GPX | Track replay, outdoor / navigation apps, many GIS imports | De-facto track interchange format |
| KML | Google Earth, path visualization for non-specialists | Easy to present and share routes |
| CSV | Tabular time / coordinate / accuracy analysis | Research post-processing and scripts |
| GeoJSON | Modern web / GIS stacks shared with points | Points and lines in one JSON ecosystem |
Mixed selection: When points + tracks are both selected, usually GeoJSON / KML are available (CSV cannot mix points + lines). For a full project backup use Export Project (GeoPackage) under Projects.
Export numeric precision
When exporting survey points, tracks, and stakeout results to CSV, GeoJSON, KML, or GPX, numeric fields are formatted to fixed decimal places at export time only (half-up rounding), for easier exchange with Excel, QGIS, and other tools. In-project GeoPackage storage and Show Data keep full precision; for an unrounded full backup use Export Project.
| Field type | Decimals | Example |
|---|---|---|
| Latitude / longitude | 8 | 43.89334745, -79.30840036 |
| Altitude (m) | 3 | 202.717 |
| HDOP / PDOP / VDOP | 2 | 0.50 |
| hAcc / vAcc, residuals, distances (m) | 3 | 0.047 |
| Heading (°) | 2 | 127.45 |
| Speed (knots) | 3 | 0.125 |
| Sample interval / average rate (Hz) | 6 | 1.000000 |
| Fix quality, satellites, counts | integers | unchanged |
Applies to track points, survey points, stakeout target / staked coordinates and residual fields, and GeoJSON properties. GeoJSON coordinates[2] matches GPX <ele> (3 decimals). Missing altitude: no third coordinate / no <ele> (same as before).
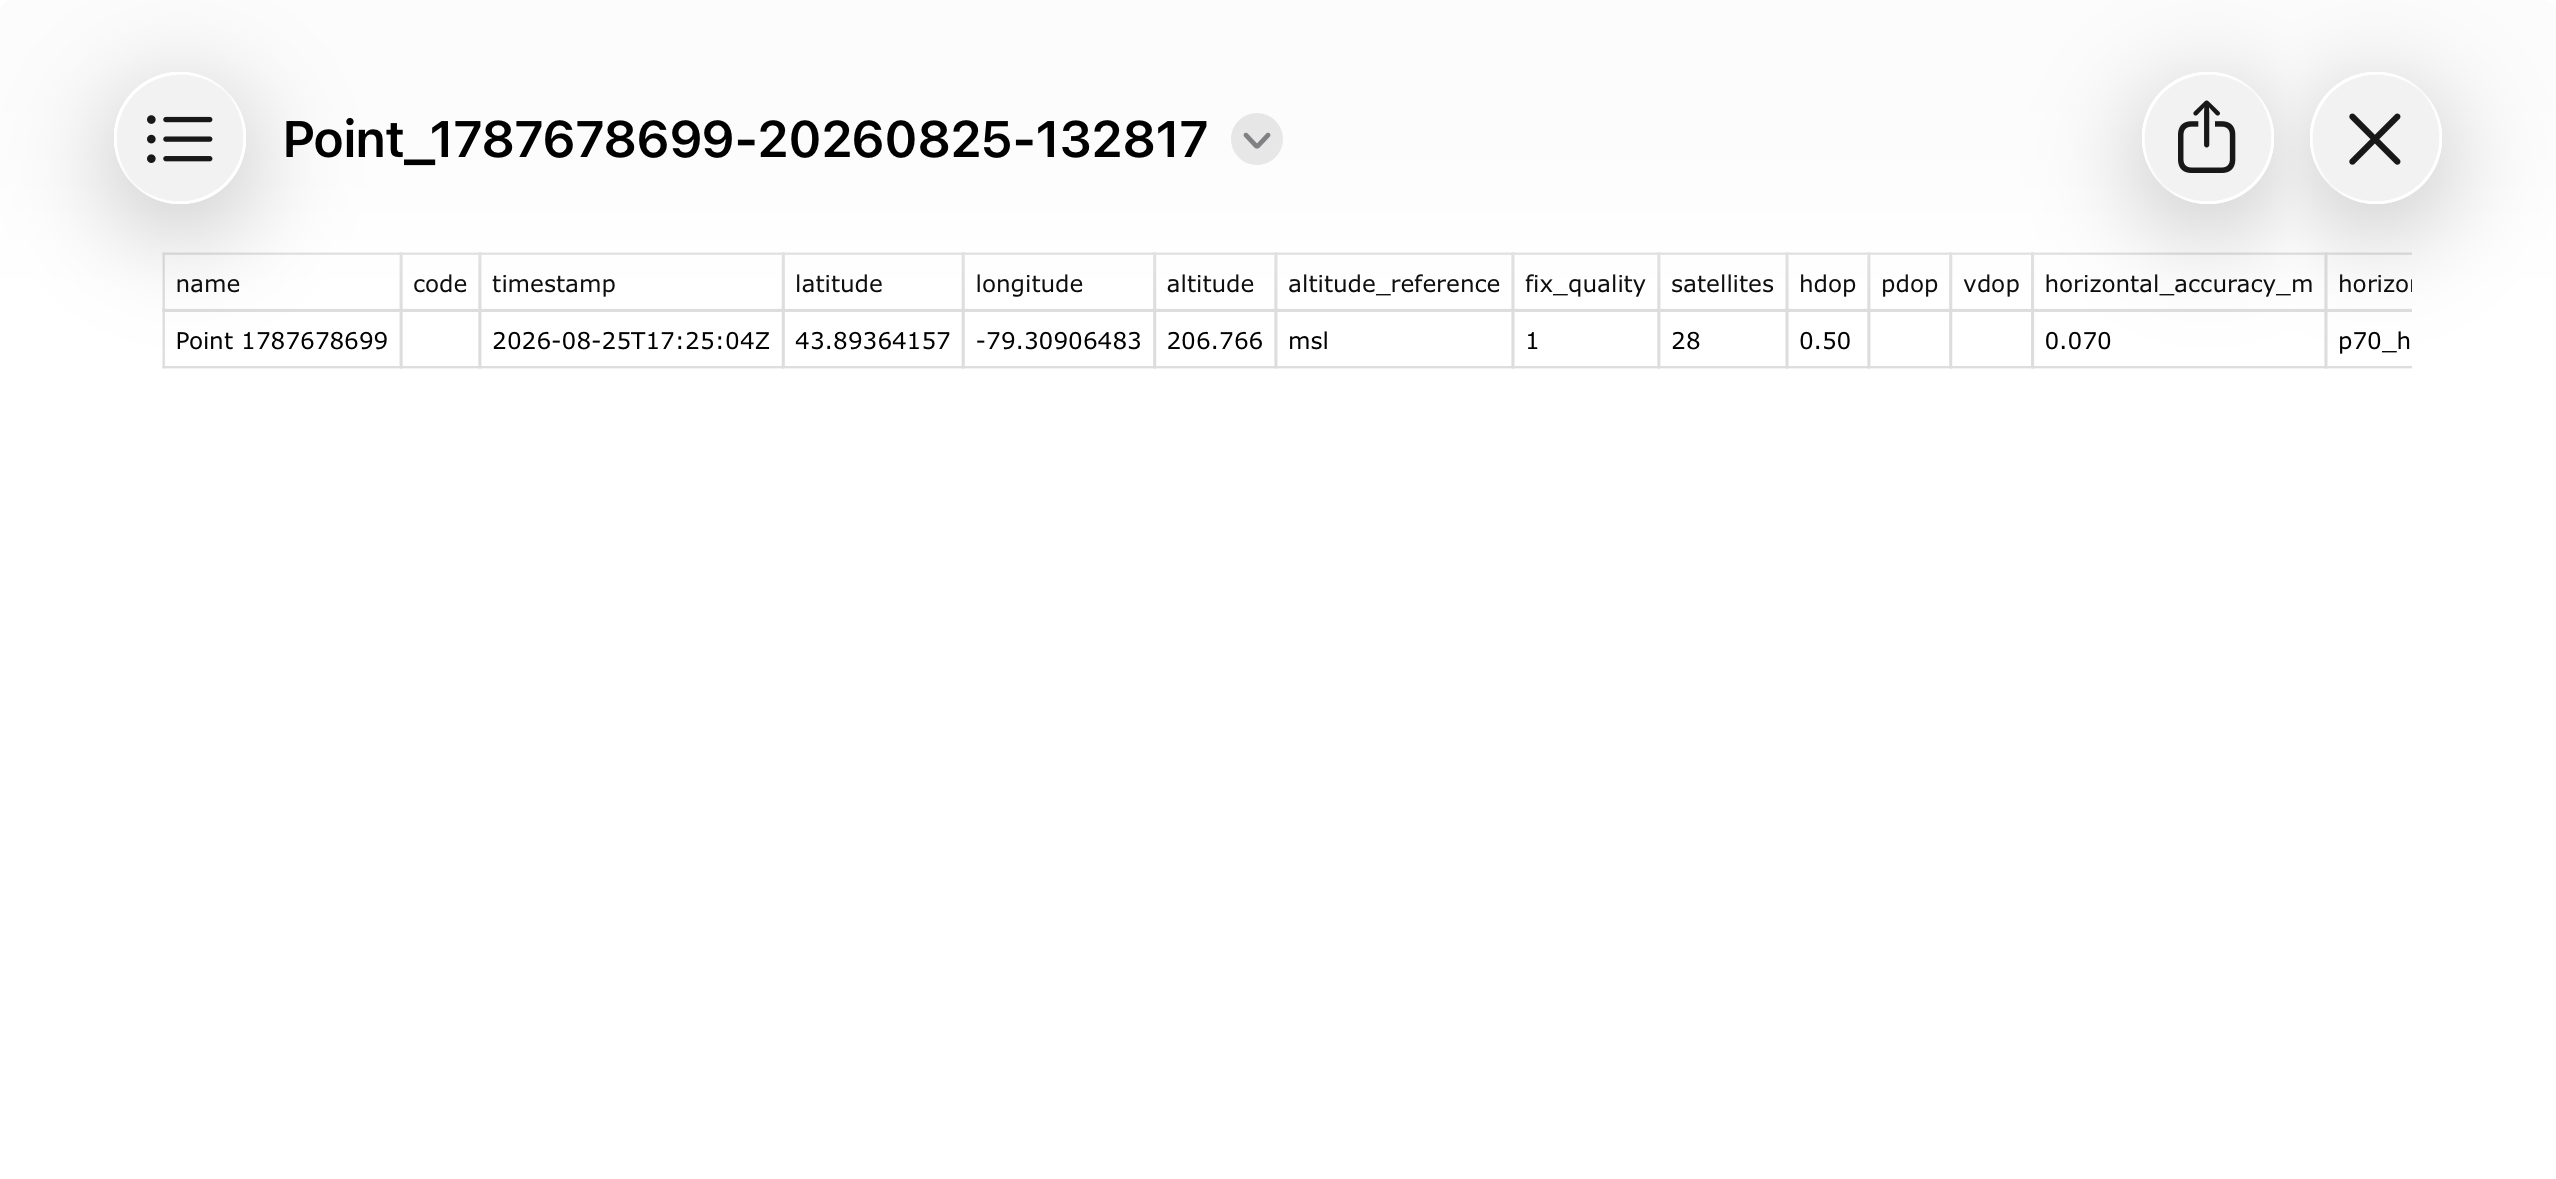
Exported CSV share preview: 8-decimal lat/lon and fixed precision on altitude / hAcc.
Knowledge card: What is GeoJSON?
GeoJSON describes geographic features as JSON text: points, lines, and polygons as coordinates + properties.
Field crews may know CSV / DWG / Shapefile better; in web maps, cloud GIS, mobile, and open-source GIS (e.g. QGIS), GeoJSON is extremely common.
Think of it as a machine-friendly “shipping box” for coordinates—less spreadsheet-friendly than CSV, but often smoother for programmatic and cross-platform exchange.
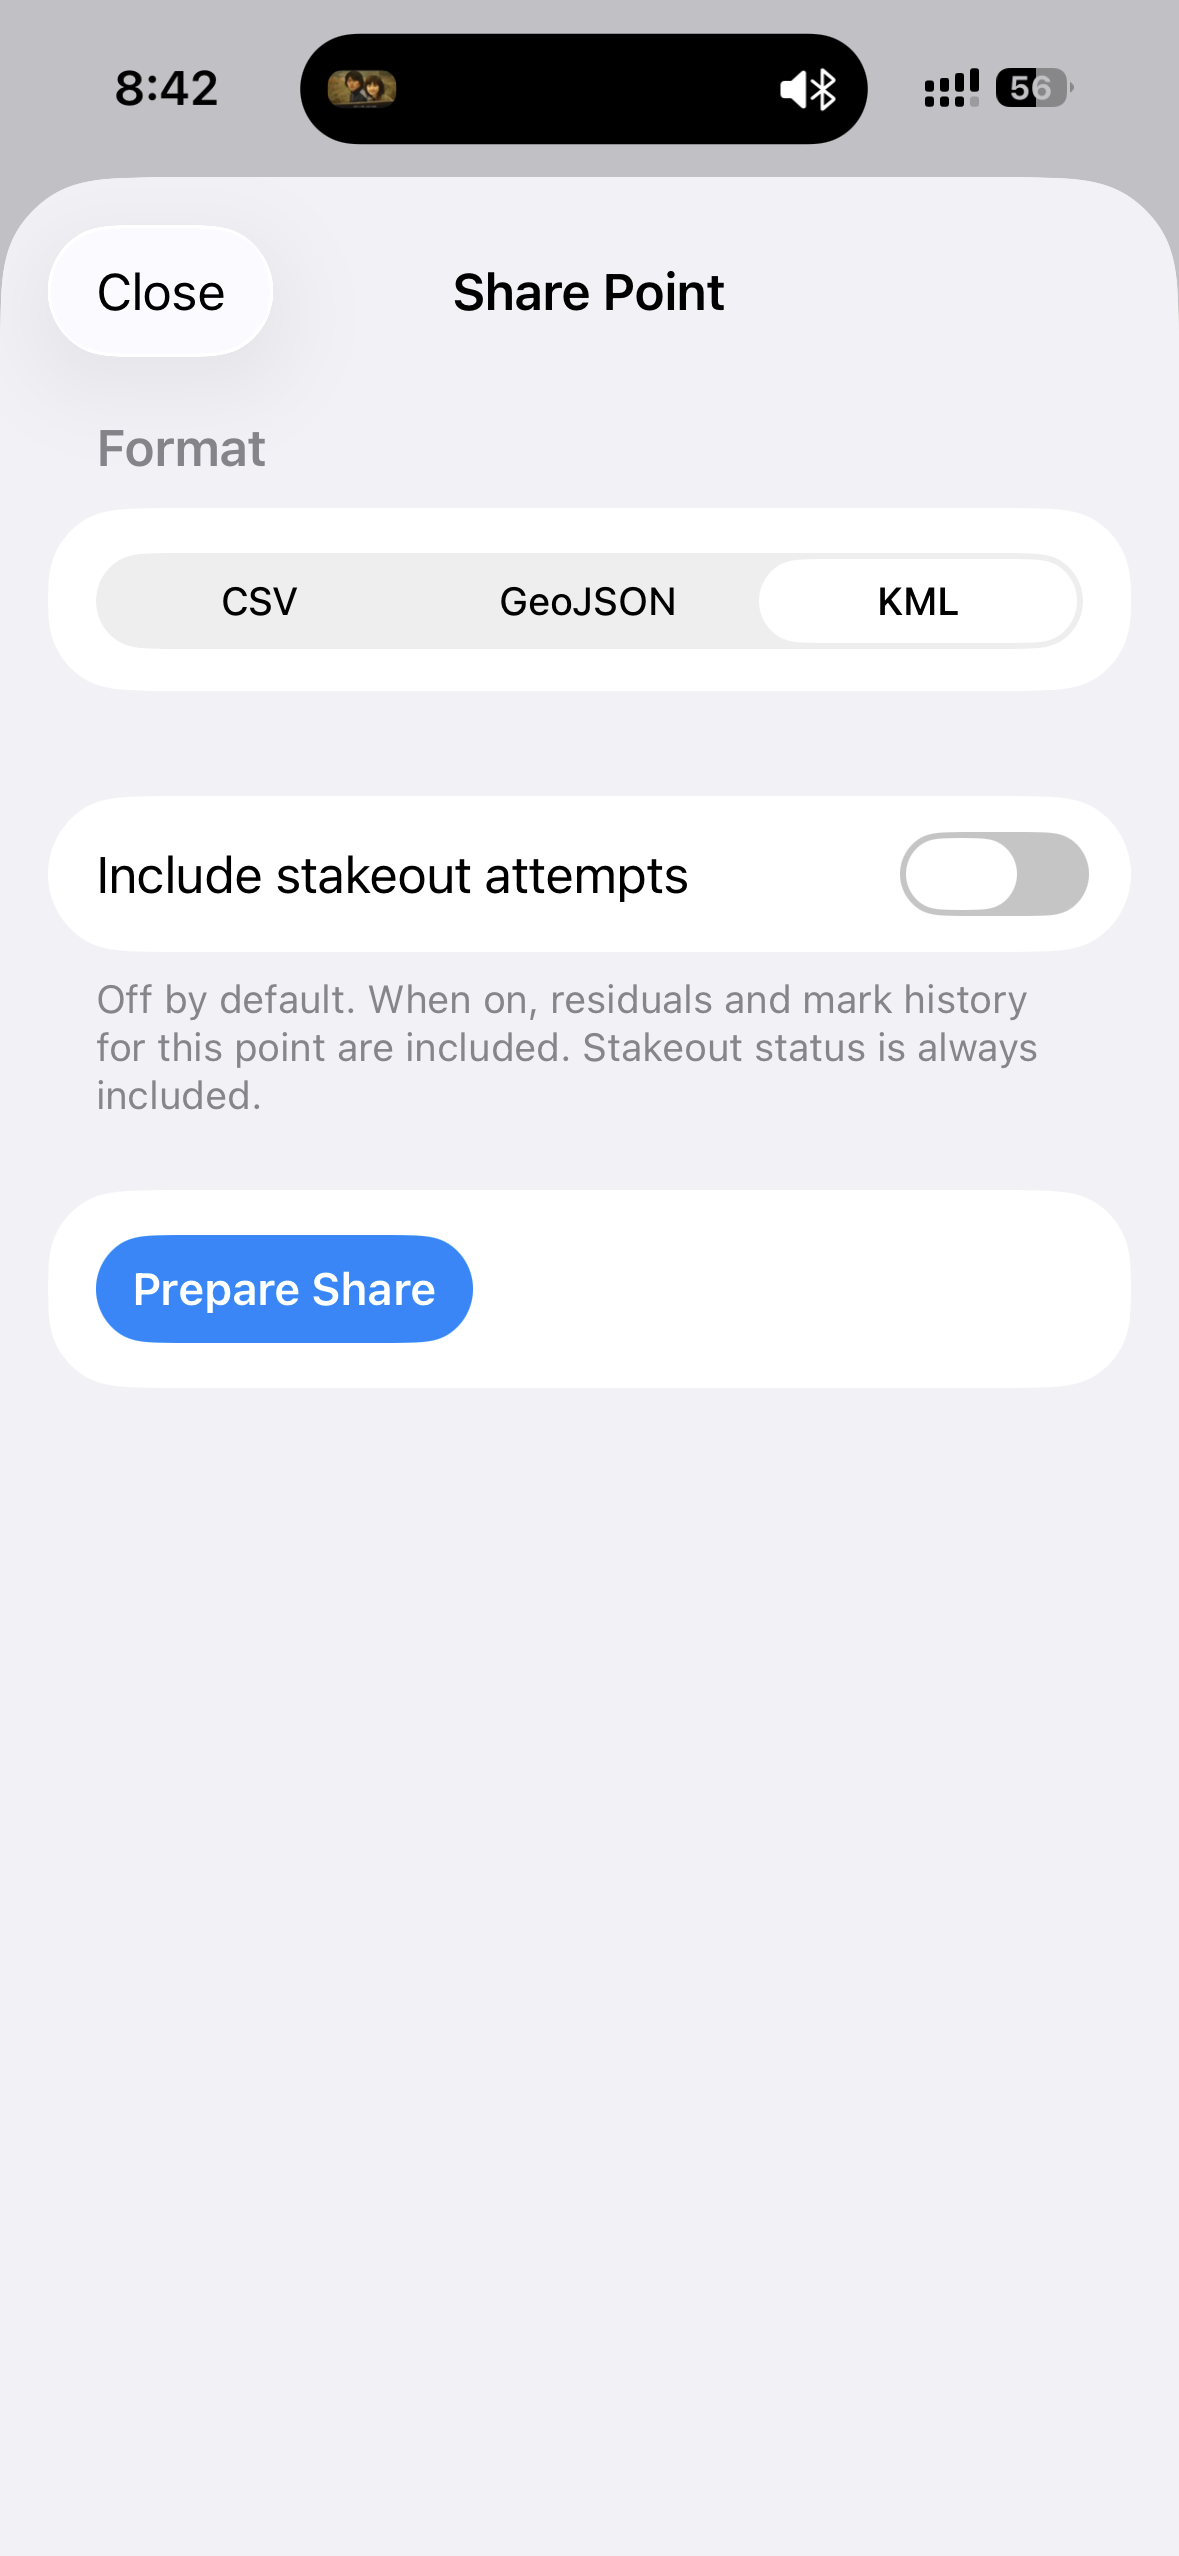
Select to Export with items checked and Export at the bottom.
10.4 Points detail
Open a point → title Points.
- First row: picker to switch among project points
- GNSS Quality: Fix, satellites, HDOP, horizontal accuracy, etc. (prefers device hAcc; see Chapter 3)
- Start Stakeout: begin stakeout navigation (requires connected Rover)
- Map (Apple Maps)
- Stakeout status and stored result count
- Toolbar: export / edit (rename, etc.; surveyed coordinates usually not editable; imported design coordinates may be)
Stakeout notes
- Navigation shows north / east / height offsets to the target.
- Default tolerances are about 0.05 m horizontal, 0.10 m vertical (follow the App).
- Mark Staked usually requires RTK Fixed (or confirm still mark when Float is within tolerance).
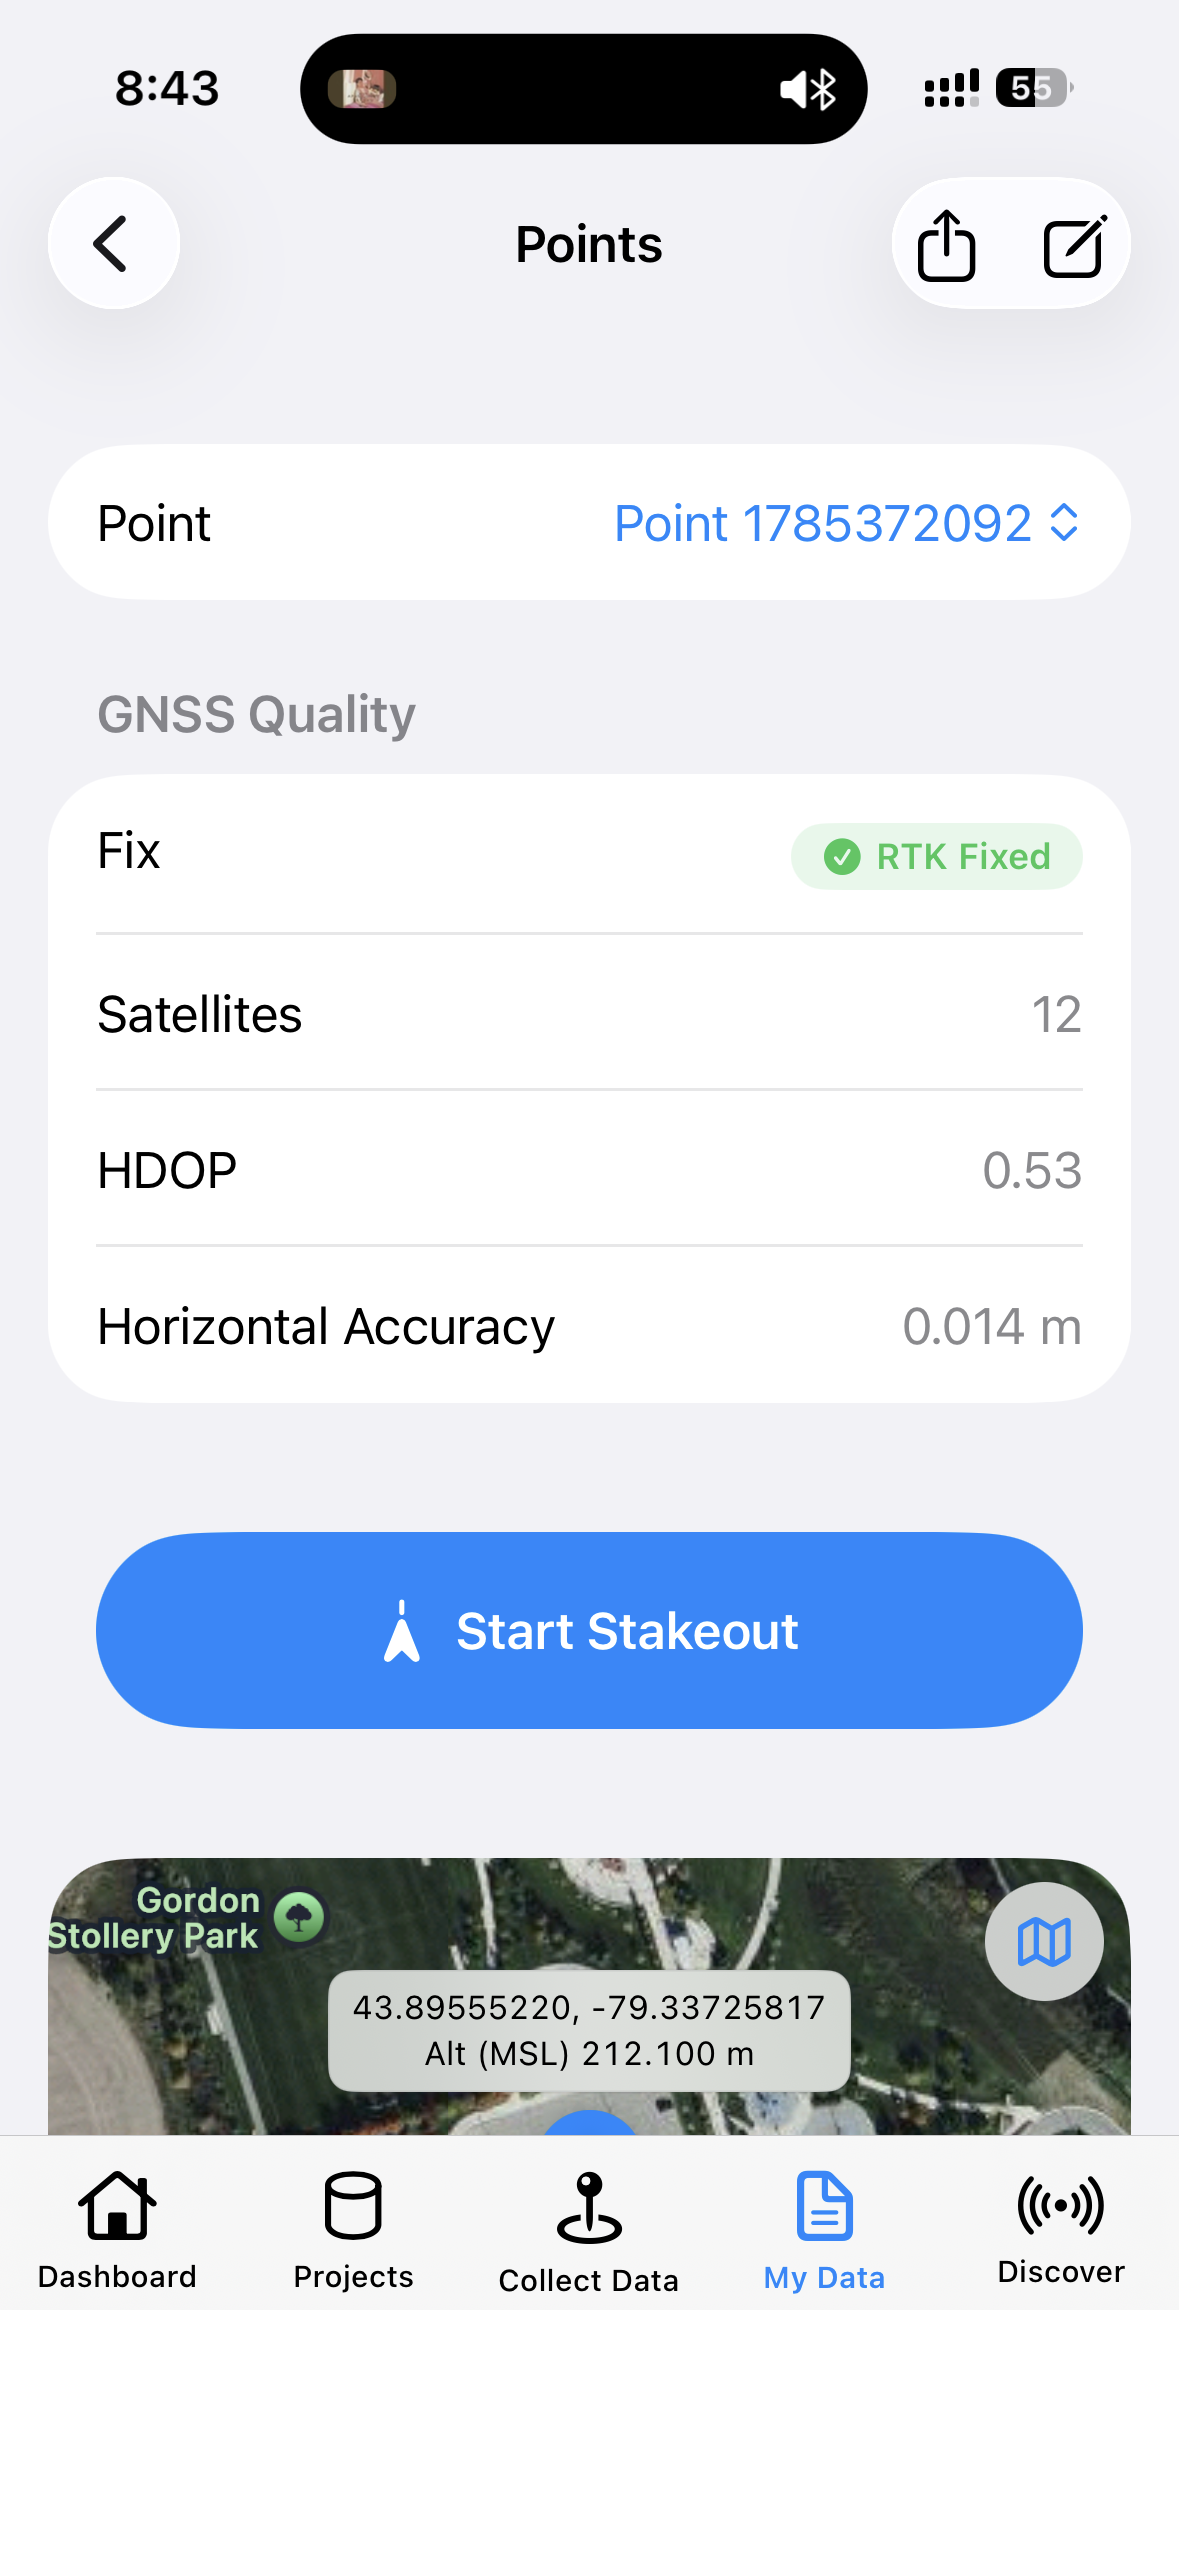
Points detail with GNSS Quality and Start Stakeout.
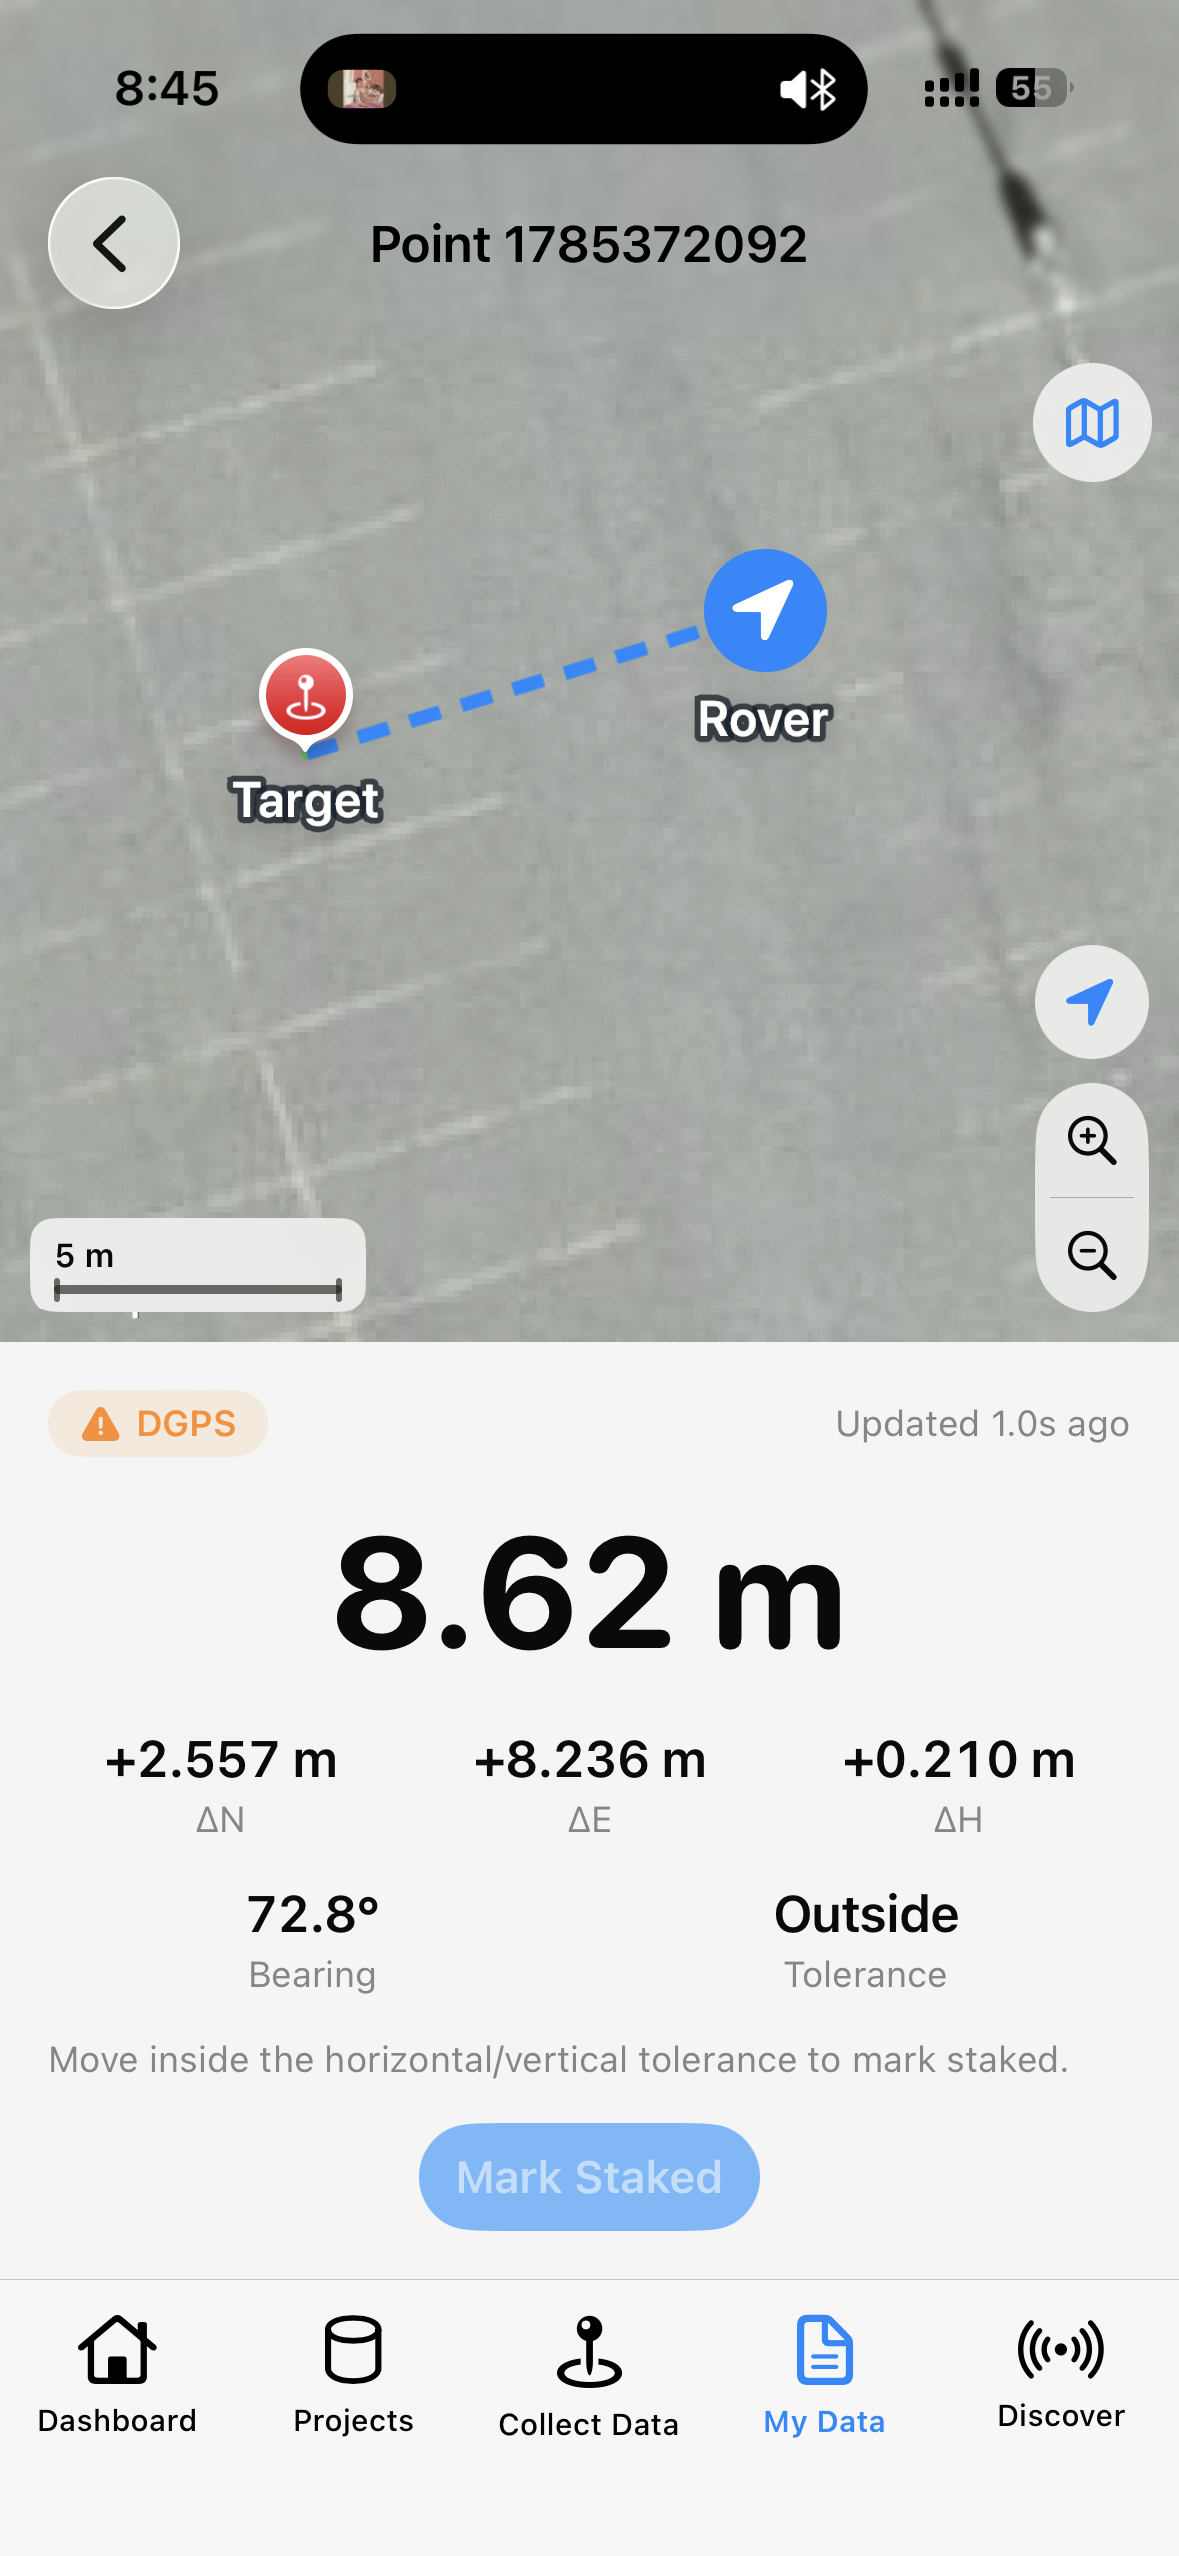
Stakeout navigation (EX-1, RTK Fixed preferred).
10.5 Tracks detail
Open a track → title Tracks.
- First row: switch tracks
- Summary: points, distance, status
- Playback:
- Map modes: 2D / 3D / Altitude 3D (Apple Maps)
- Play / pause, about 1×–100× speed
- Toolbar:
- Export Track (then system share)
- Show Data (tabular points)
- Edit Track Name
Show Data (spreadsheet-style)
Example columns: #, Time, Lat, Lon, Alt, Fix, HAcc.
Tap a row → Track Point detail; first line reads:
Point of <track name>
(This is a track sample, not an independent survey Point, and has no Stakeout.)
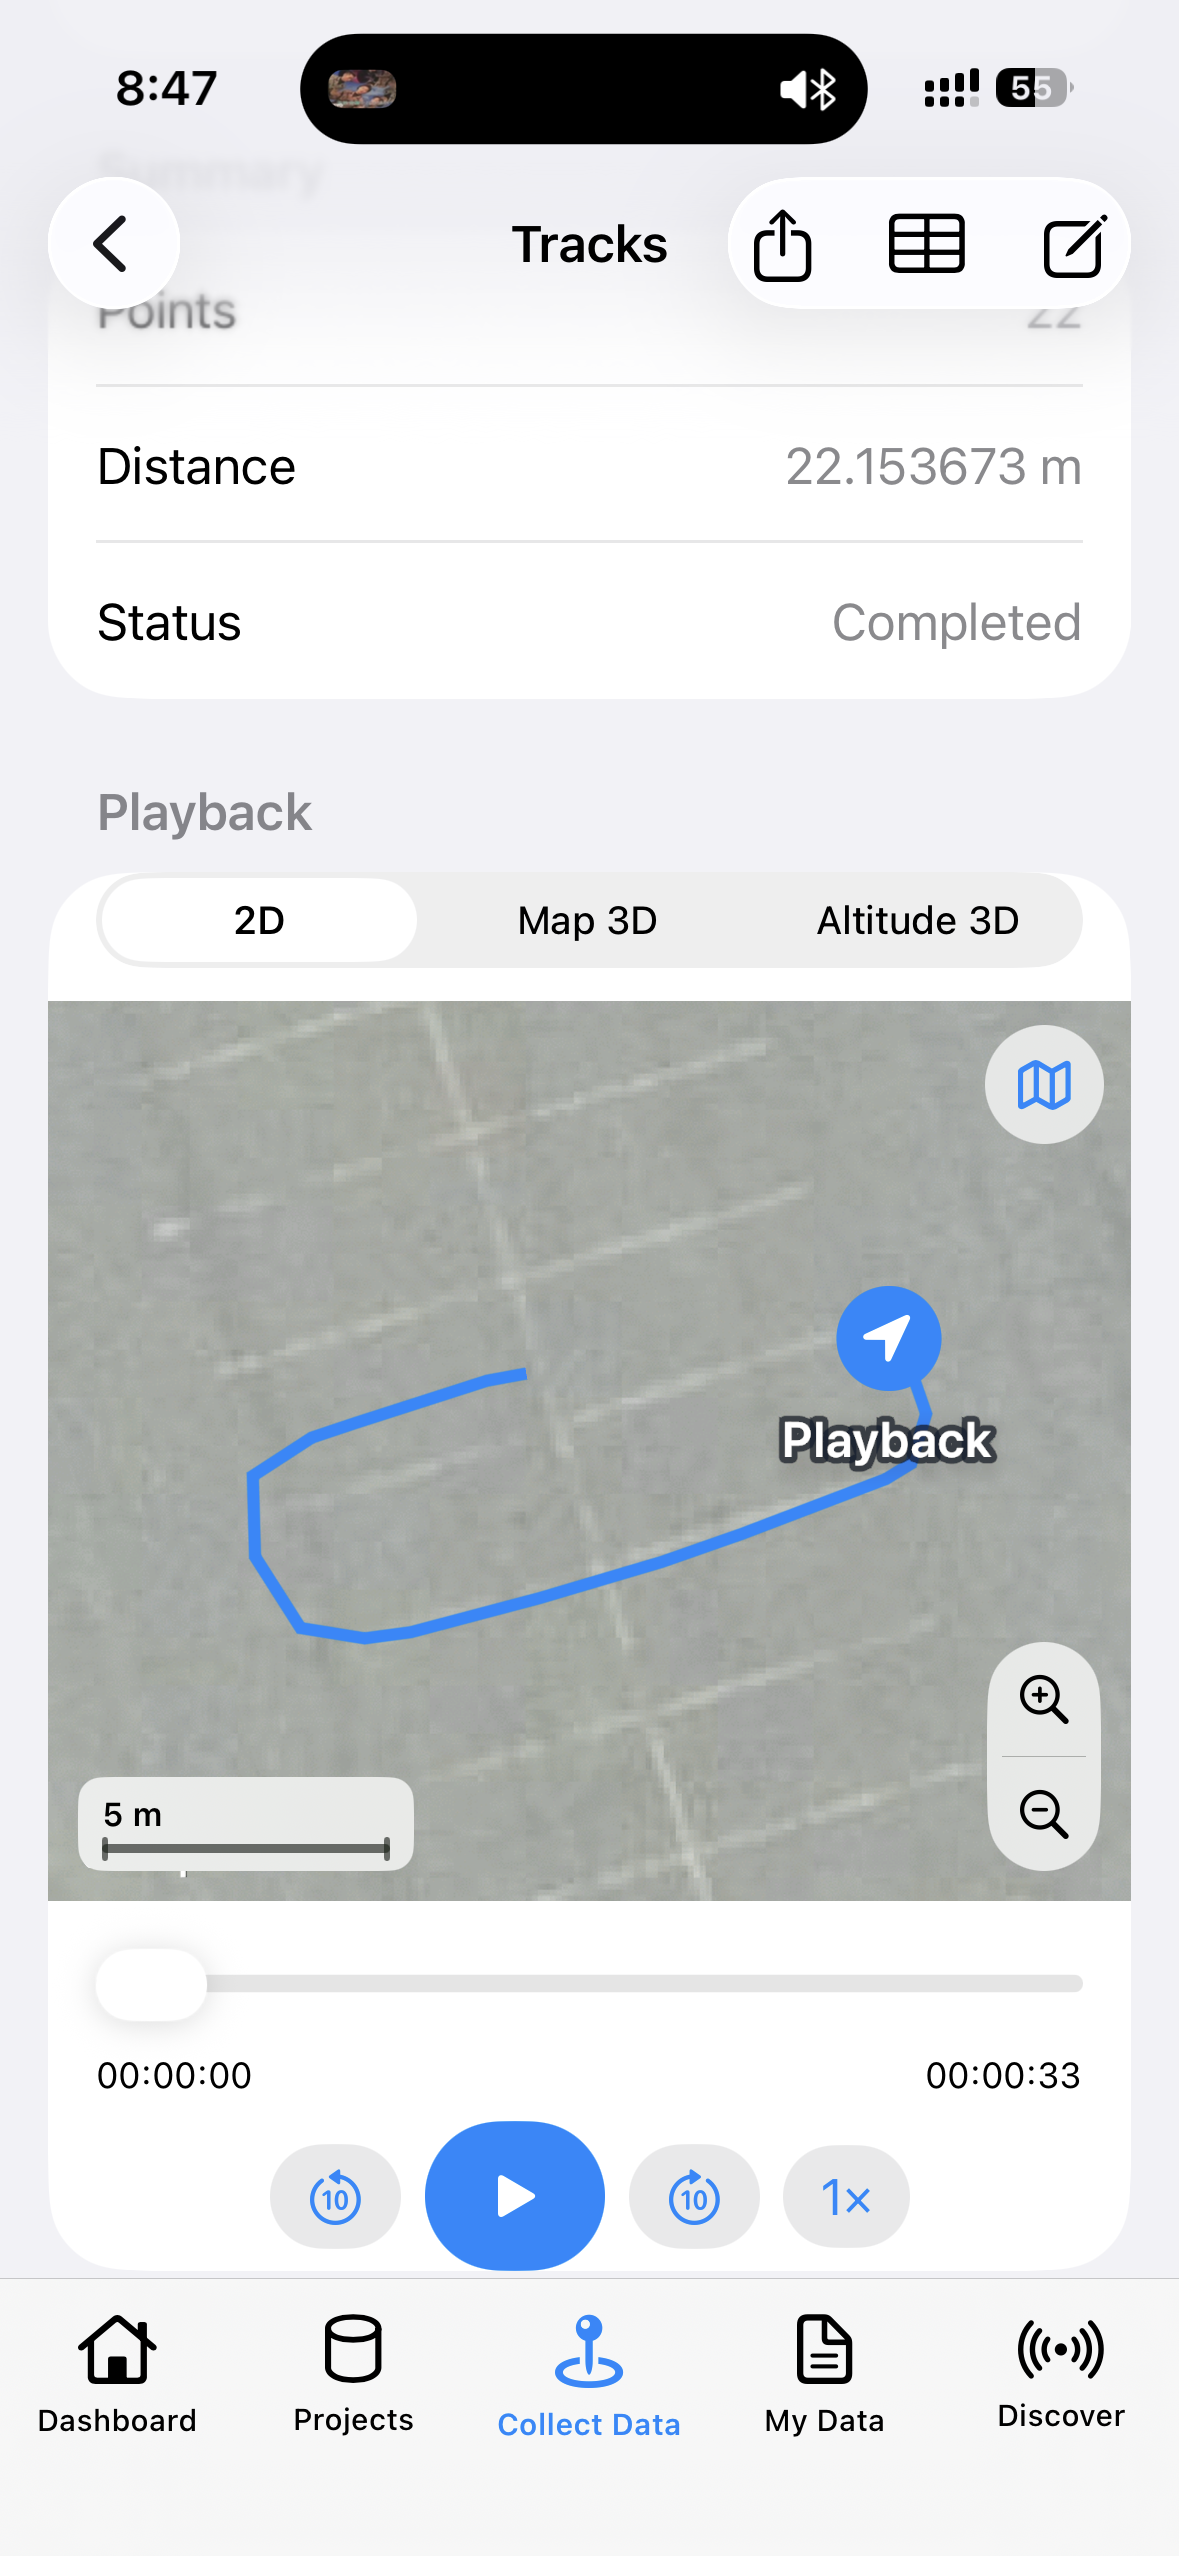
Tracks detail with Playback.
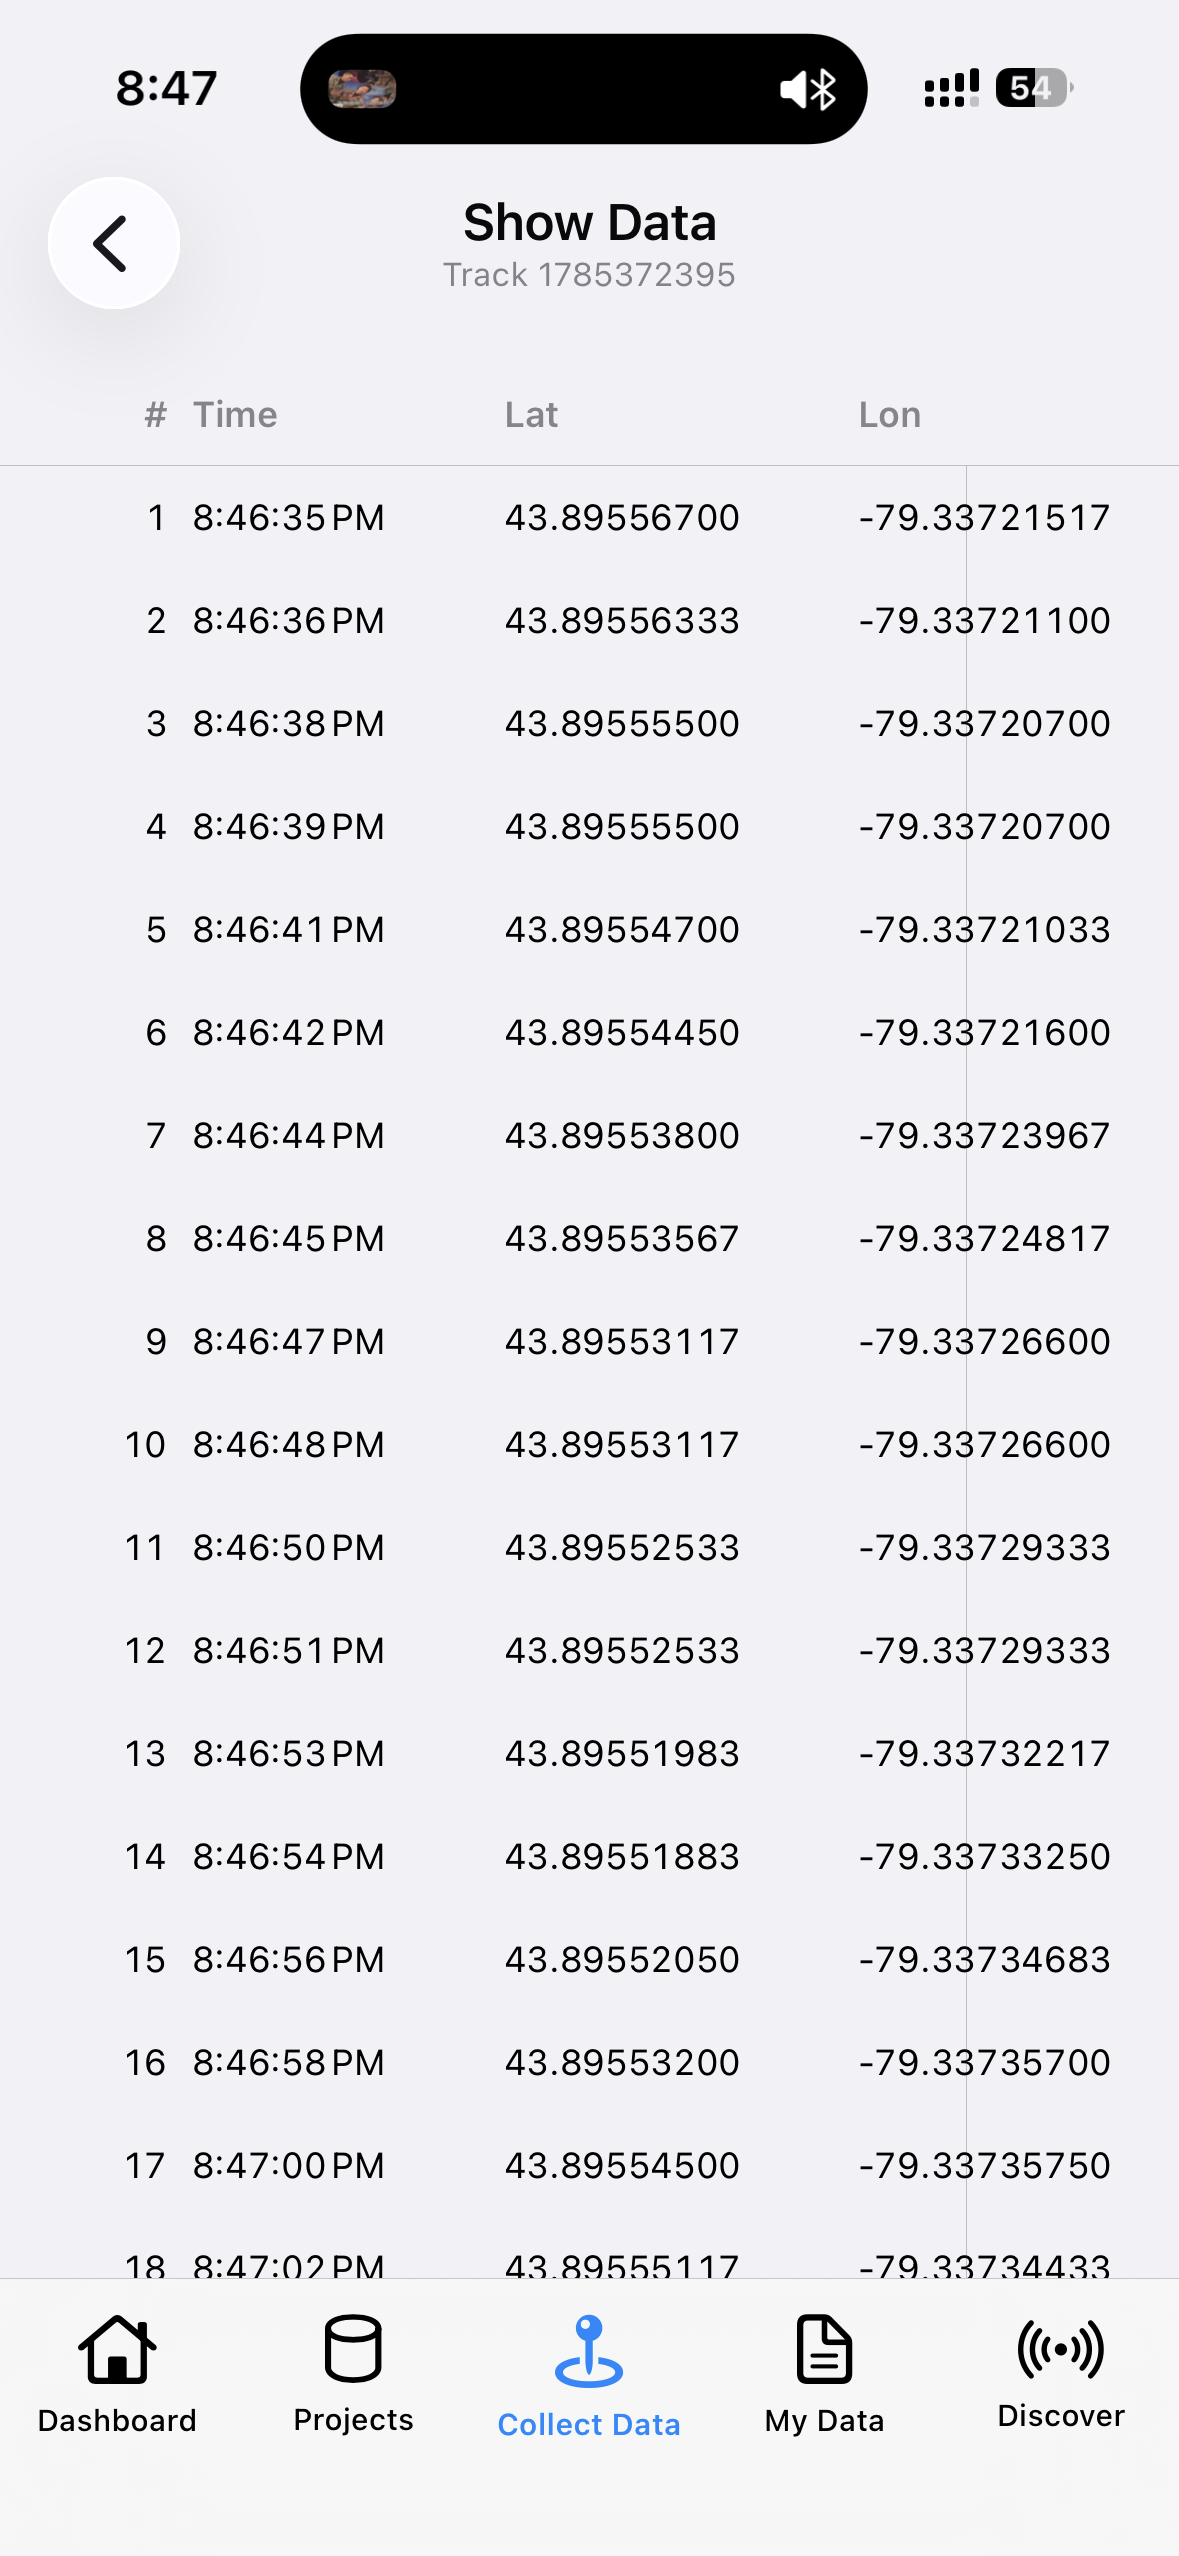
Show Data table with multiple rows.
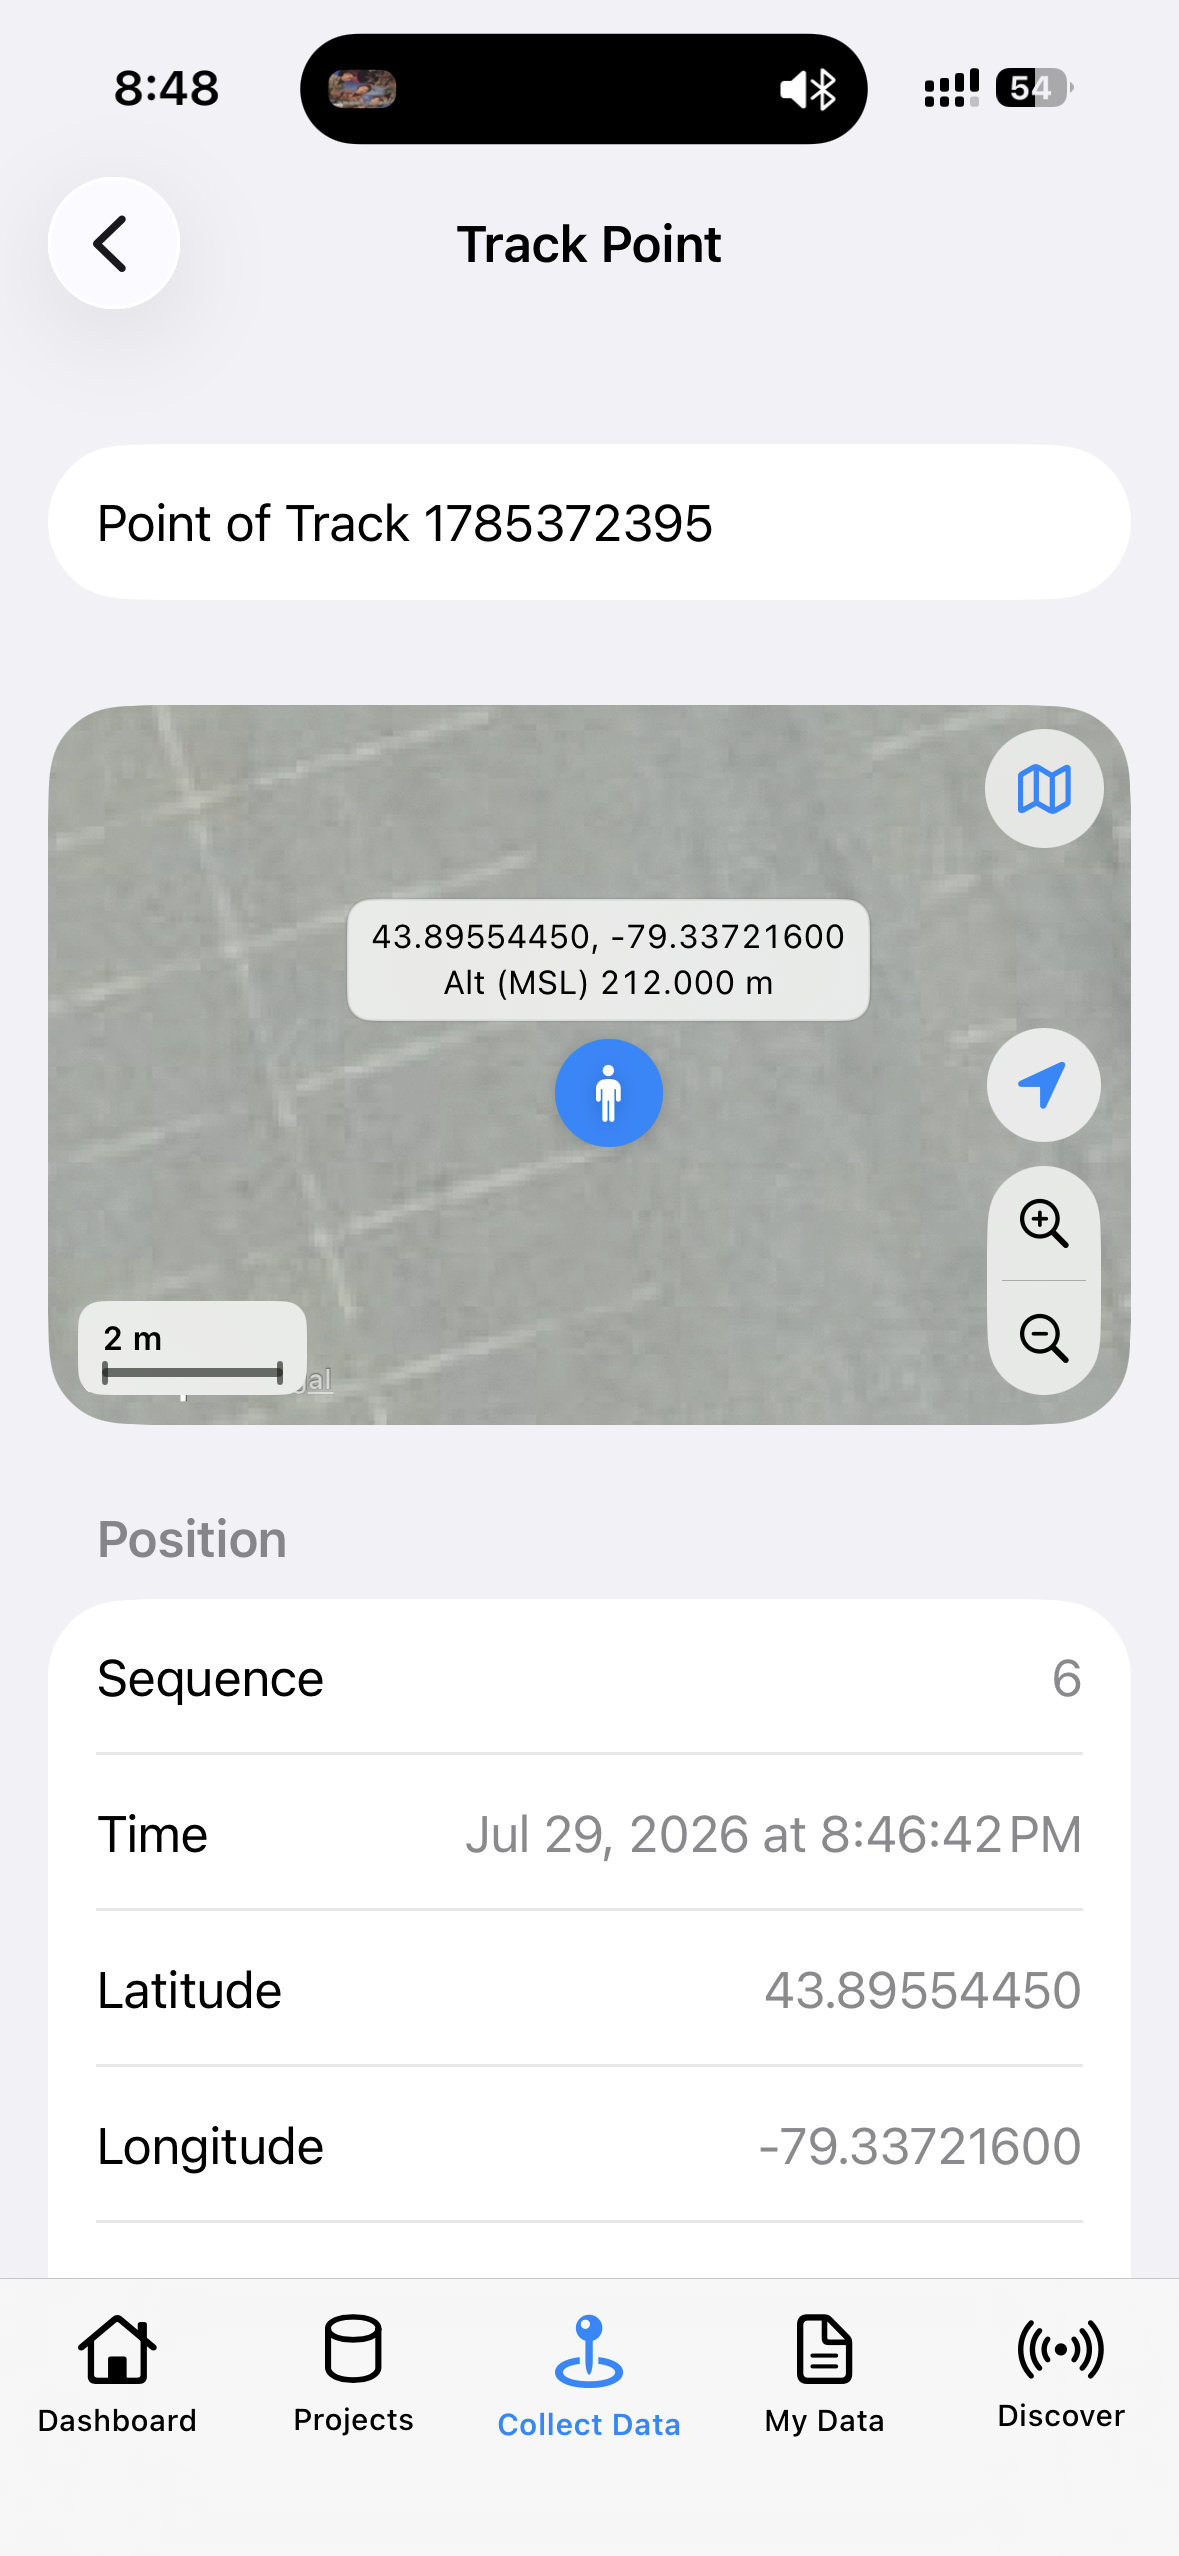
Track Point detail with Point of … on the first line.
10.6 iOS Share Sheet
After many exports (points, tracks, multi-select, project export, device config export, etc.), the App opens the iOS Share Sheet instead of locking files inside the App only.
You can:
- Save to Files / local storage
- Send to iCloud Drive, Dropbox, Google Drive, etc.
- Mail / Messages to teammates
- AirDrop to nearby Apple devices
- Open in other installed apps that declare support for the file type
This is the standard iOS way to hand off results: after fieldwork, share CSV / KML / GPX / GeoJSON / GeoPackage without a cable.
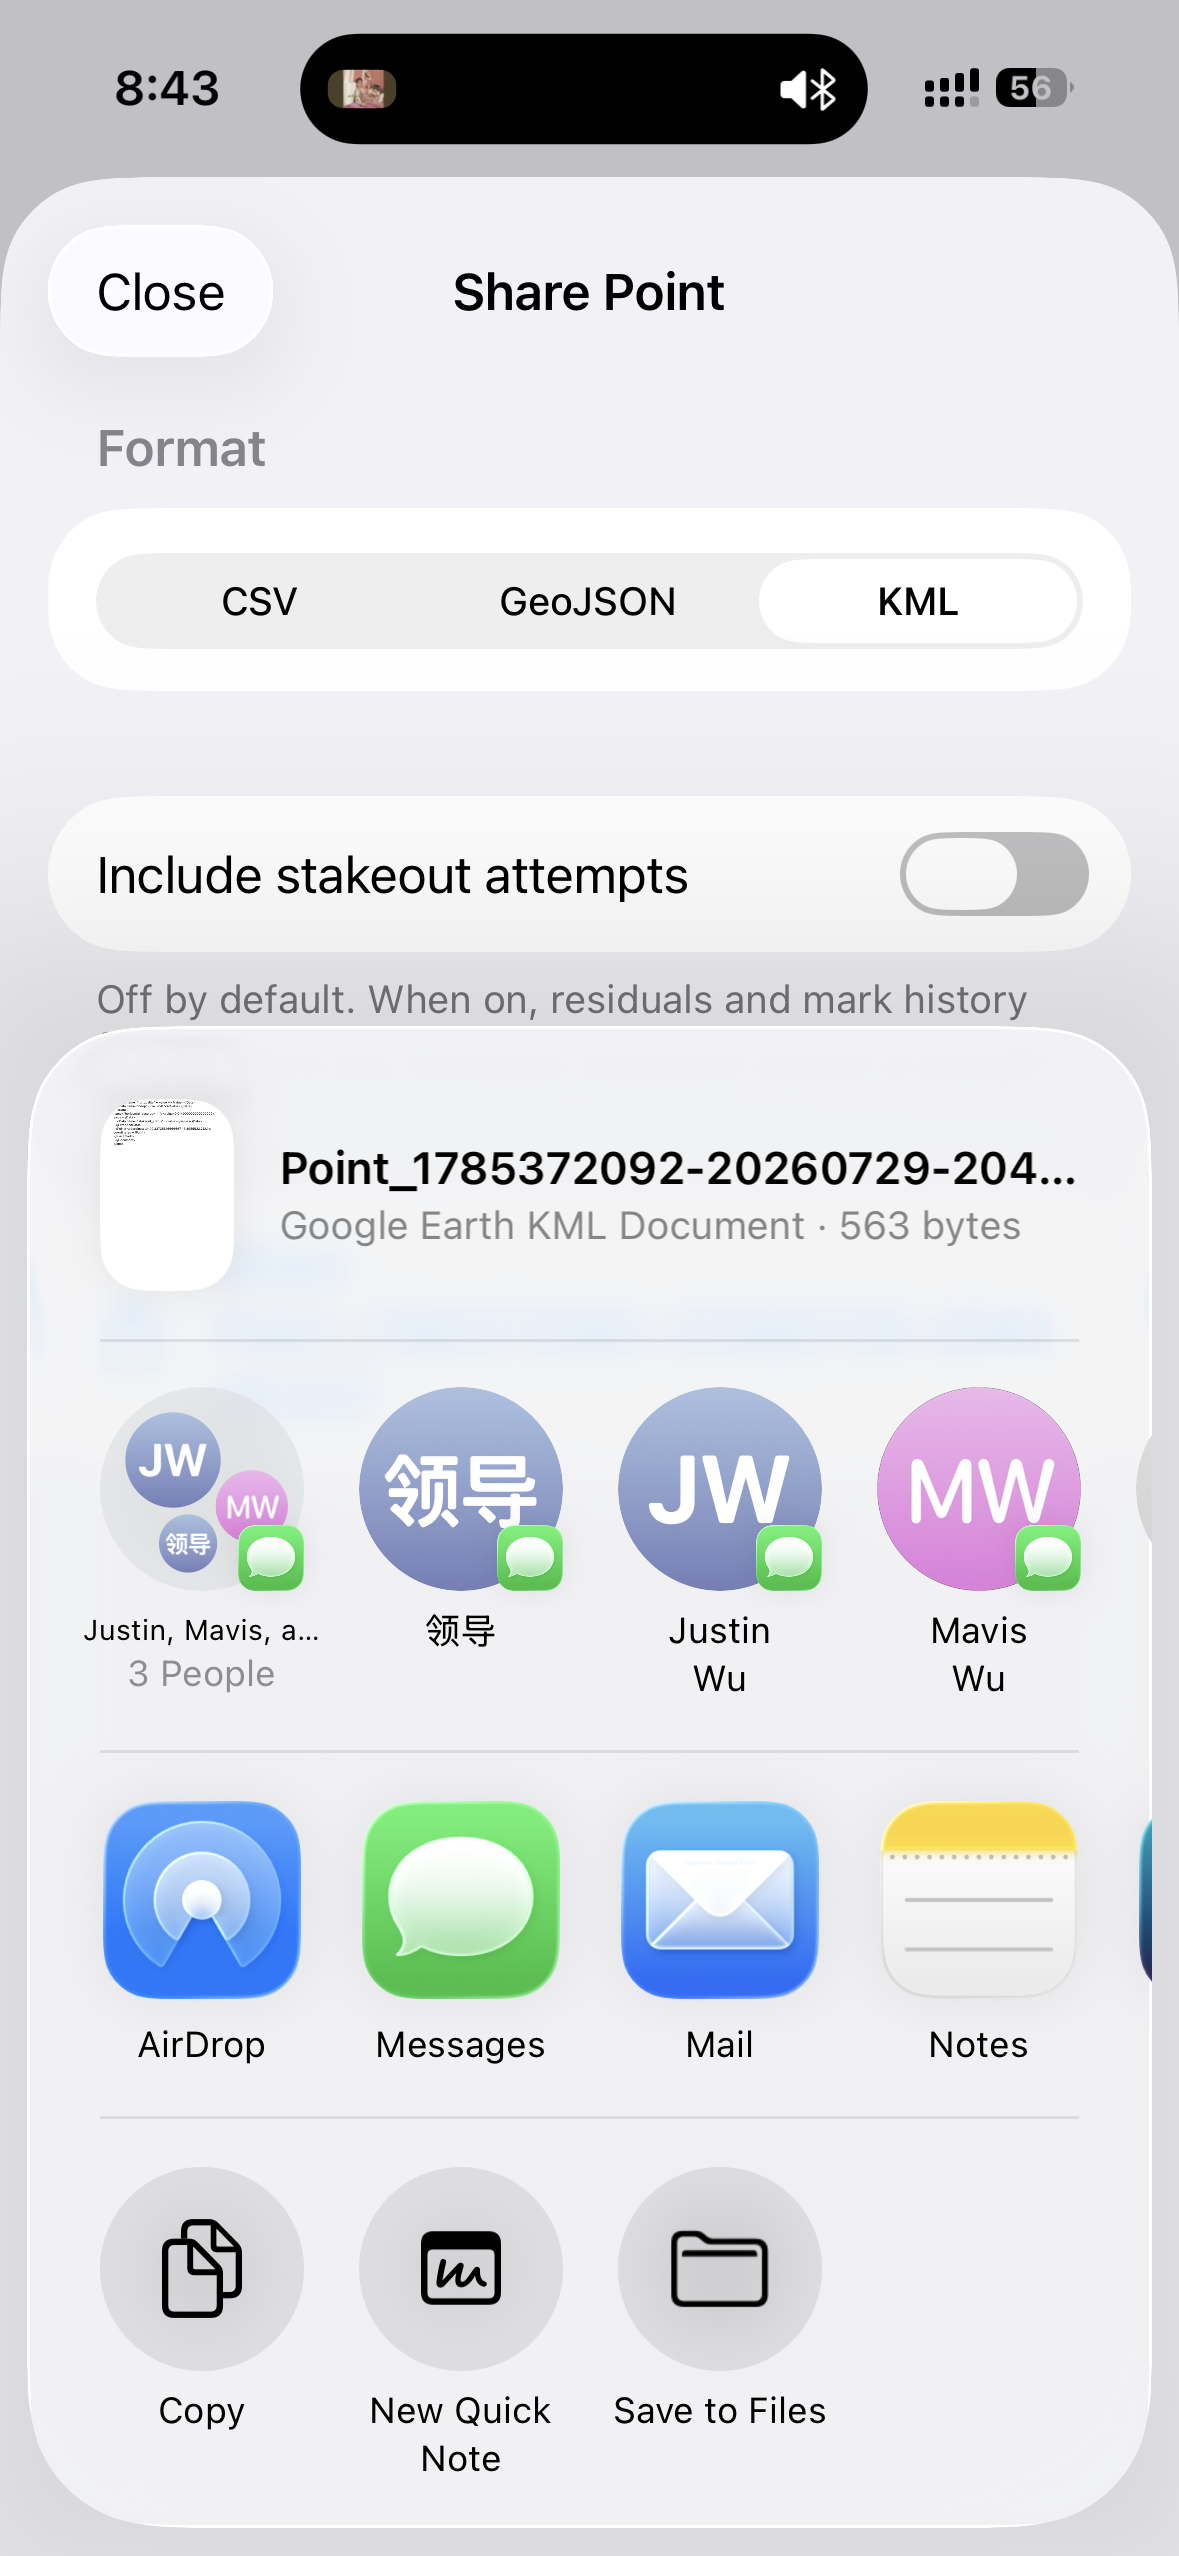
iOS Share Sheet example.
Appendix A: Glossary
| Term | Meaning |
|---|---|
| GNSS | Global Navigation Satellite Systems (GPS, BeiDou, GLONASS, Galileo, etc.) |
| NMEA | Standard text sentences from receivers (e.g. GGA, RMC) used by many apps for position |
| RTCM | Differential correction format required by RTK Rovers |
| NTRIP | Protocol to carry RTCM over the internet |
| NTRIP Caster | Relay: Base uploads, Rover downloads; can turn a private Base into “your own CORS” |
| CORS | Continuously Operating Reference Station network; often delivers RTK via NTRIP |
| RTK Fixed / Float | Fixed vs floating solution; Fixed is usually more stable and accurate |
| hAcc / vAcc | Receiver horizontal / vertical accuracy estimates (m); EX-1=UBX, P-70=HPPOSLLH, P-9=proprietary |
| Ellipsoidal h / MSL height | Height above ellipsoid vs mean sea level / geoid; differ by geoid undulation |
| Occupation | Stay on a point for several seconds and average |
| Stakeout | Navigate to known target coordinates and mark the location |
| GeoPackage (.gpkg) | Project database / full project exchange format used by this App |
| GeoJSON | Open JSON format for points/lines/polygons; common in modern web / GIS |
| GPX | Common XML format for tracks and waypoints |
| KML | Common visualization / landmark format (e.g. Google Earth) |
| CSV | Comma-separated tables; easy in Excel and most software |
| Share Sheet | iOS system share panel: Files, cloud drives, Mail, AirDrop, other apps |
Appendix B: FAQ
Q1: Why is Collect Data grayed out?
A: You need an Active project and a connected Rover for normal collection. Base role cannot collect. Exception: if a point or track collection was interrupted in another project, switch back to that project—or if you have no interrupted collection and no connection, connect a Rover on Dashboard.
Q7: The receiver disconnected while I was recording. Do I have to reconnect to save?
A: No. Open Collect Data or tap the orange interrupted banner in the same project, then tap Finalize to save (same as Stop / Save Point) or Discard to delete. To continue recording the same track, reconnect the same receiver and use Resume on the connected Collect Data page.
Q8: What does “Reconnecting… attempt 1/5 in progress” mean?
A: The App is automatically trying to restore an unexpected Bluetooth drop (see 1.4). In progress means the current try is active; waiting for attempt 2/5 means the next try is scheduled. Tap Cancel or turn Auto-reconnect off under Dashboard … → Connection to stop. This is separate from saving interrupted Collect Data (Q7).
Q11: What does “Reconnecting to caster…” mean?
A: The Base NTRIP upload session is automatically reconnecting after an unexpected caster/network drop (see 5.6). This is not the same as Bluetooth Reconnecting… attempt 1/5 (Q8). To stop: turn off the Dashboard NTRIP toggle, or disable NTRIP Server auto-reconnect under Connection. Initial caster connection failures (wrong account, mount point, etc.) are not auto-retried—fix NTRIP Server settings in RTK Settings first.
Q9: How do Raw Update Rate and Dashboard Output Rate relate? Is a high Rejected count normal?
A: Output Rate sets how fast the receiver sends fixes; Raw only controls whether the App thins what it logs (it does not change Output Rate). For a denser track: raise Output Rate on the Dashboard (e.g. P-70 at 20 Hz), then choose Raw Update Rate in Collect Data (9.5). Rejected counts epochs that failed Fix Level, had non-increasing GNSS time, or failed the jump filter (>150 m/s). With Raw + Any fix and a stable fix, Rejected should stay near zero. Points skipped by a 1 Hz (etc.) interval gate are not Rejected.
Q10: Why do exported CSV / GPX coordinates show only a few decimal places?
A: CSV / GeoJSON / KML / GPX exports format numbers at export time (8 decimals for lat/lon, 3 for altitude and meter fields, 2 for DOP, half-up rounding) for interchange. Project storage and Show Data keep full precision; use Export Project for an unrounded backup. See 10.3 Export numeric precision.
Q2: Why don’t I see my EX-1 in the list?
A: Confirm power and Bluetooth permission; check whether it is filtered as already saved; the list should show a name such as EX-1 NTRIP BLE.
Q3: QField / Survey123 / QuickCapture cannot connect to NMEA?
A: Confirm this App’s NMEA Server is TCP, 127.0.0.1, matching port, and enabled; both apps running; port not taken by another device. The peer app must support TCP NMEA external GNSS. See Appendix C (QField example).
Q4: RTK stays Float and never Fixed?
A: Check CORS/NTRIP credentials and mount point, network, baseline length, and sky obstruction. Without a valid correction source you cannot fix.
Q5: Can deleted projects / points / tracks be recovered?
A: Usually no. Export important data first and save via Share Sheet to cloud or a computer.
Q6: Where do I enter Survey-in Duration on P-70?
A: P-70 uses Receiver Managed Survey-in; parameters are managed on the receiver, not with EX-1-style Duration/Accuracy fields in the App.
Appendix C: QField quick setup (example)
This section uses QField as the example for consuming this App’s TCP NMEA.
Survey123, QuickCapture, and other TCP NMEA iOS apps usually follow the same idea: choose TCP in positioning / external GNSS settings and enter the local host and port. Adapt menu names to each app.
C.1 Prepare this App first
- Columbus receiver connected; Dashboard shows a live fix.
- NMEA Server Settings: Type = NMEA Server, Protocol = TCP, Host = 127.0.0.1, Port = 9000 (or your custom port).
- Turn on NMEA Server on the Dashboard.
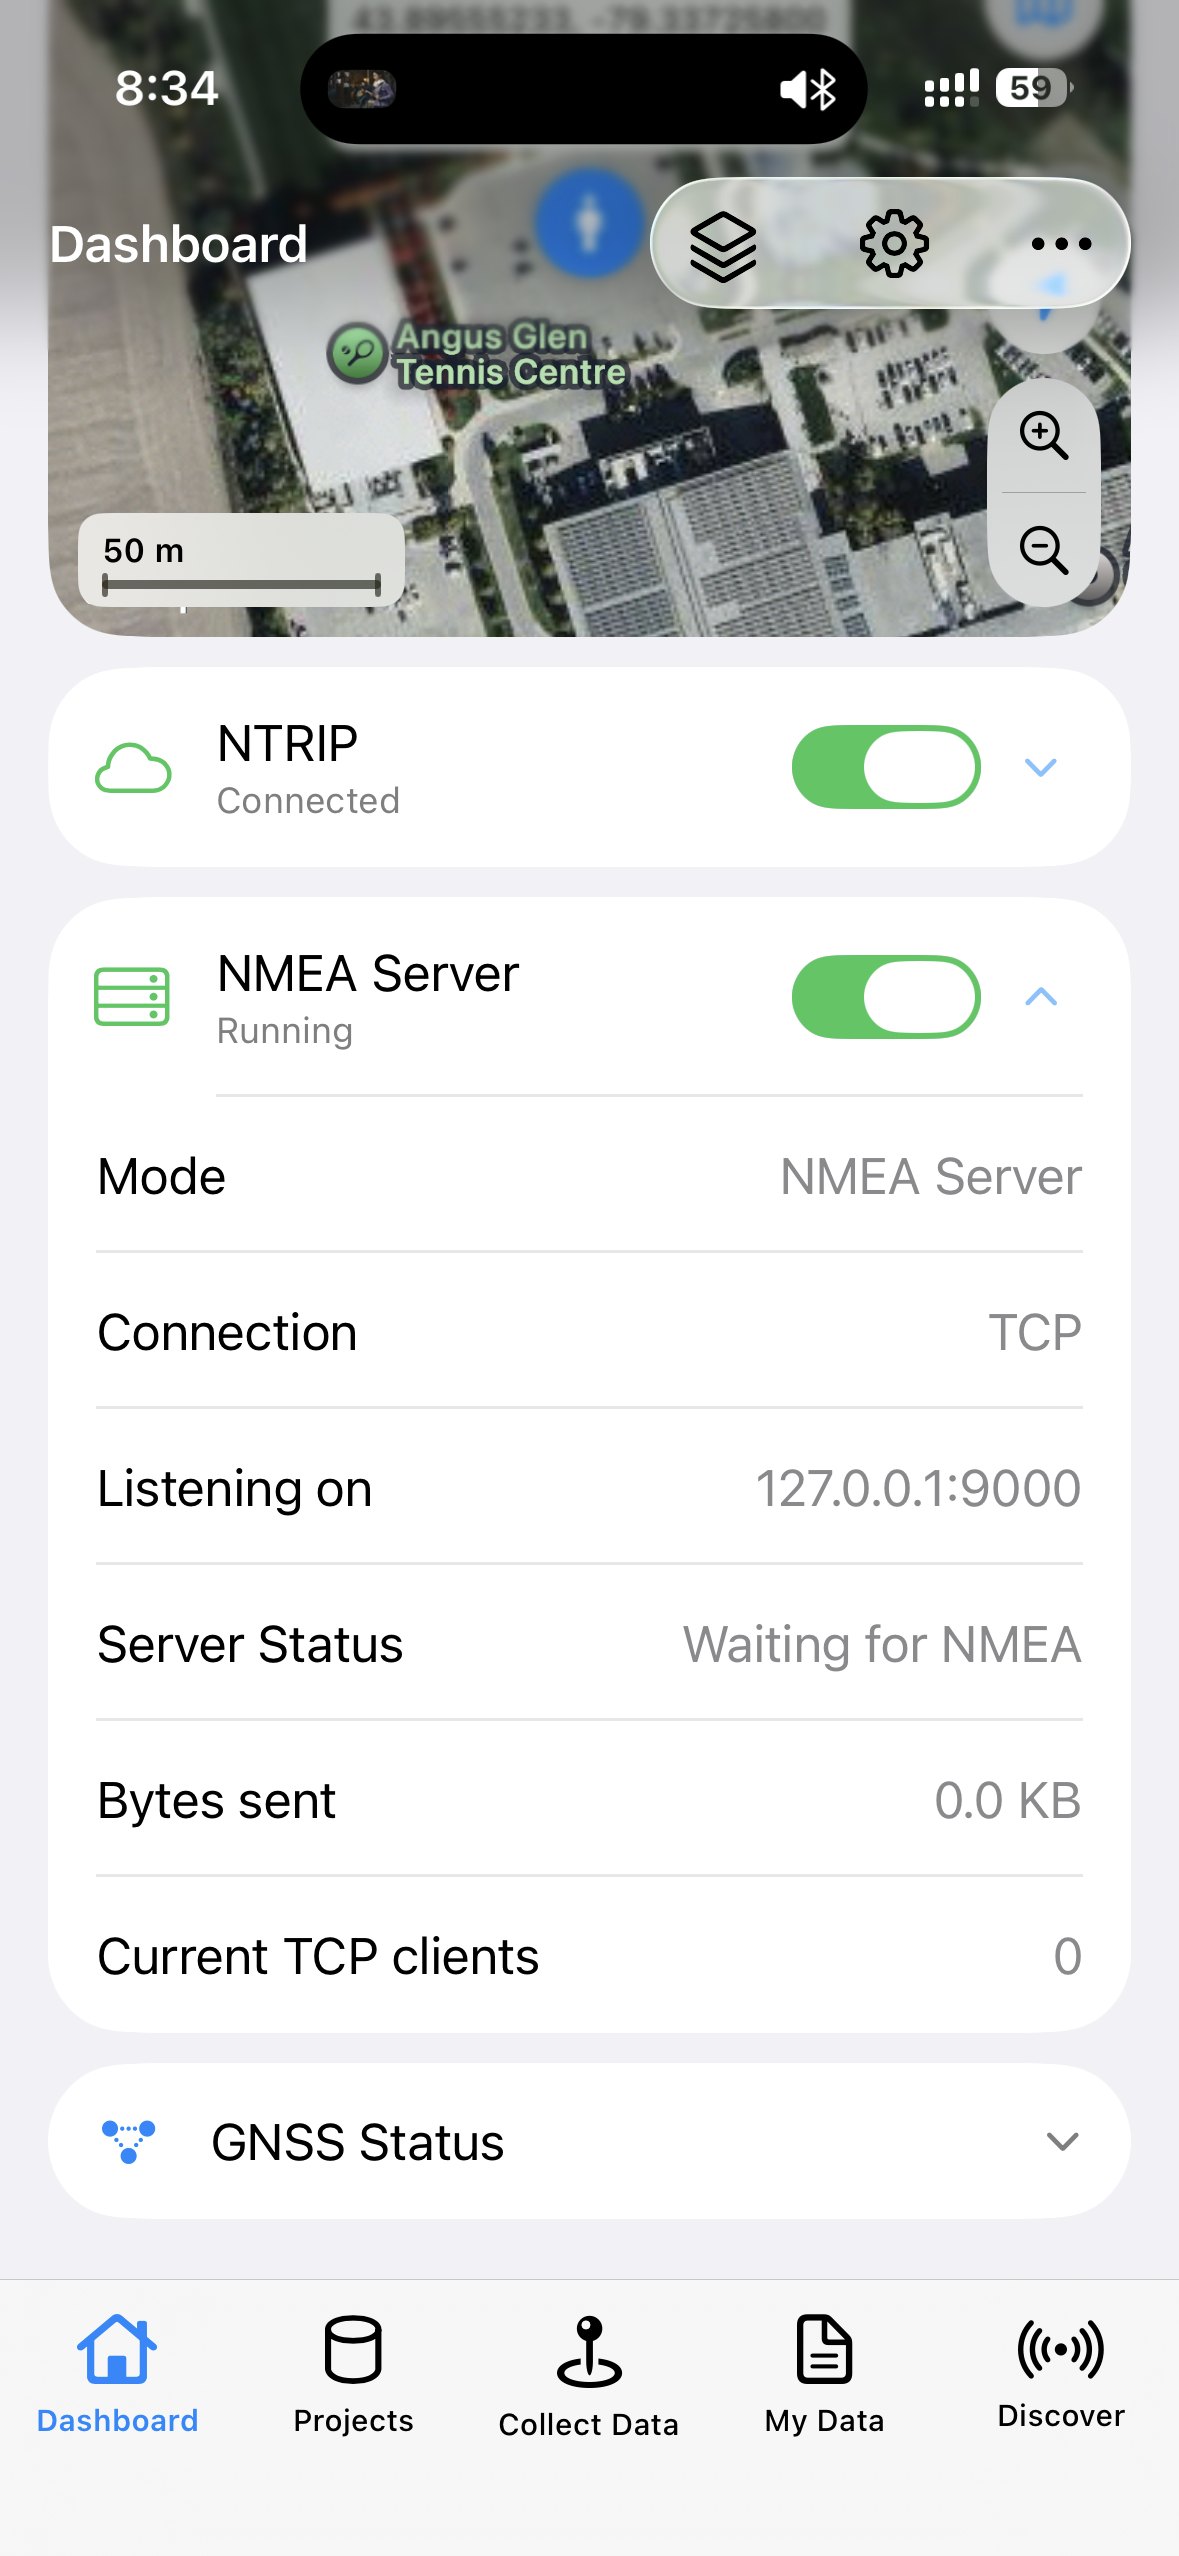
This App Dashboard with NMEA Server enabled.
C.2 Add a TCP positioning device in QField
- Open QField (keep this App running).
- Go to Settings → Positioning.
- Tap Add; choose connection type TCP (on iOS, TCP/UDP is typical—not direct Bluetooth to the receiver).
- Address
127.0.0.1, port matching this App (default 9000), then save. - Set it as the current Positioning device and Connect.
- Optionally enable location / accuracy indicators; return to the map and confirm the position comes from the external GNSS.
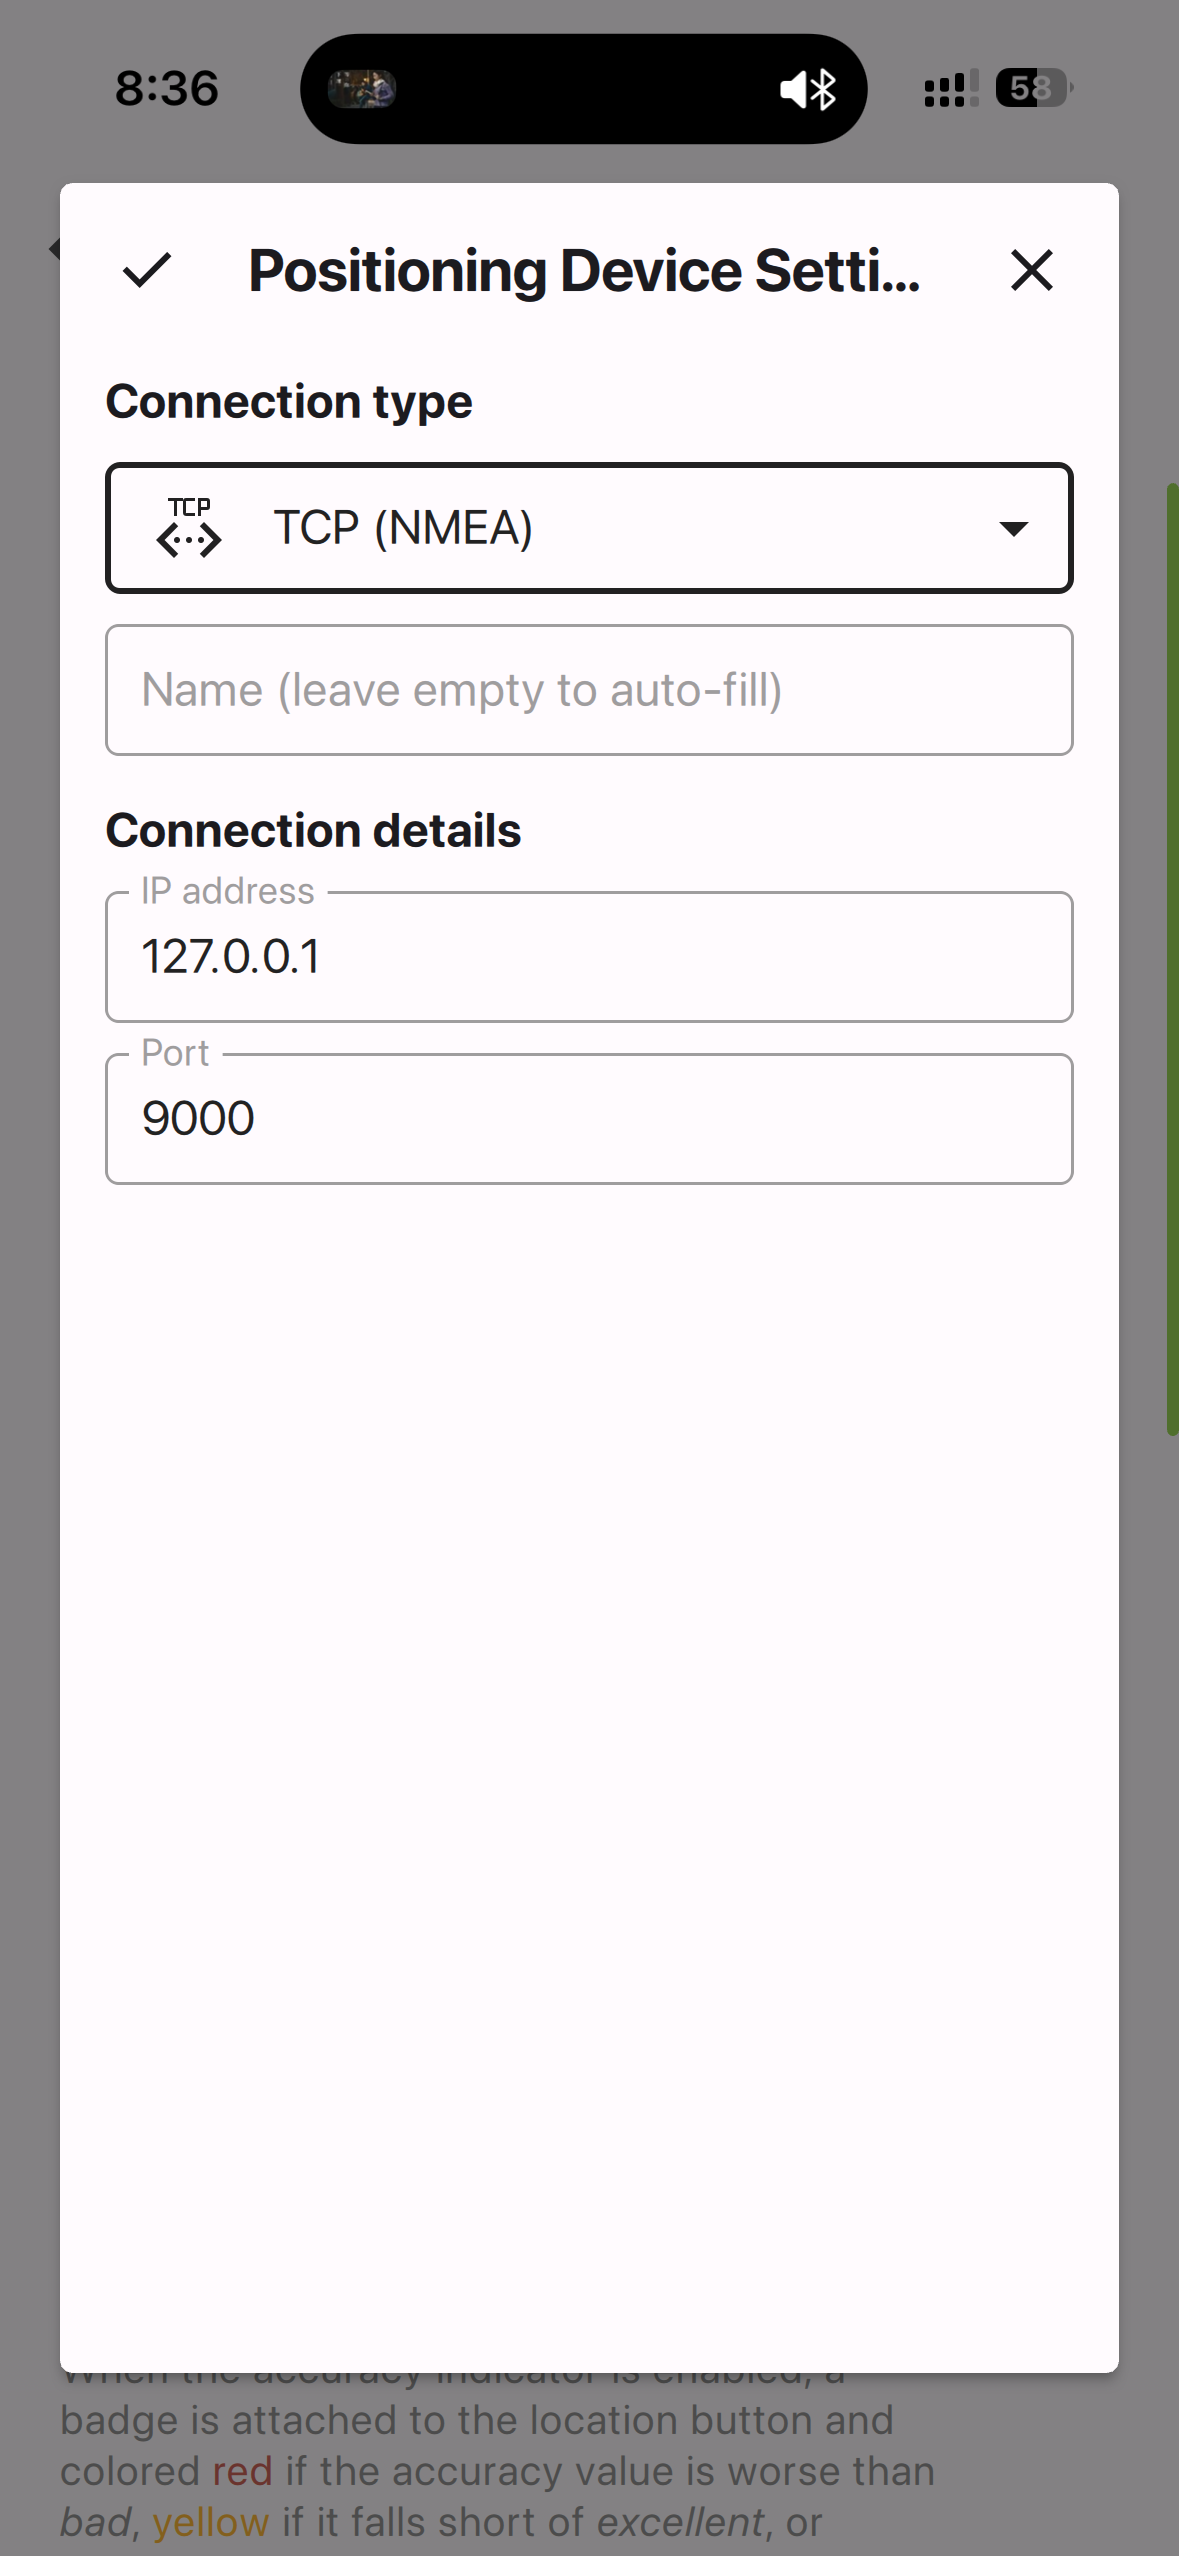
QField Positioning list / Add entry.
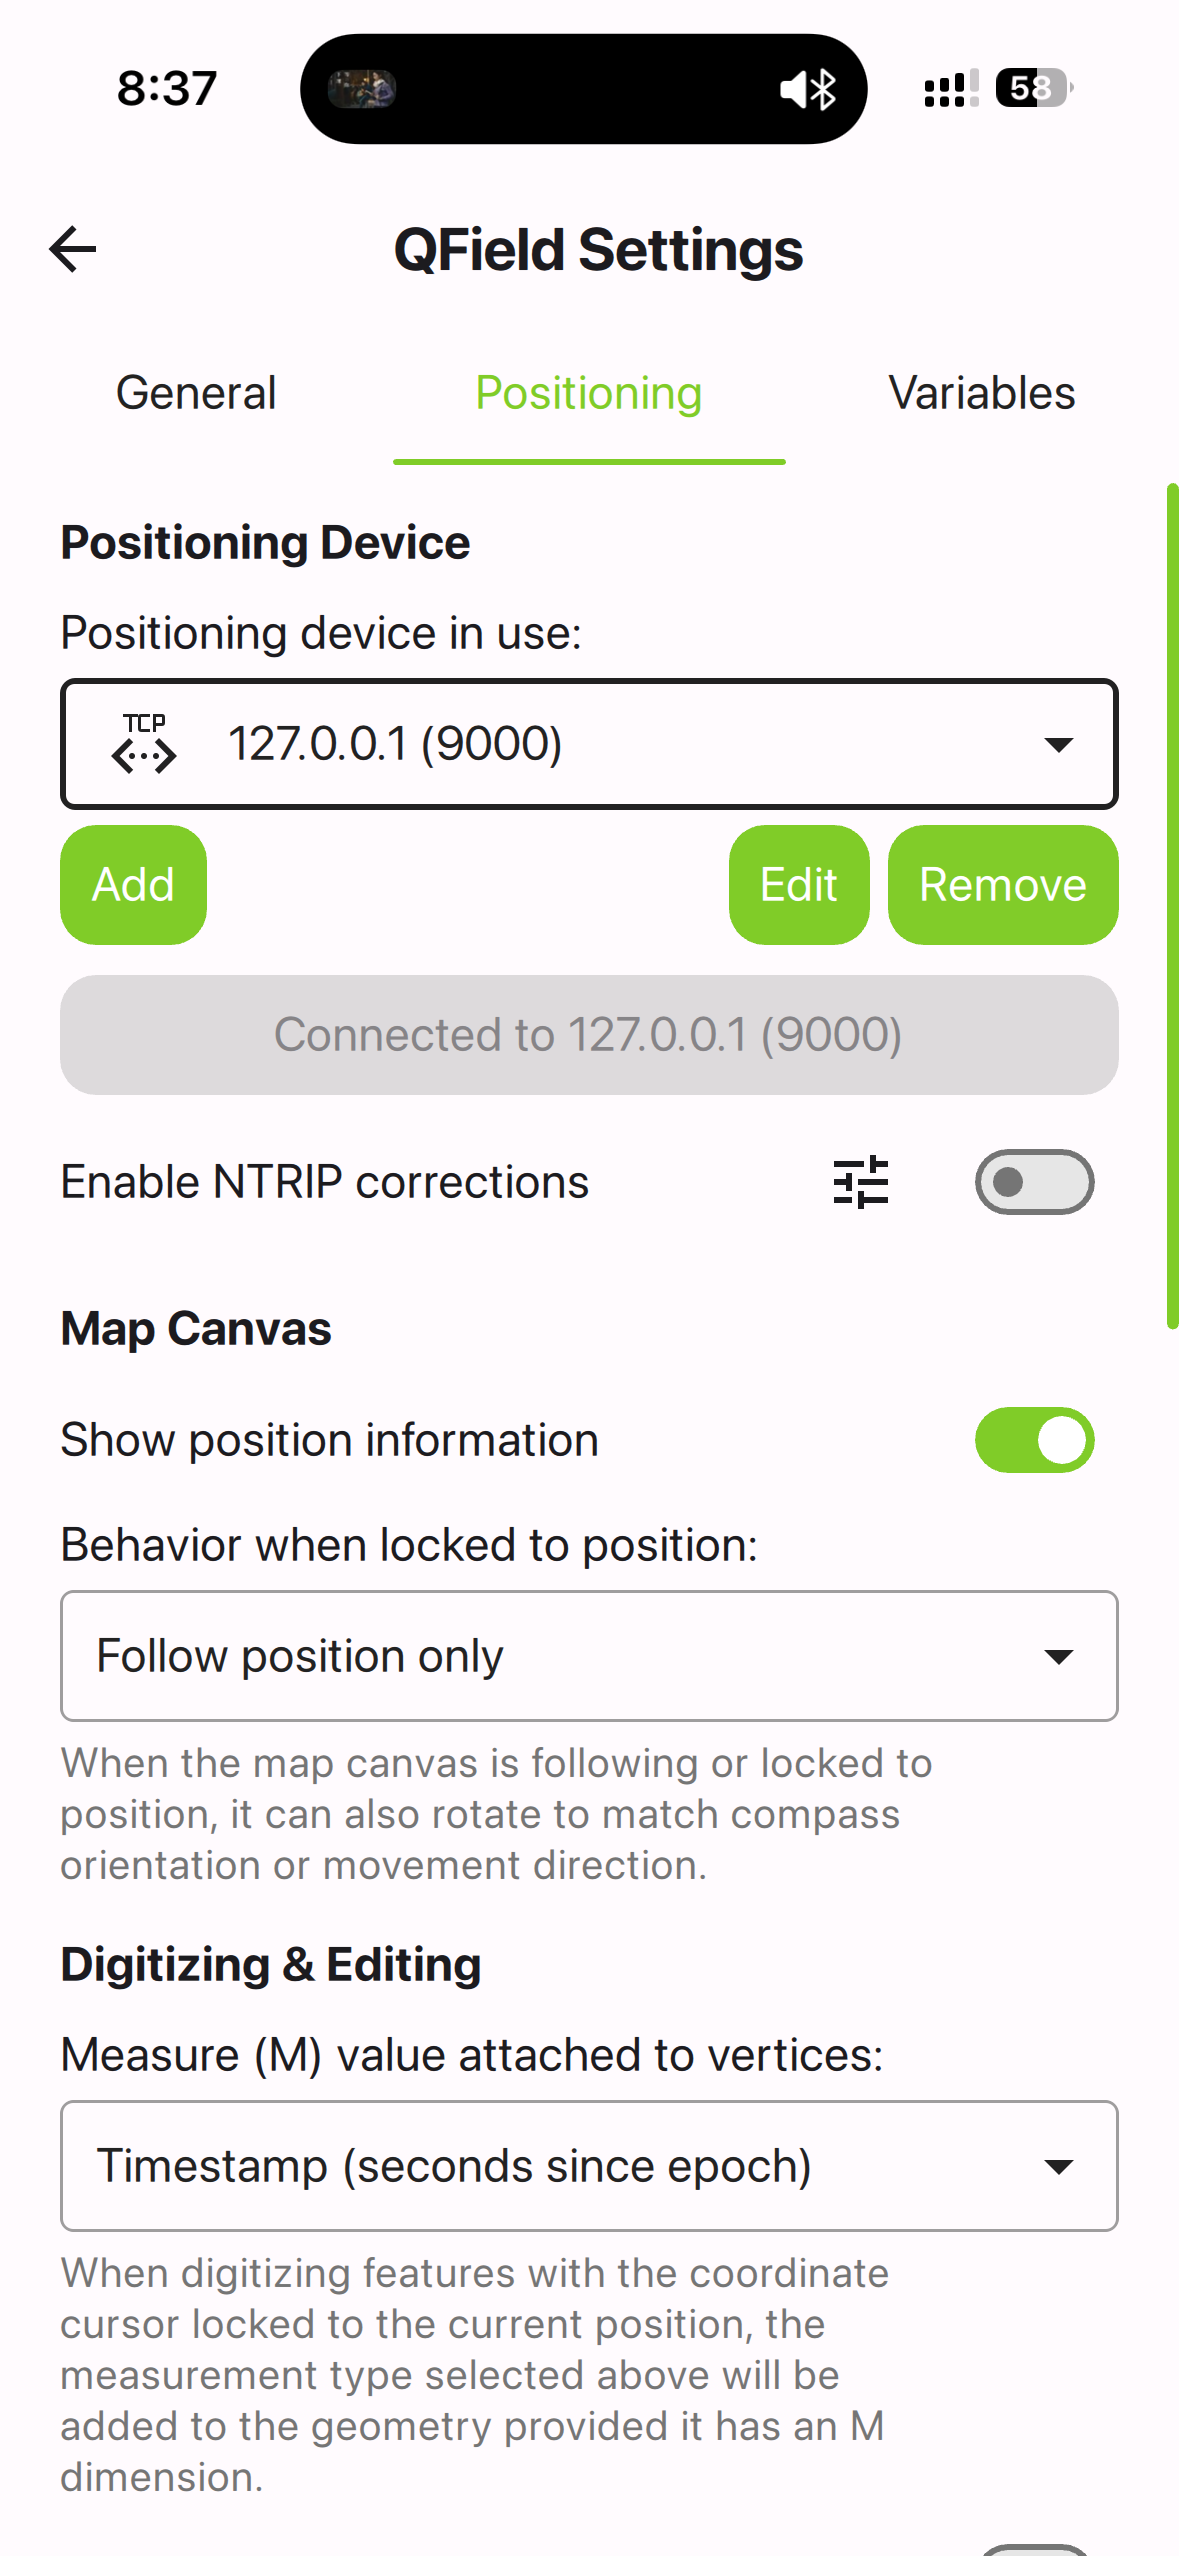
QField TCP settings 127.0.0.1:9000.
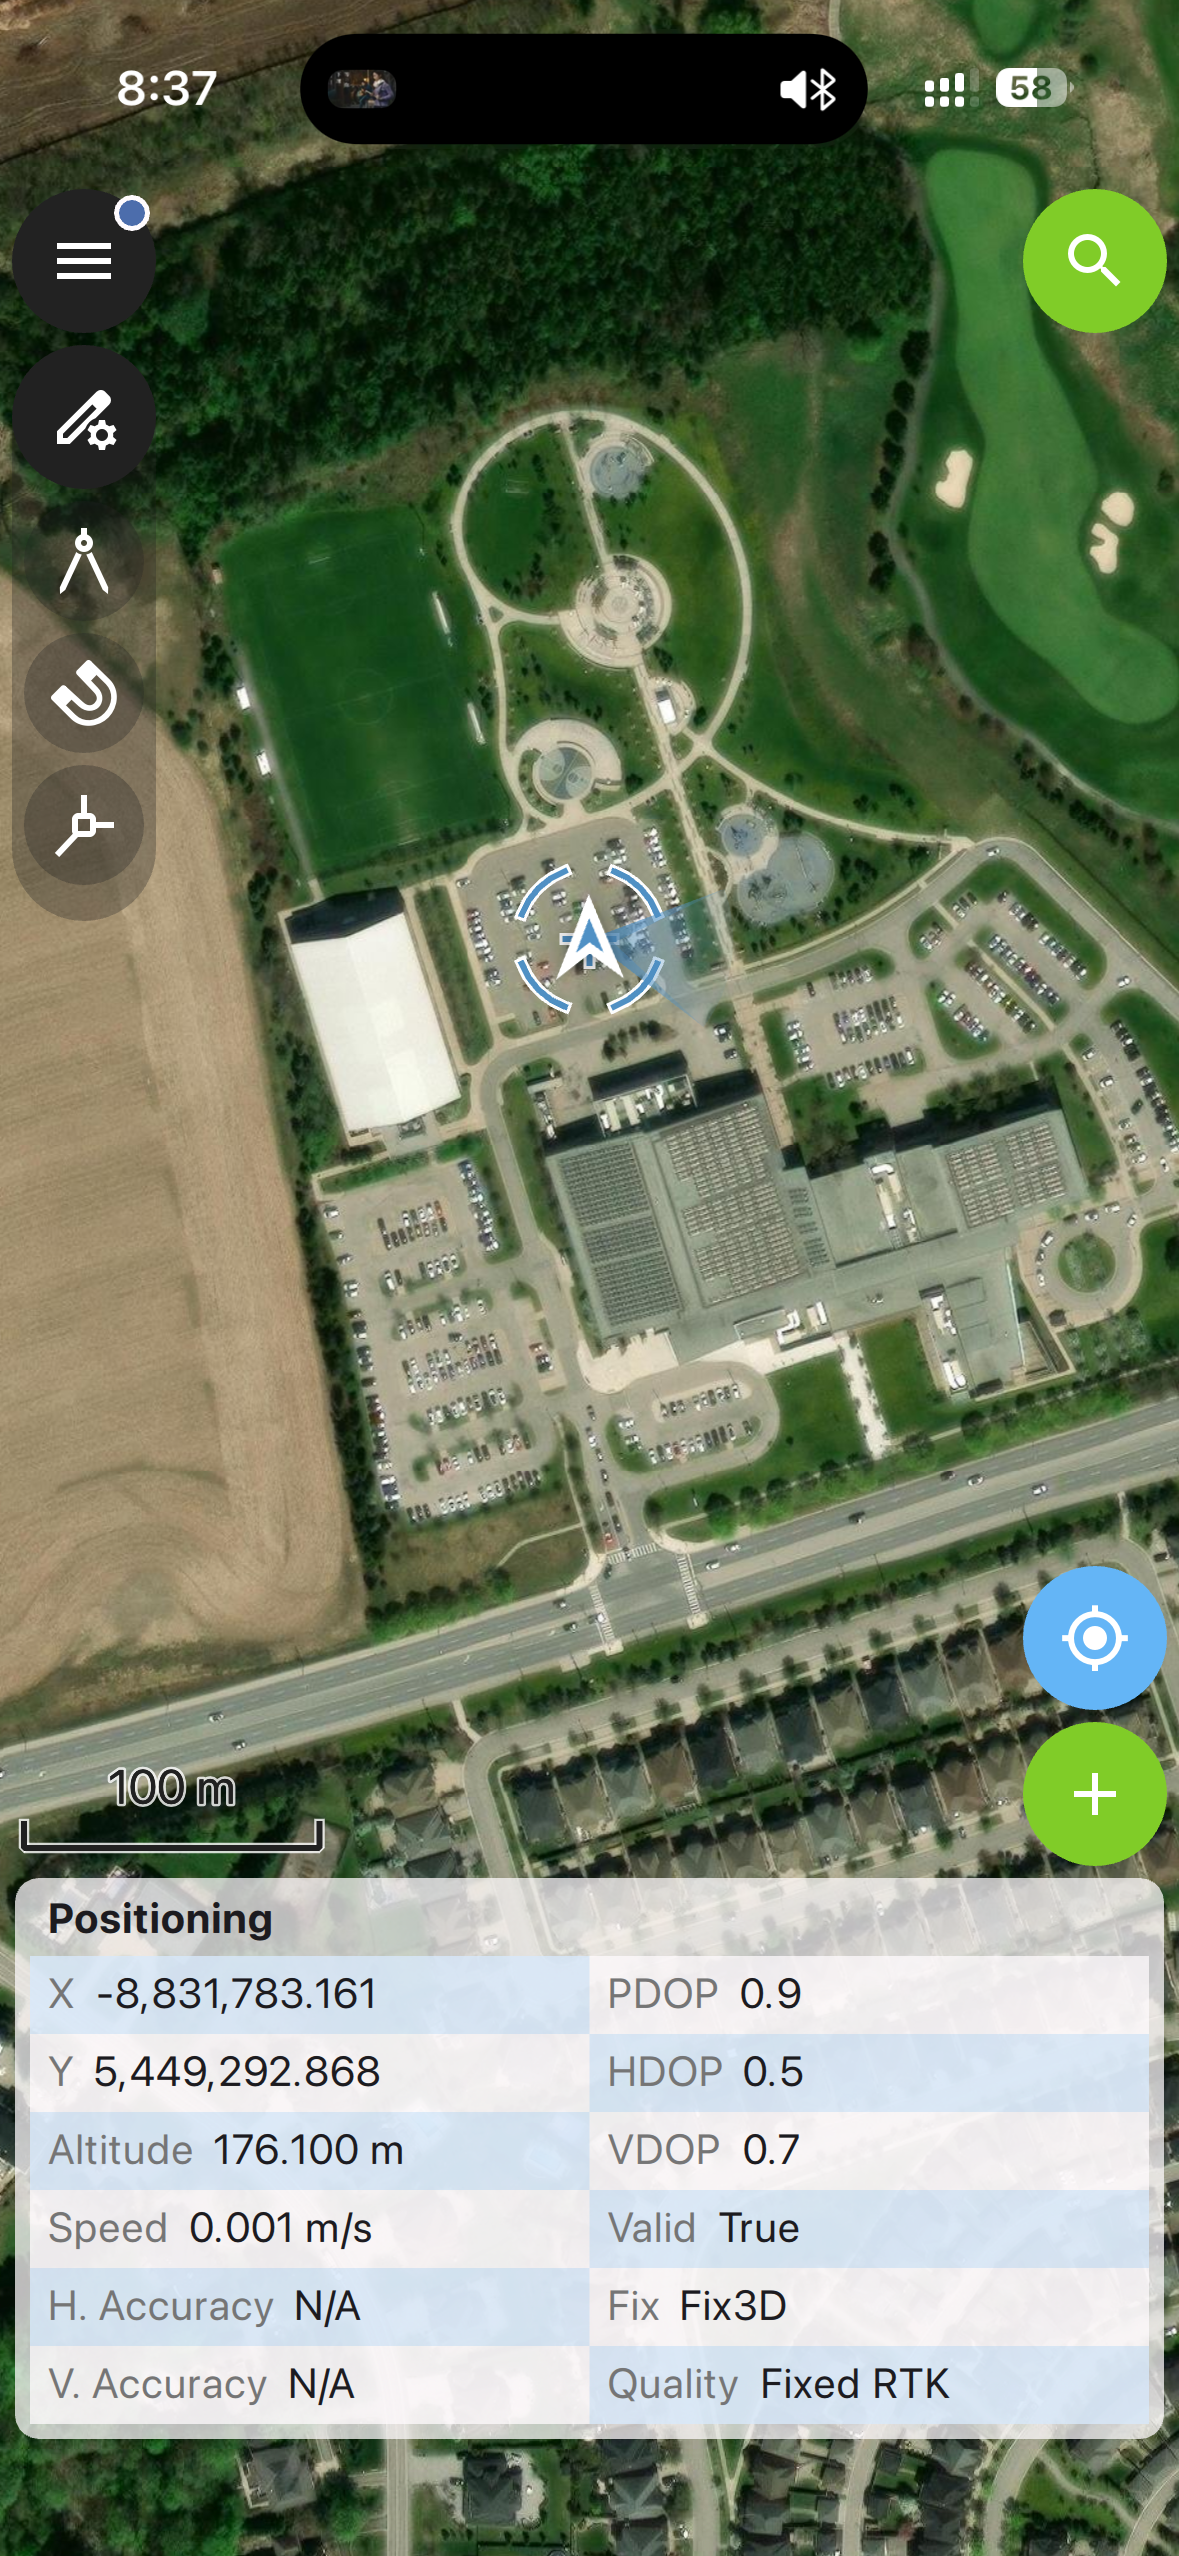
QField connected to external GNSS with accuracy / coordinates shown.
C.3 QField tips
- Keep both apps open; if you quit this App, QField stops receiving NMEA.
- Ports must match; on conflict use Replace in this App or change the port.
- On iOS, QField’s mainstream external GNSS path is TCP/UDP NMEA—exactly what this App’s NMEA Server is designed for.
Official positioning docs: QField — GPS, GNSS and NTRIP.
Appendix D: Video demos
Demo videos are hosted on the public S3 bucket geoastra-media (prefix demo_videos/). Click a link to play in the browser (Content-Type: video/mp4).
Base URL: https://geoastra-media.s3.us-east-1.amazonaws.com/demo_videos/
| # | Demo | Description | Play |
|---|---|---|---|
| 1 | Scan | Scan and connect to a nearby BLE GNSS receiver | Play video |
| 2 | Device List: Export, Delete All & Import | Export device configs, delete all devices, and import | Play video |
| 3 | RTK Rover Configuration | Configure RTK Rover / NTRIP Client settings | Play video |
| 4 | RTK Base Survey-in Configuration | Configure RTK Base and run Survey-in | Play video |
| 5 | NTRIP & NMEA Log Consoles | View NTRIP and GNSS/NMEA receiver log consoles | Play video |
| 6 | Project Management | Create, switch, rename, import, and export projects | Play video |
| 7 | Data Point Collection | Collect a survey point with occupation averaging | Play video |
| 8 | Track Recording | Record a continuous GNSS track | Play video |
| 9 | Track Playback | Play back a recorded track on the map | Play video |
| 10 | Stakeout | Navigate to a target point and mark it as staked | Play video |
| 11 | Data Point Export | Export collected points (e.g. CSV / KML / GeoJSON) | Play video |
| 12 | Export Track | Export a recorded track | Play video |
This manual is based on current App features and behavior to help GNSS beginners understand why a bridge app is needed and how to connect, run RTK, collect data, and share results. Screenshots are hosted on S3; demos are in Appendix D.